Seamless Accounting Integration with Xero and Salesforce

Today we are going to talk about building an accounting integration between Xero and Salesforce using Declarative Webhooks!
Xero is a popular cloud-based accounting software used by over 1.8 million small businesses and accountants globally. With its API, Xero enables developers to build custom integrations that connect Xero to other essential business platforms.
In this post, we will walk through an example of integrating Salesforce, the leading CRM platform, with Xero using declarative webhooks. This revolutionary approach allows us to automate synchronizing accounting data between the two systems without writing any code.
If you’re interested in exploring integrations with other accounting platforms, our post on integrating Salesforce with accounting software like Quickbooks provides valuable insights. It makes streamlining your accounting processes across various platforms remarkably straightforward, demonstrating the ease of integrating Salesforce with accounting software.

Overview of Xero and Salesforce
Xero is an accounting software targeted at small and medium sized businesses. It allows users to manage tasks like:
- Invoicing and billing
- Tracking expenses and cash flow
- Reconciling bank transactions
- Payroll
- Inventory management
Some key capabilities include:
- Access anywhere: Being cloud-based, Xero can be accessed via web browser or mobile apps.
- Collaboration: Data is shared in real-time across accountants, bookkeepers and business owners.
- Integration: Open API and hundreds of third-party apps allow easy integration with other platforms.
- Automation: Features like automated bank feeds and invoice reminders save time on manual work.
On the other hand, Salesforce is the most widely used CRM platform globally. It helps businesses manage key customer-facing processes:
- Contact and account management
- Lead and opportunity tracking
- Quotes and proposals
- Customer support and ticketing
- Marketing automation
- Reporting and analytics
Connecting these two systems can supercharge a business by aligning sales and accounting on a common platform.
Benefits of Integrating Salesforce and Xero
Here are some of the major advantages of bridging your CRM and accounting data:
1. A Single Source of Truth: Data like customer details, contacts, product catalogs, invoices, and payments is synchronized between the systems in real-time. This creates one single version of truth across departments.
2. Increased Efficiency: Automated synchronization eliminates the need for duplicate data entry or manual syncing of records between the systems. This results in massive time savings as workflows become more streamlined.
3. Enhanced Analytics: With a holistic view of customer interactions across marketing, sales, billing and support, businesses can derive deeper insights from CRM and accounting data. These data-driven insights help improve crucial business decisions.
4. Improved Customer Service: Support agents have quick access to customer billing records and account status right within Salesforce for faster query resolution. Similarly, the accounting team has up-to-date customer details leading to better service.
5. Faster Invoice Creation: New sales orders in the CRM can automatically trigger invoice generation in Xero. This accelerated cash flow through faster billing and collections.
6. Deeper Sales Insights: Sales reps have access to customer invoice histories and accounting data for more contextual conversations and stronger relationships.
7. Flexibility and Agility: Apps like Declarative Webhooks make integration easily configurable by admins and developers. Businesses can rapidly adapt processes to changing needs.

Overview and Key Steps to Integrate Xero with Salesforce
We will leverage the Declarative Webhooks app, available on the Salesforce AppExchange, to build our bi-directional integration without writing any code.
Declarative Webhooks provide a wizard-style UI to configure API callouts, handle responses, and orchestrate end-to-end integration processes.
Here are the key steps we will walk through:
1. Establish a secure API connection from Salesforce to Xero using OAuth 2.0 authentication standard.
2. Create callout templates in Salesforce to define the API request and response handling for specific actions like creating customers and invoices in Xero.
3. Build callout templates to define the order and dependencies between API callout templates.
4. Automate the integration with Salesforce flow or other automation that invokes the callouts.
Let’s explore each of these steps in more detail.
Configuring the Xero API Connection
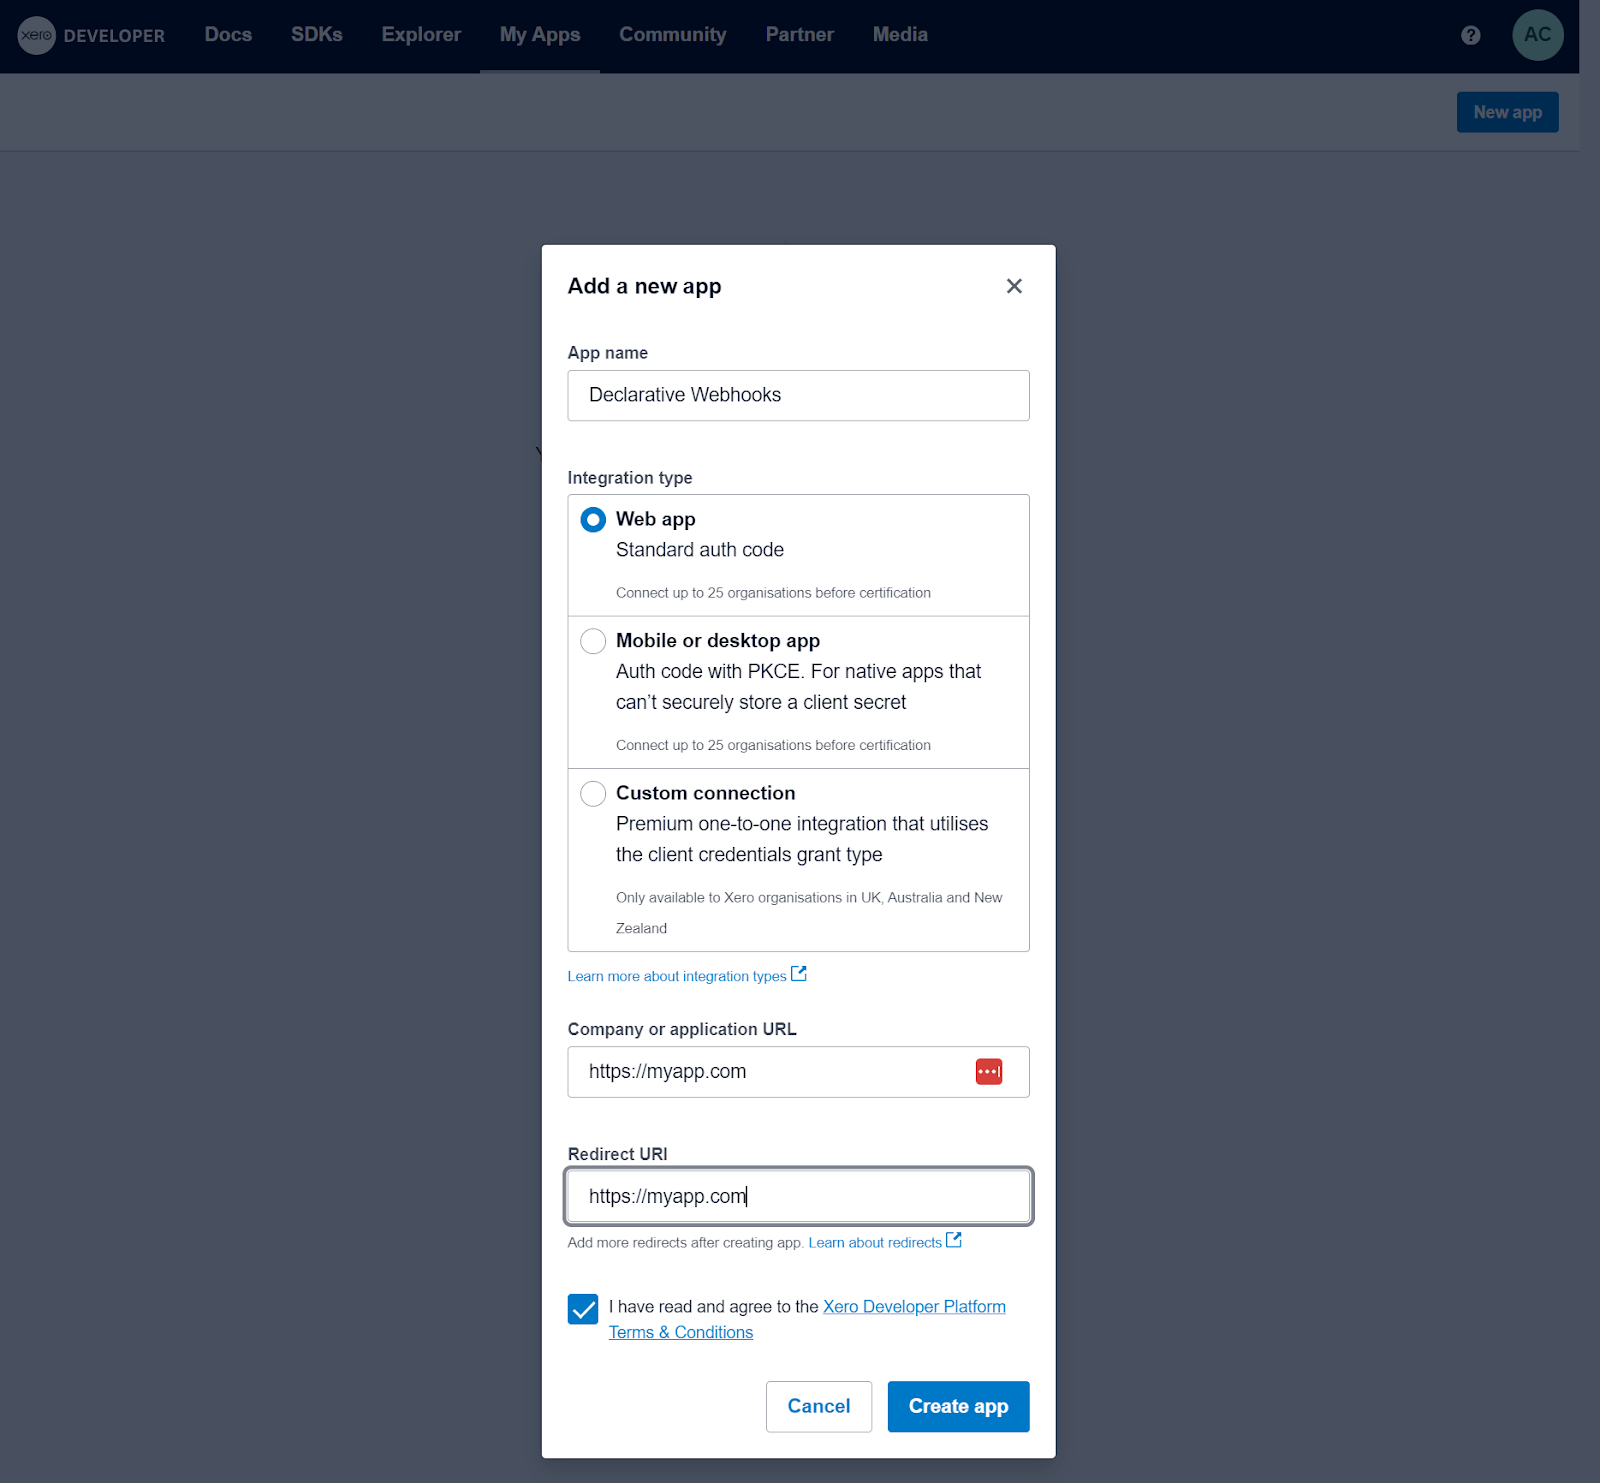
To set up a new OAuth2 application in Xero, first head to Xero’s developer portal. If you don’t already have a Xero account, make sure to register for one first.
For the application setup, you’ll need to provide the following information:
Application Name: Pick a name that resonates with your project, but remember that it shouldn’t include the term ‘Xero’.
URL of Company or Application: This should be a secure HTTPS URL, although it’s not going to be utilized in Salesforce.
OAuth 2.0 Redirect URI: Enter an HTTPS URL here as well, even though it won’t be functional in Salesforce at this point. You’ll have the chance to edit this later.
After entering the above details click on ‘Create App’ and then choose the ‘Generate a Secret’ option.
Make sure to leave this page open as you’ll need the information later on.
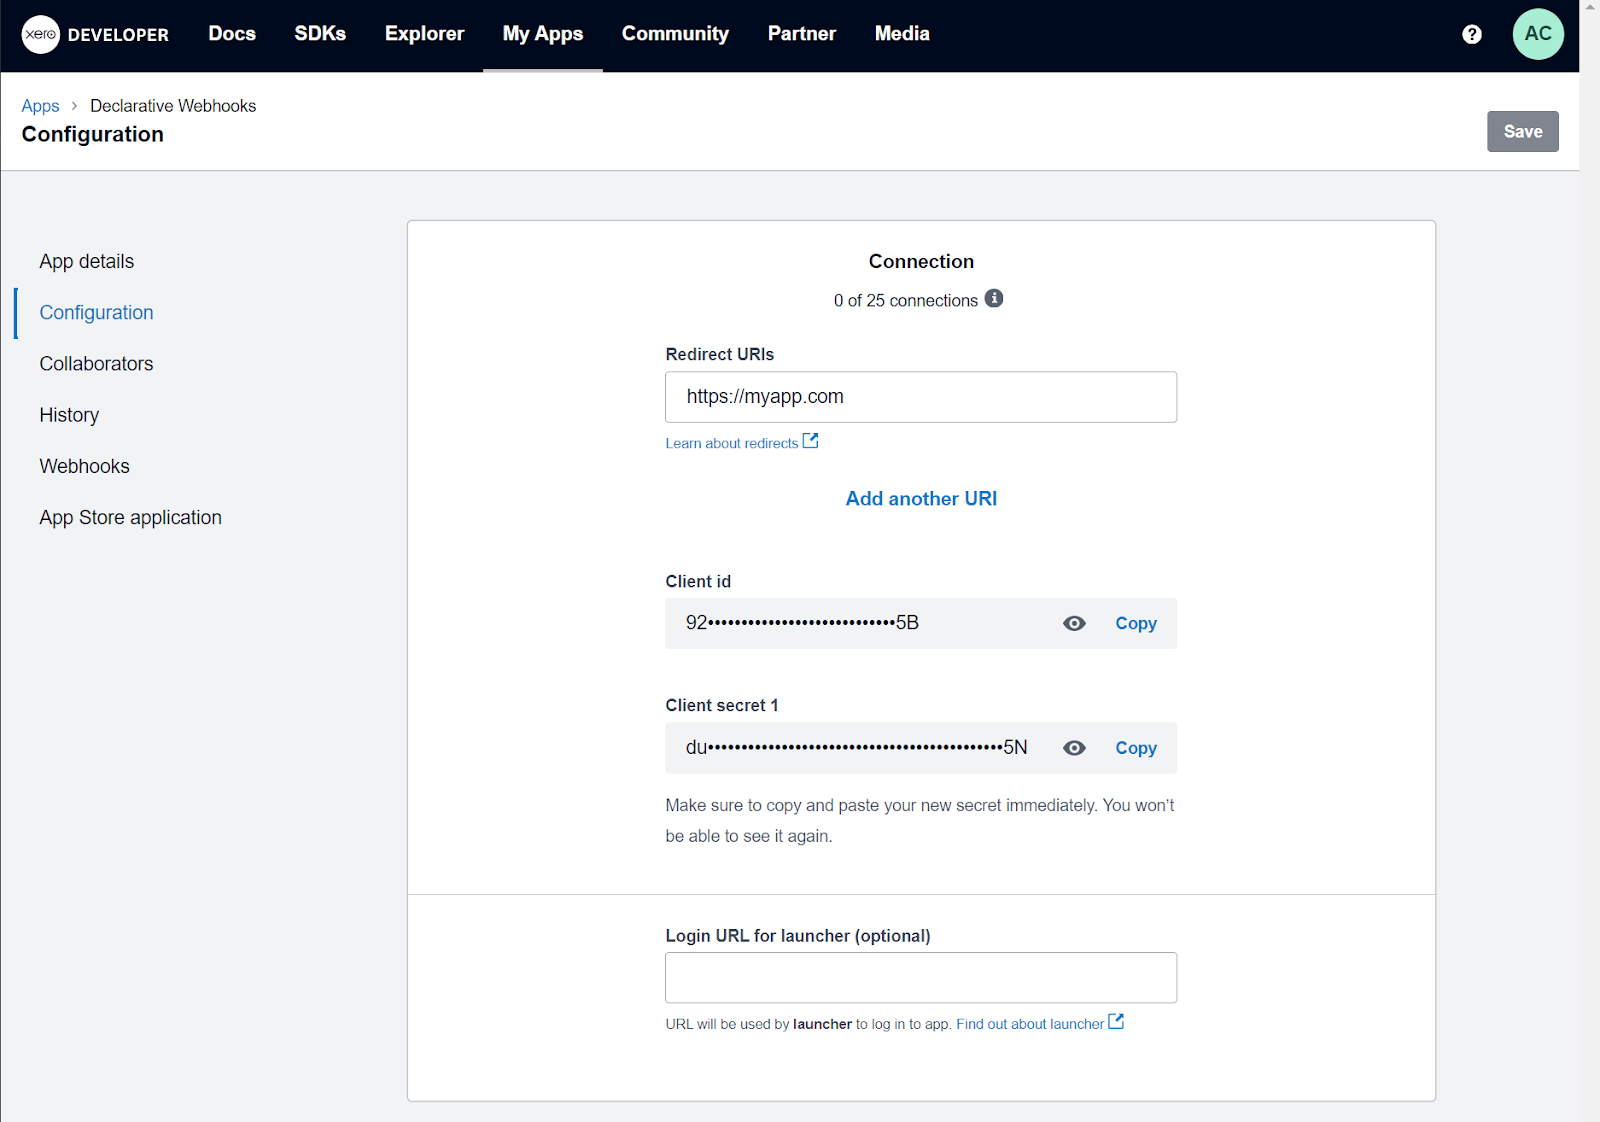
To call Xero APIs from Salesforce, we first need to configure an authenticated connection. Go to Setup > Auth Providers tab in Salesforce and create new.

Use the client id and client secret generated earlier in your Xero configuration page.
The other parameters are:
Authorize Endpoint URL: https://login.xero.com/identity/connect/authorize
Token Endpoint URL: https://identity.xero.com/connect/token
User Info Endpoint URL: use https://identity.xero.com/connect/userinfo
Token Issuer: https://identity.xero.com
Scope: offline_access openid profile email accounting.transactions accounting.transactions.read accounting.contacts
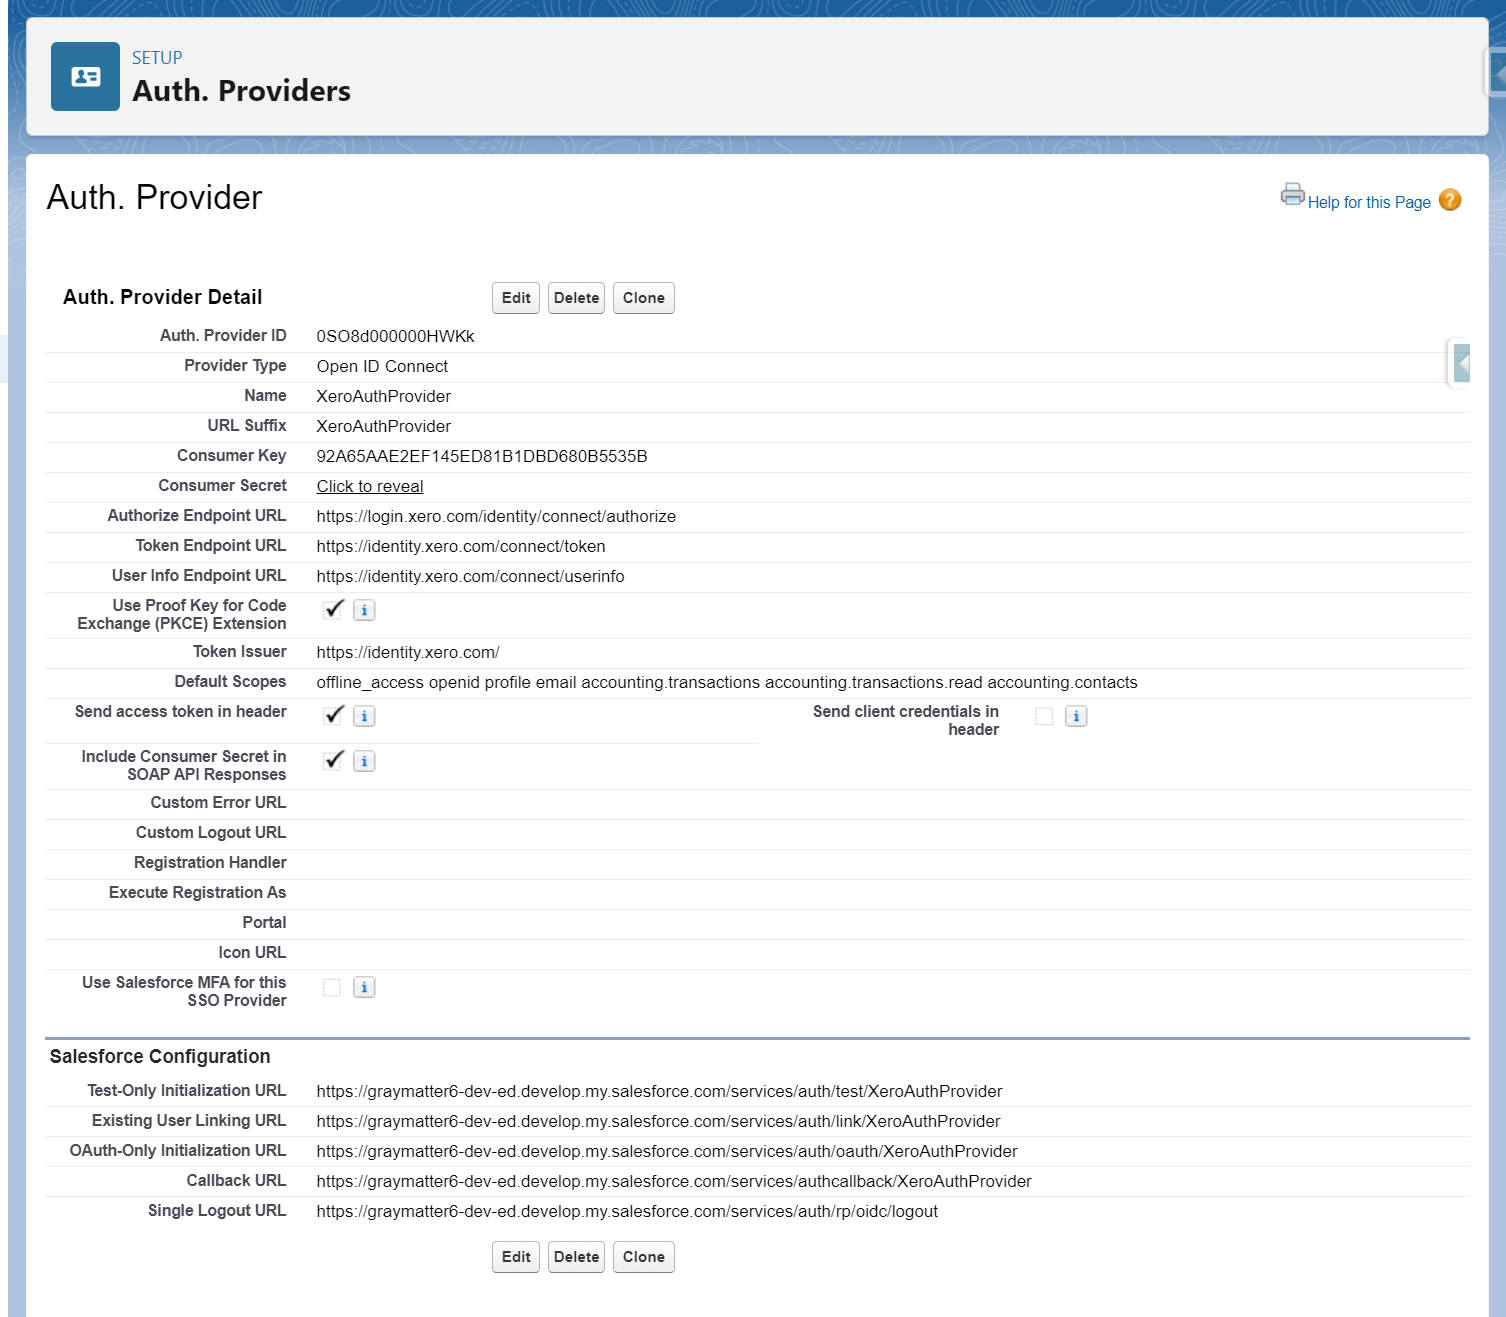
After saving the Auth. Provider setting, copy the callback URL and add this URL as a redirect link in your Xero connected app configured earlier.
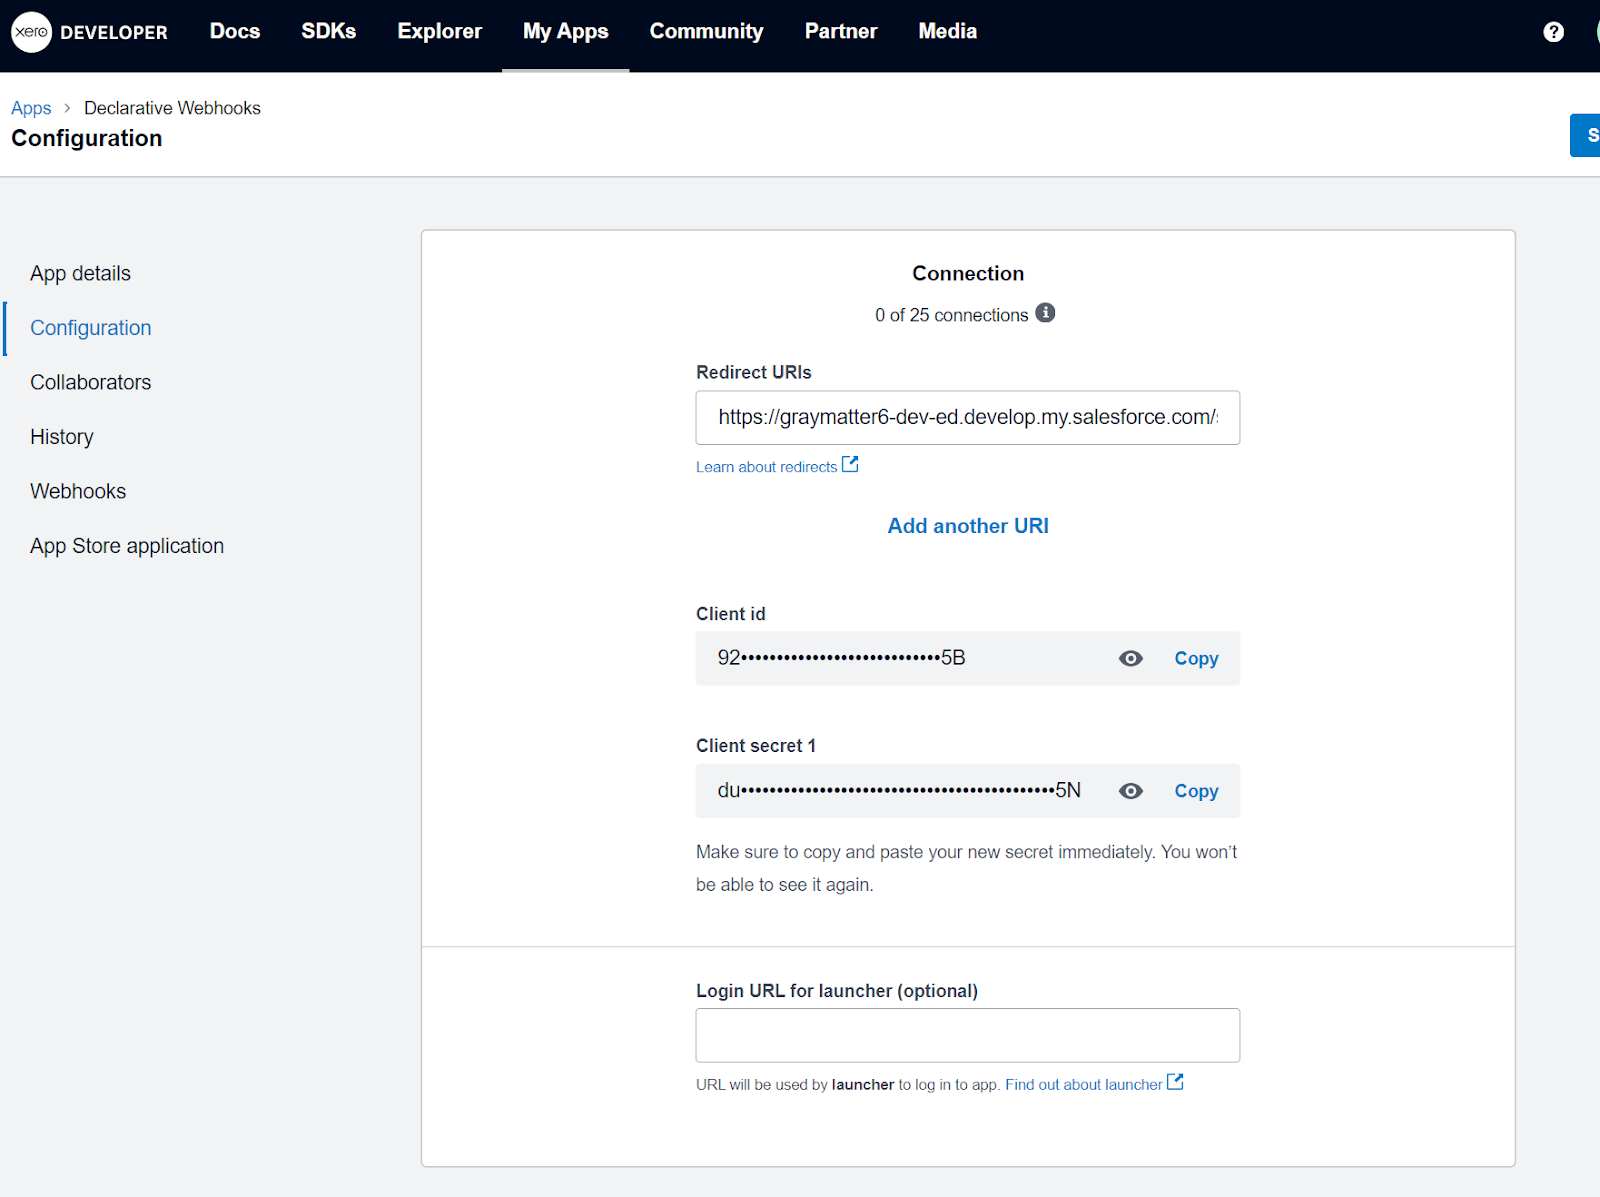
After this, we need to create a named credential that will use our auth provider configured earlier. Go to Setup > Named Credentials in Salesforce and click new.
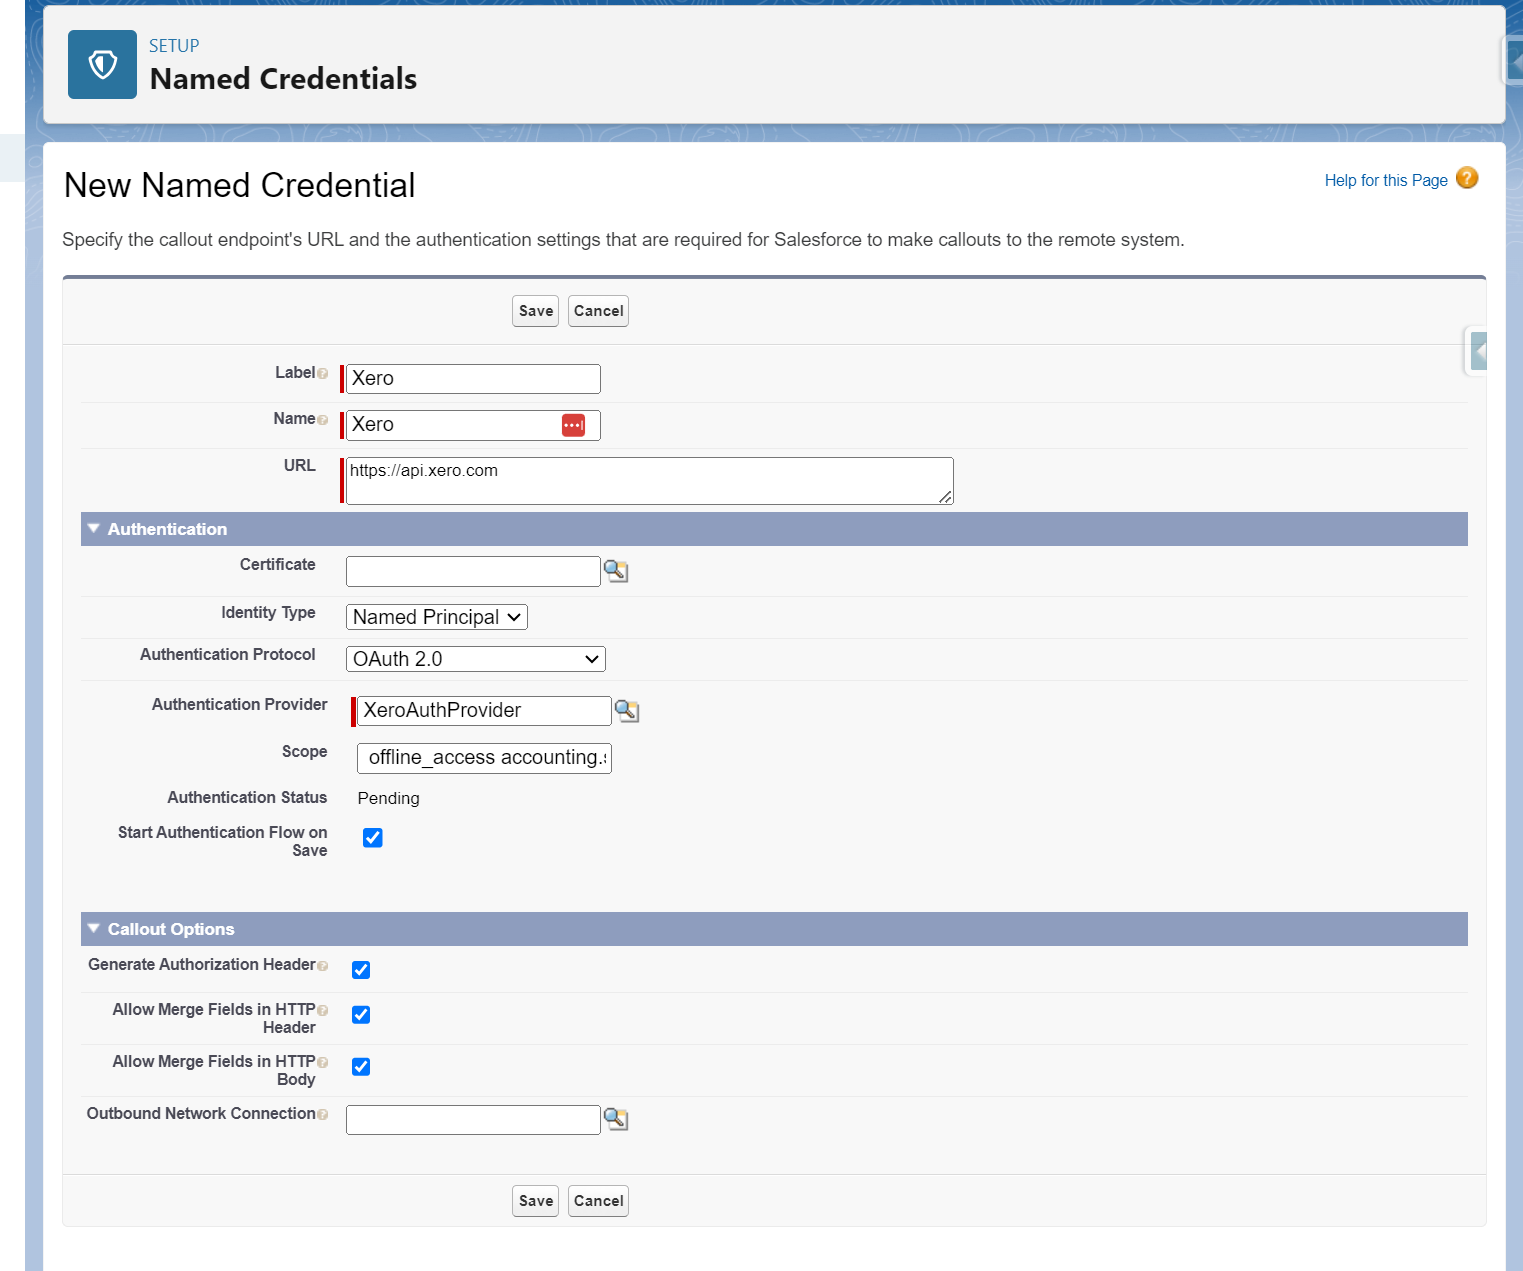
Put the scope as: offline_access openid profile email accounting.transactions accounting.transactions.read accounting.contacts
Click to confirm this on the Xero side.

Building Xero API Callout Templates in Salesforce
The core of any API integration is defining the endpoints, payload and response handling for each call.
In declarative webhooks, callout templates provide an easy way to configure these API calls without code.
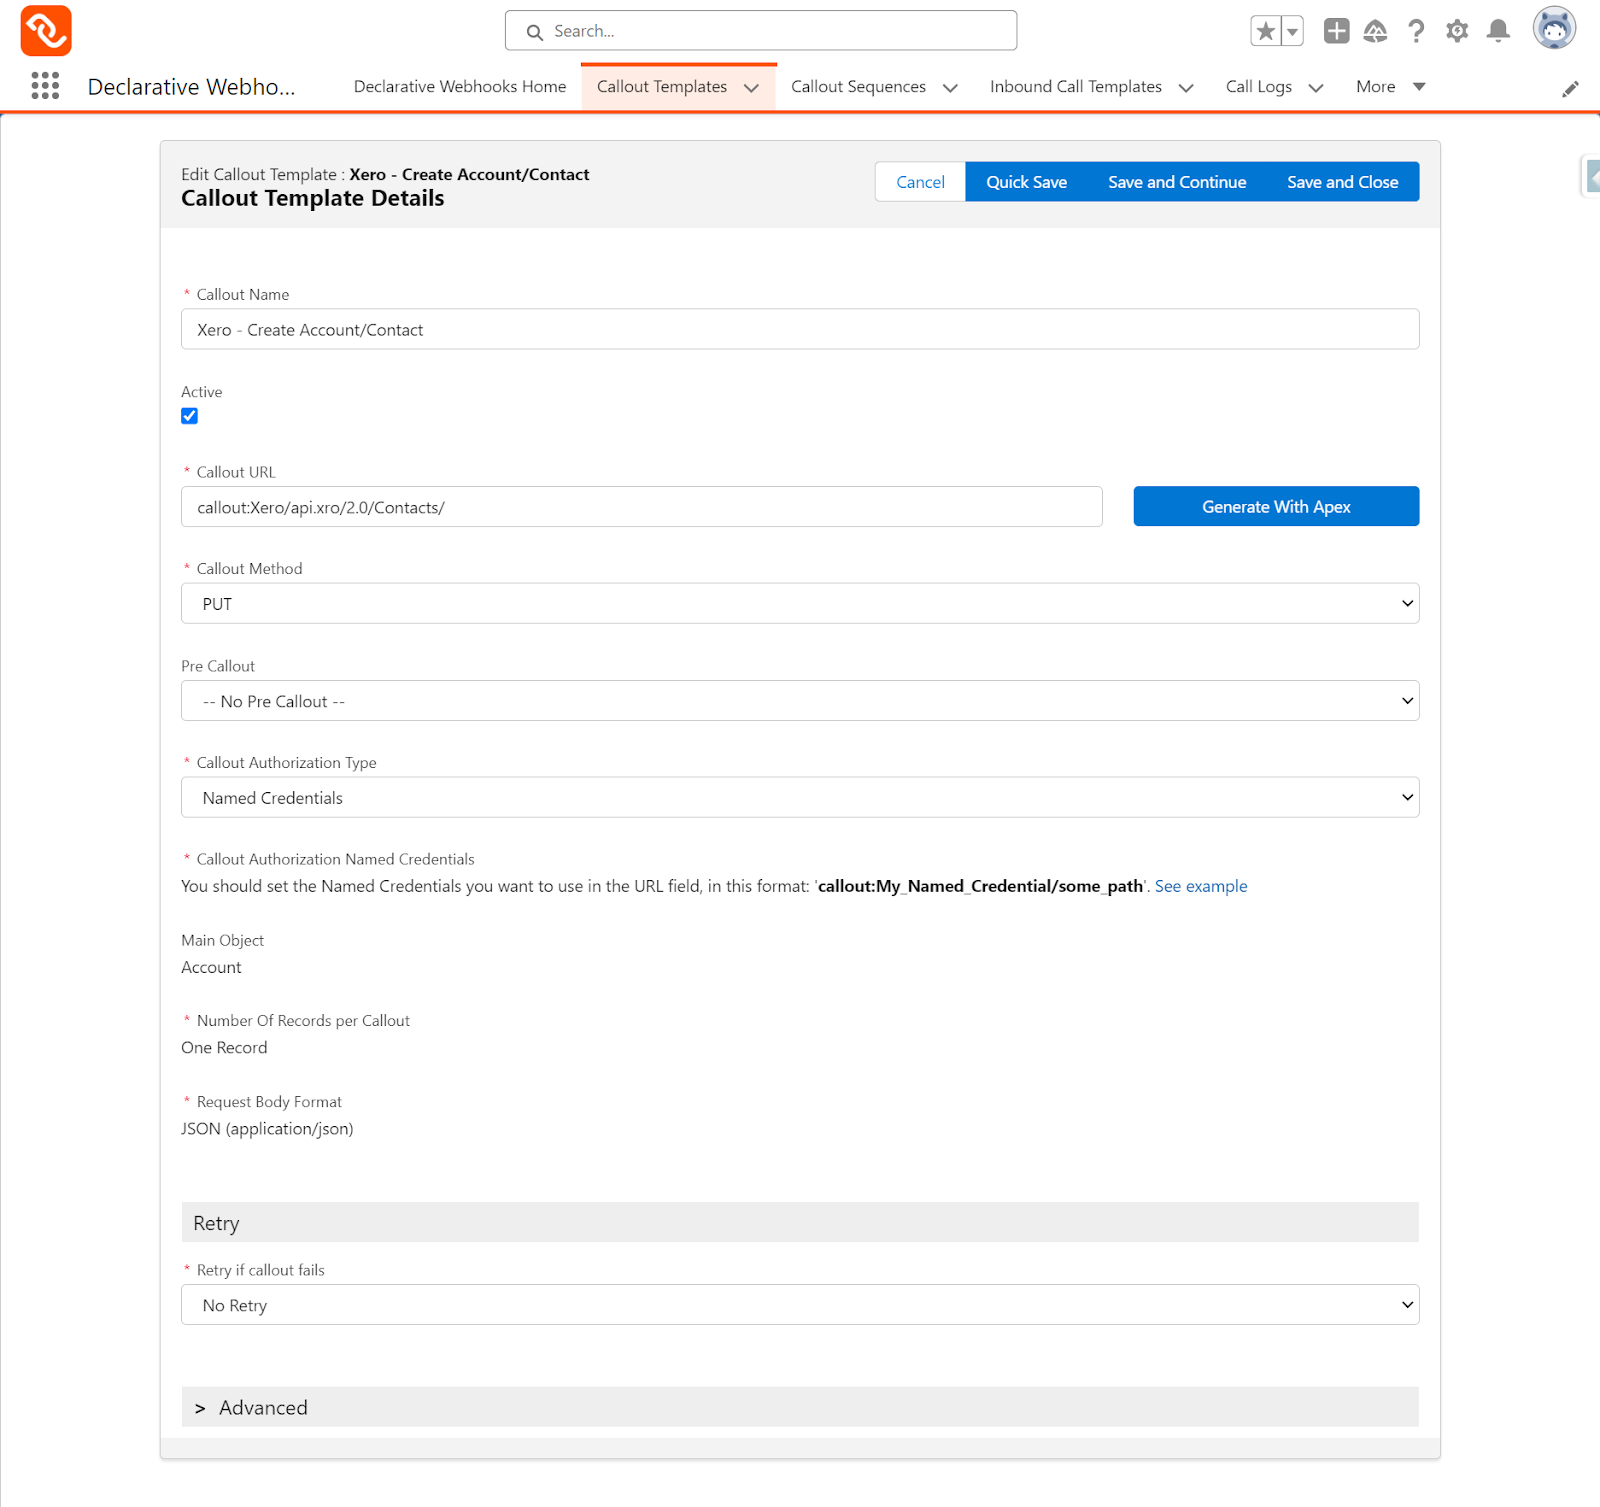
1. Create Customer Template
– Use PUT/Contacts endpoint
– Set method to POST, with JSON request and response
– Callout URL will include the Named Credential we have set up earlier
– Main object as Salesforce Account
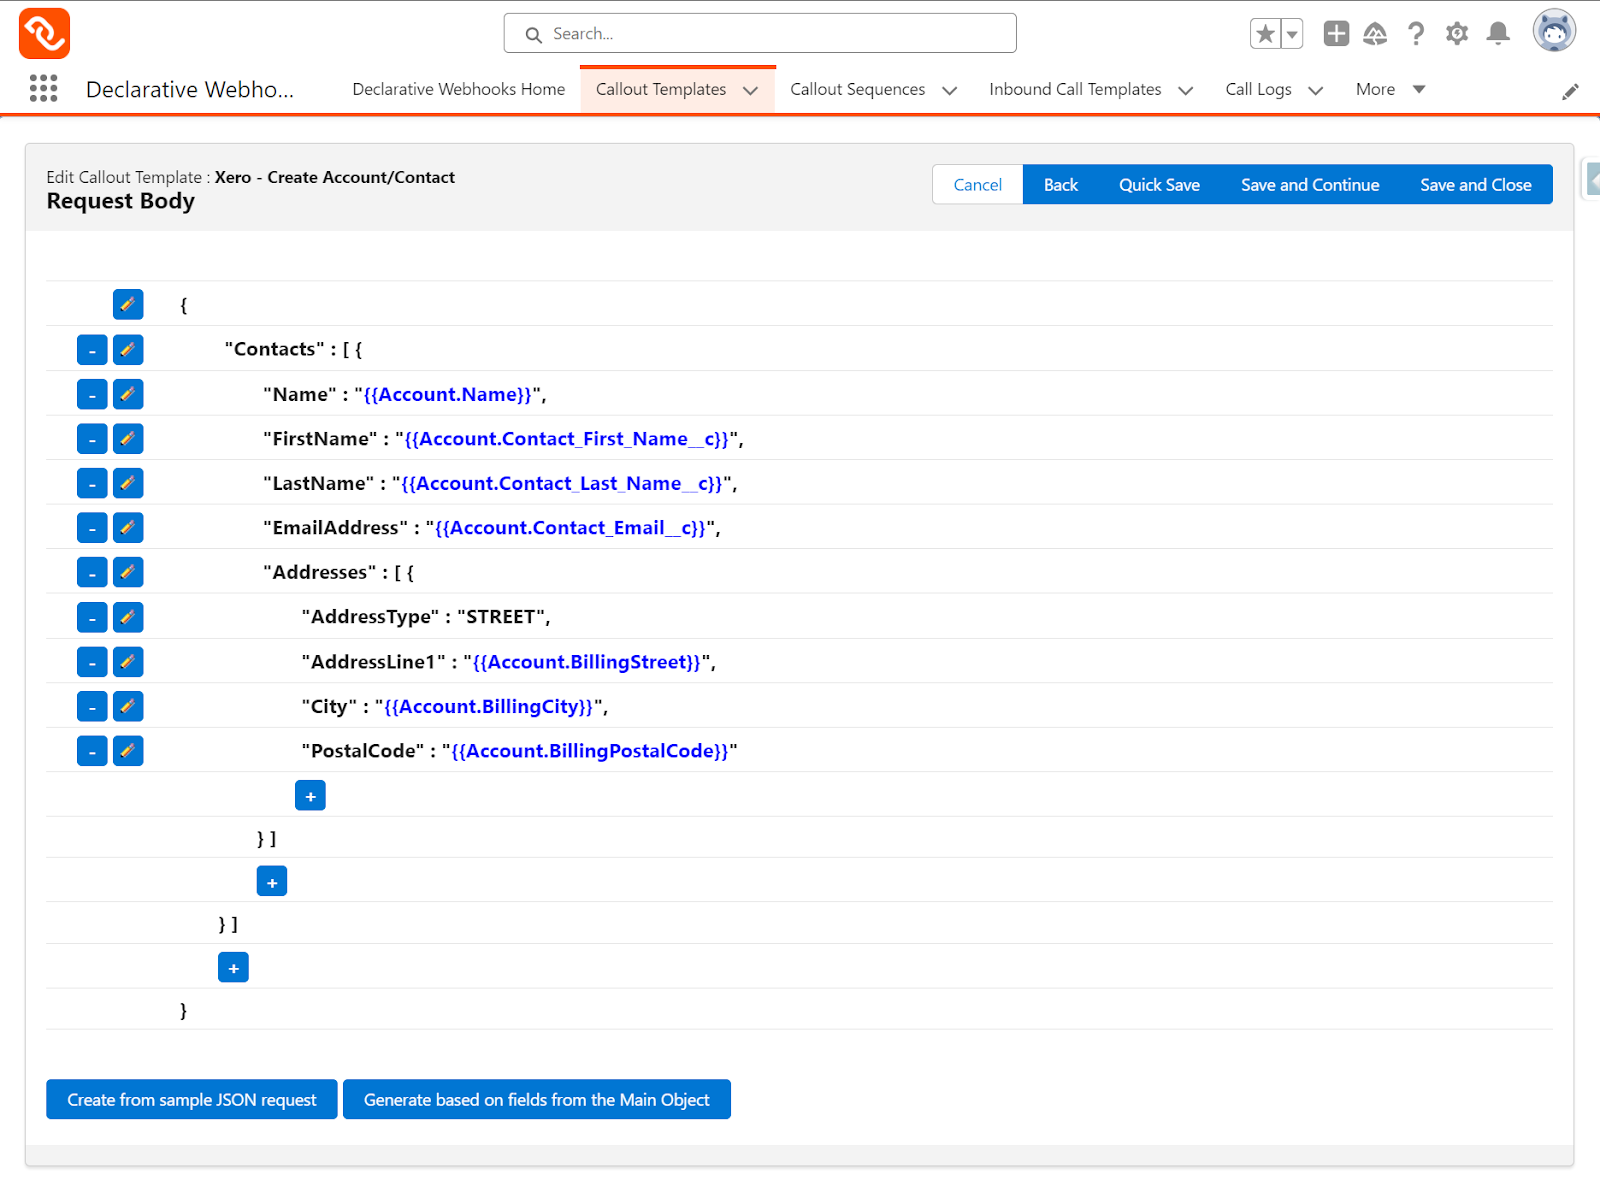
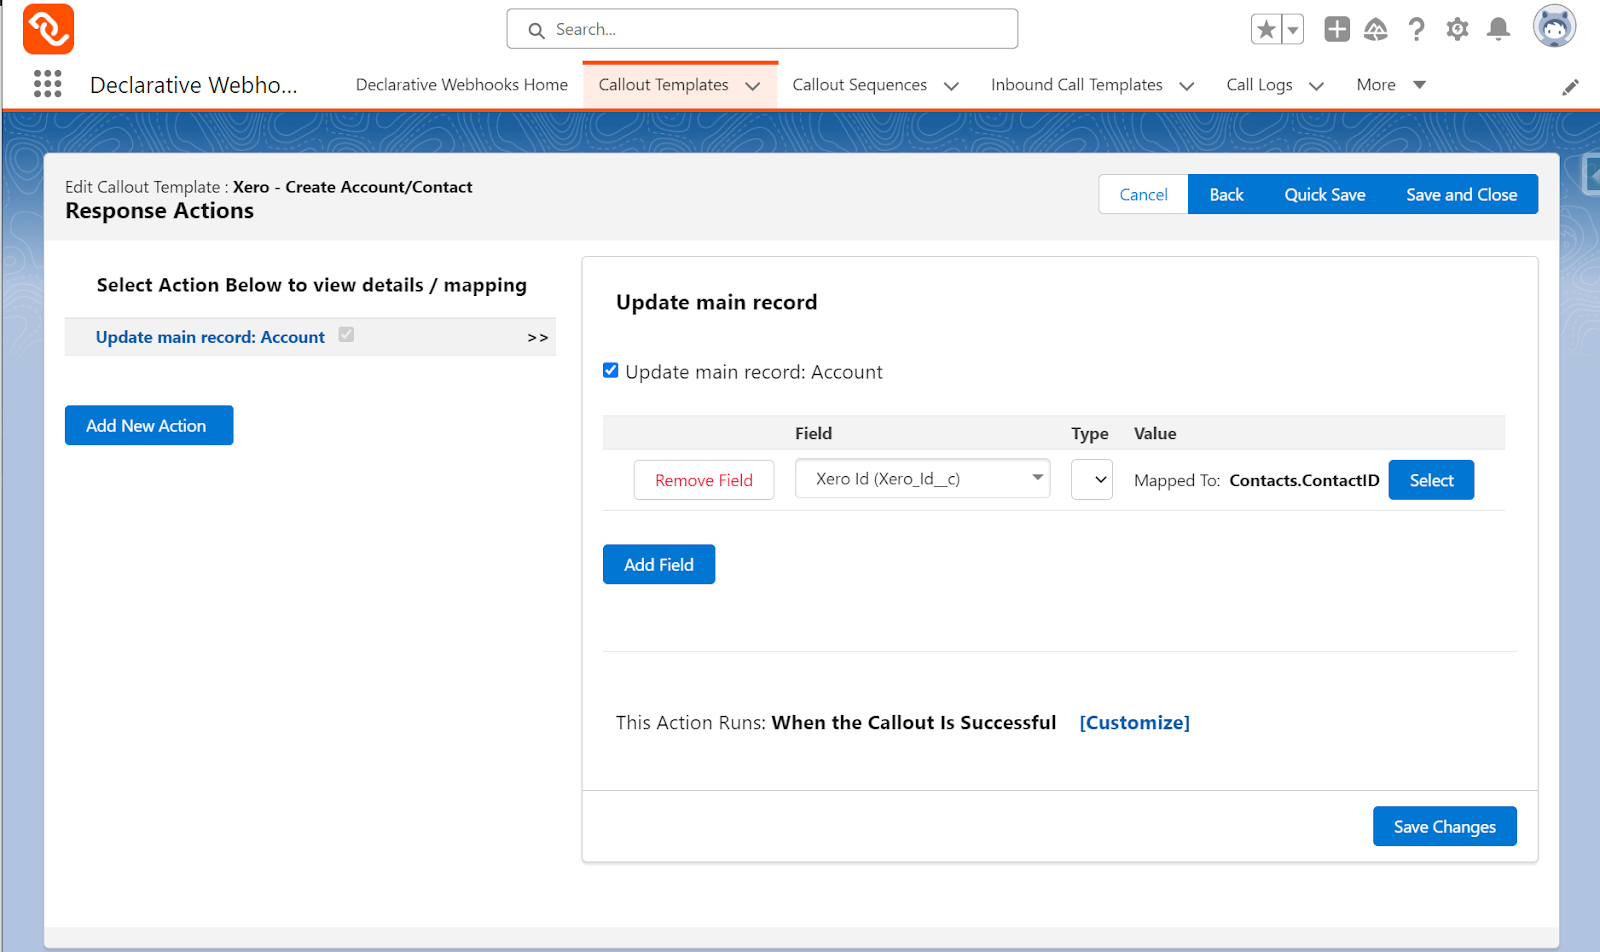
In the mapping screen we are mapping account name, email, billing address etc. from SF to Xero.
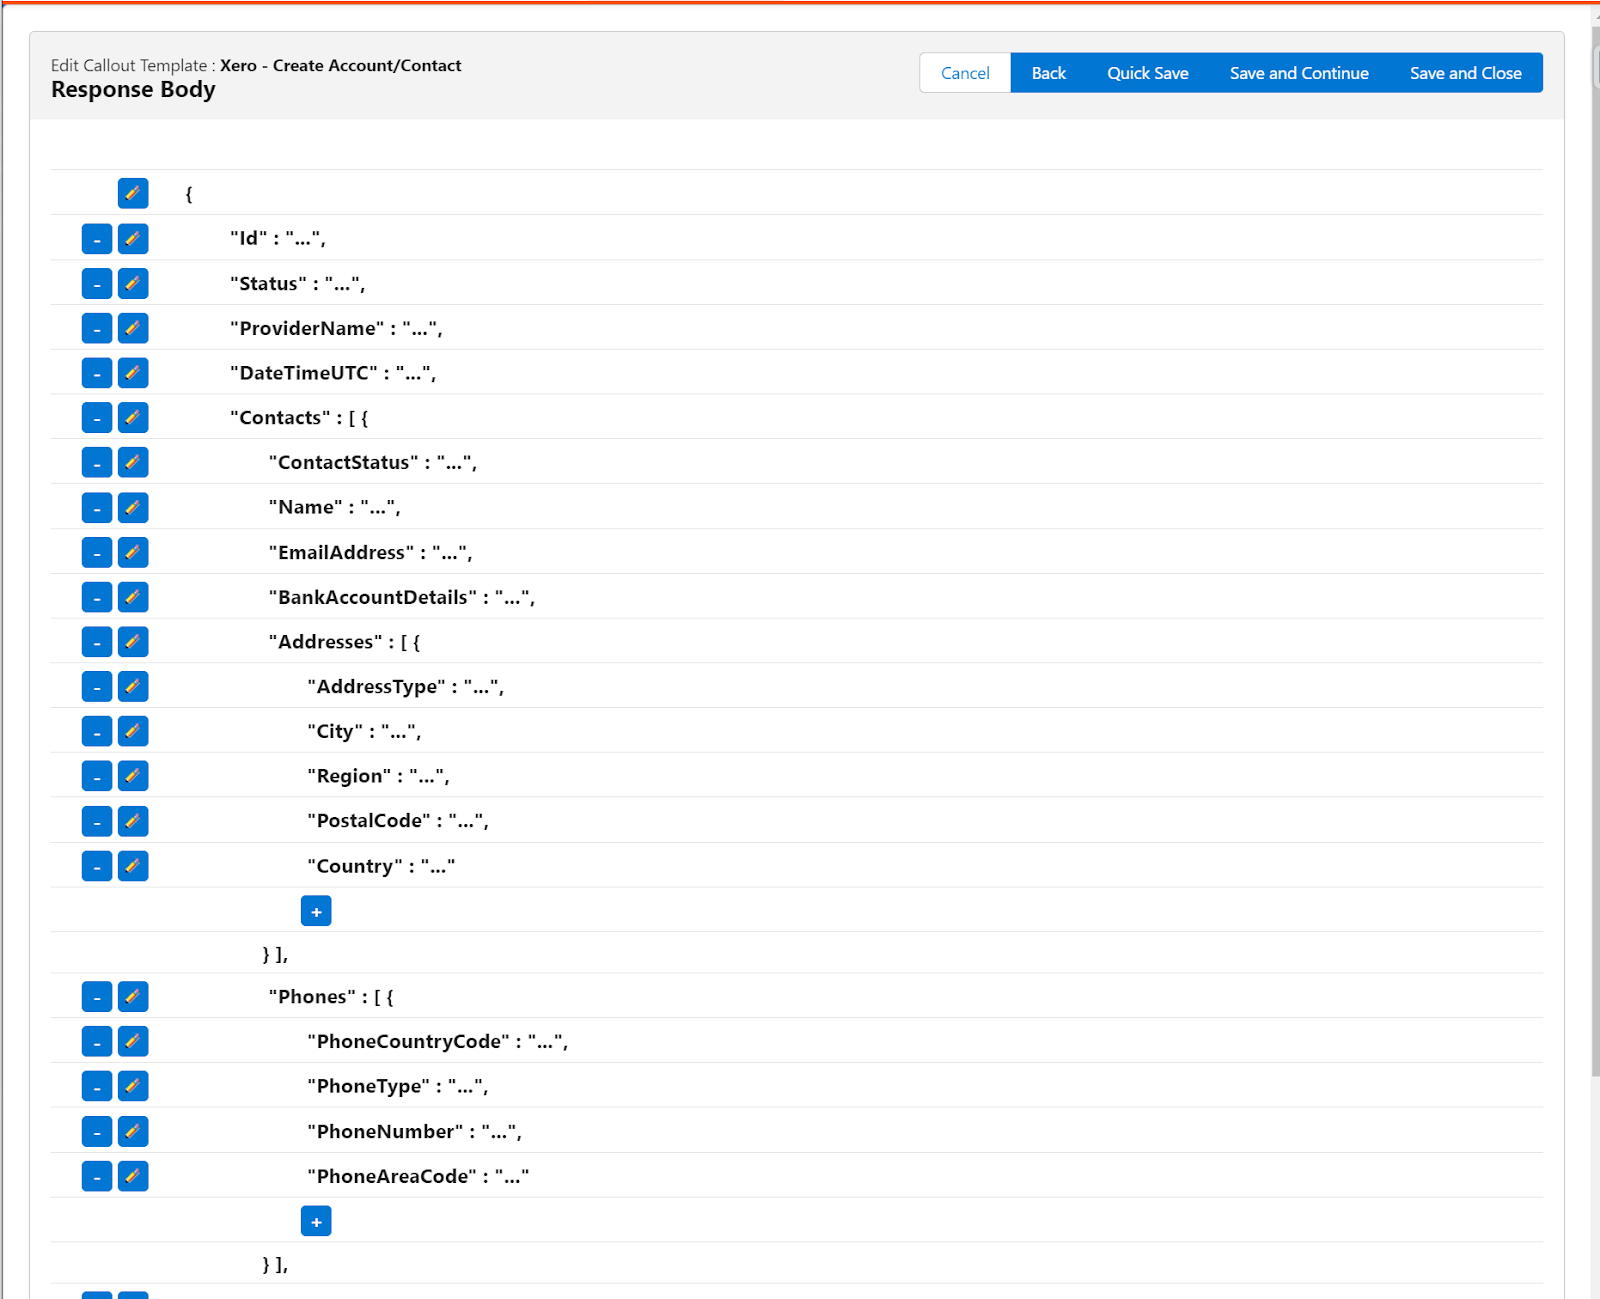
Response handler stores newly created Contact ID on SF account. We need the response templates for saving information returned from Xero.
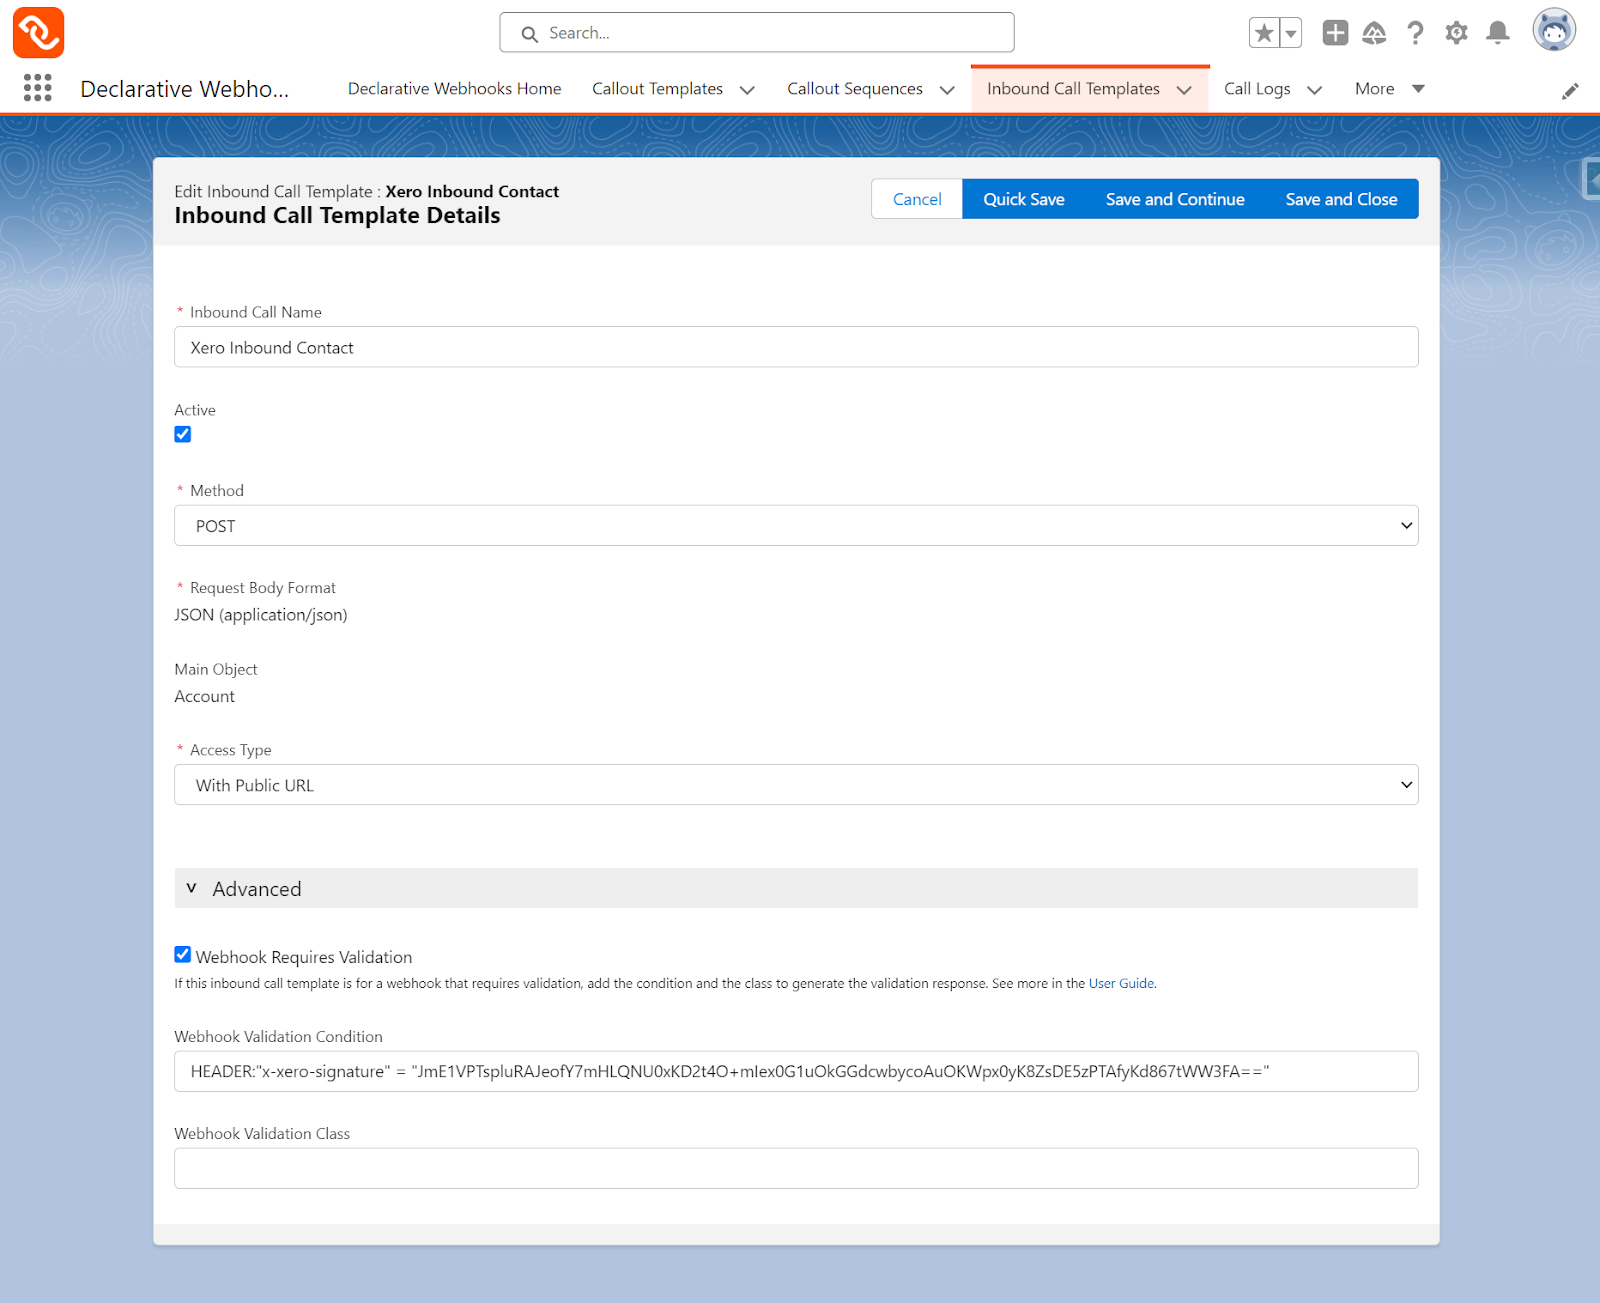
Now let’s create a webhook and an inbound callout template with Declarative Webhooks so that we get updates on this contact from Xero when it is updated.
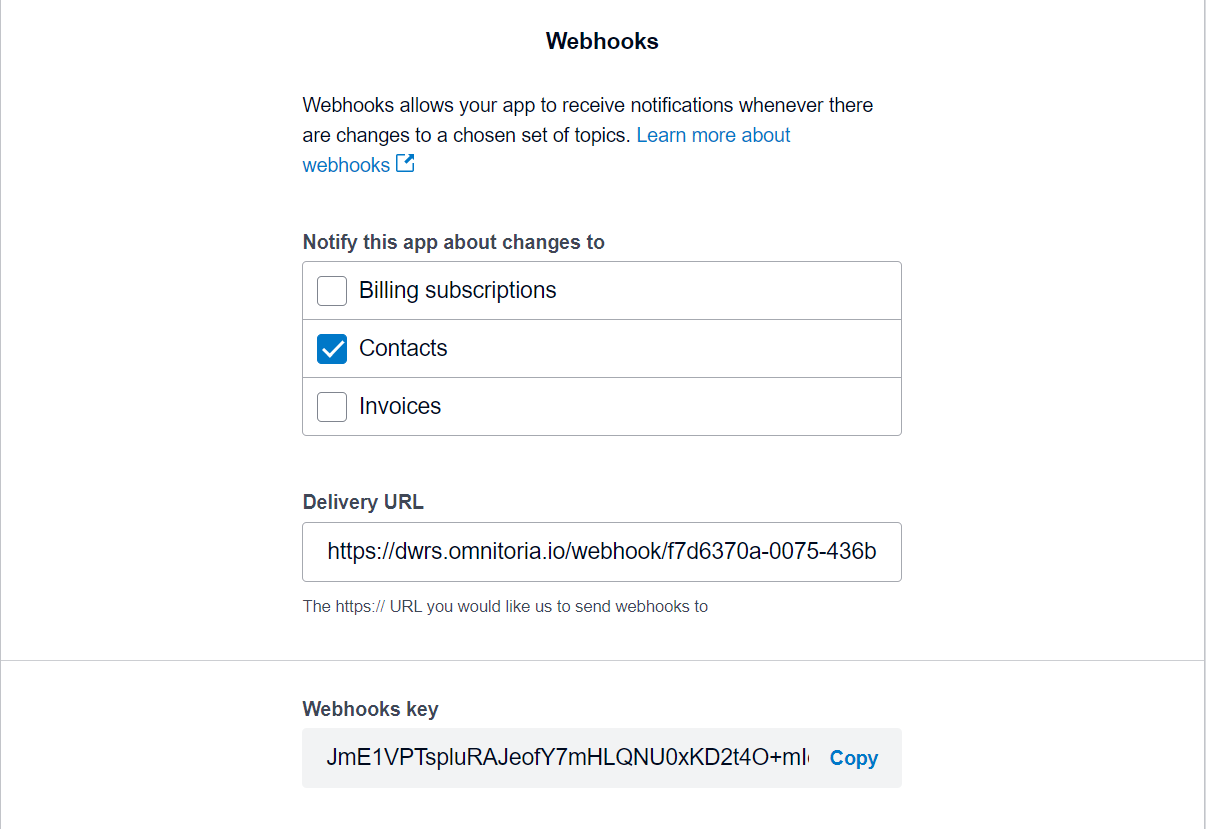
First, go to https://developer.xero.com and click the app we configured earlier, go to the Webhooks tab and define a webhook for Contacts.
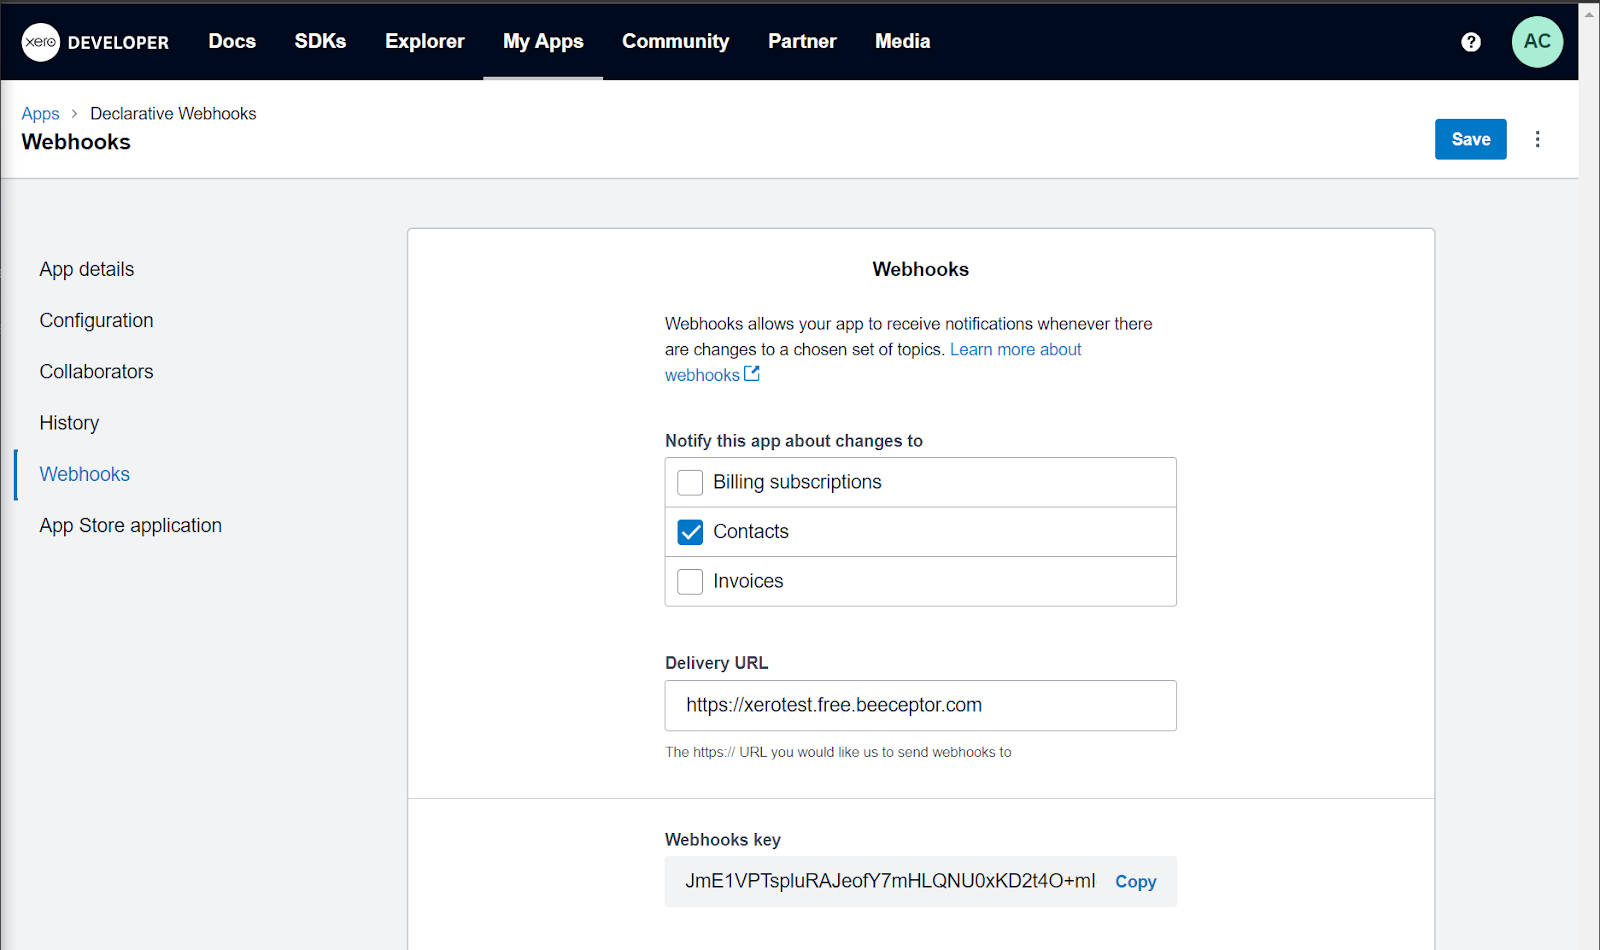
Copy the webhook key so that we can use it to validate it.
We will change the Delivery URL to our Inbound Template external URL after creating our inbound template.
After this step, go to Declarative Webhooks app and create a new inbound template. Here’s what it should look like. We’re validating the webhook here by entering the condition sent in the header as: HEADER:”x-xero-signature” = “your xero webhook signature”
As usual, define the request body. You can test the incoming payload by using a service to receive test payloads.
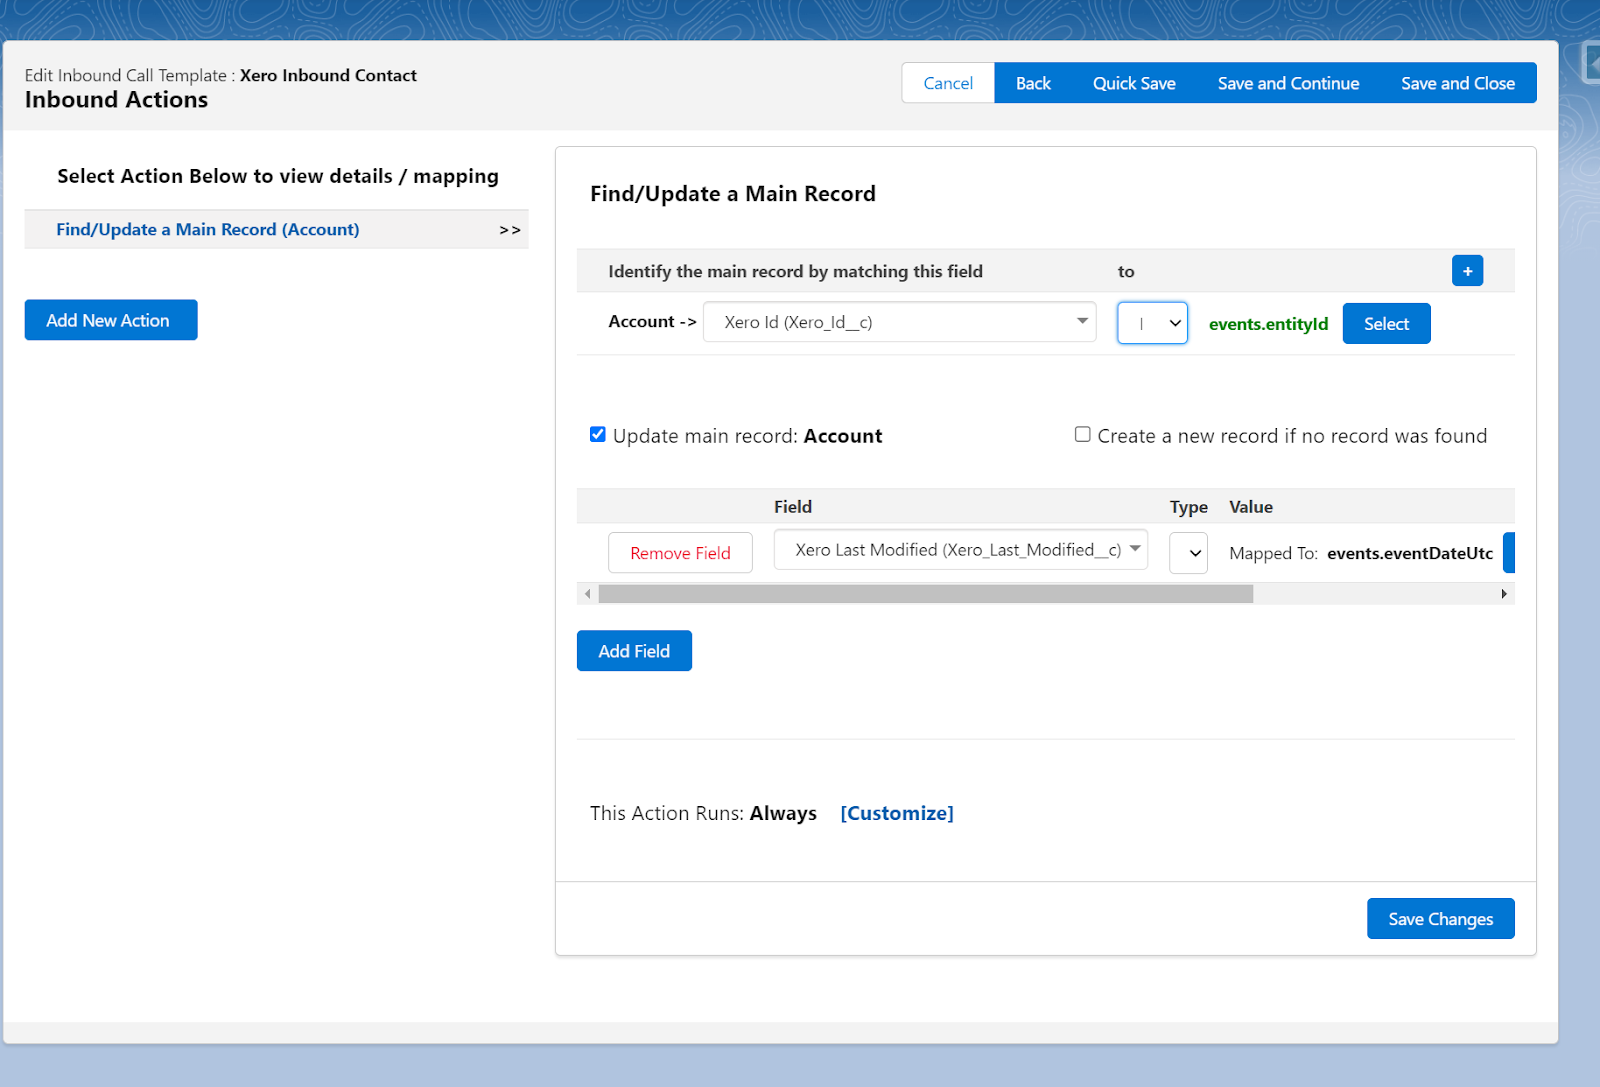
In the final step we are mapping the id value coming from Xero to our custom field.
After creating the inbound template, copy the external URL address and head over to the webhook configuration page again and provide the URL.
As for the last step, we will configure a record triggered flow that will launch our outbound template whenever an account record gets created/updated.
Add an Apex action element and use the developer name of the outbound template.
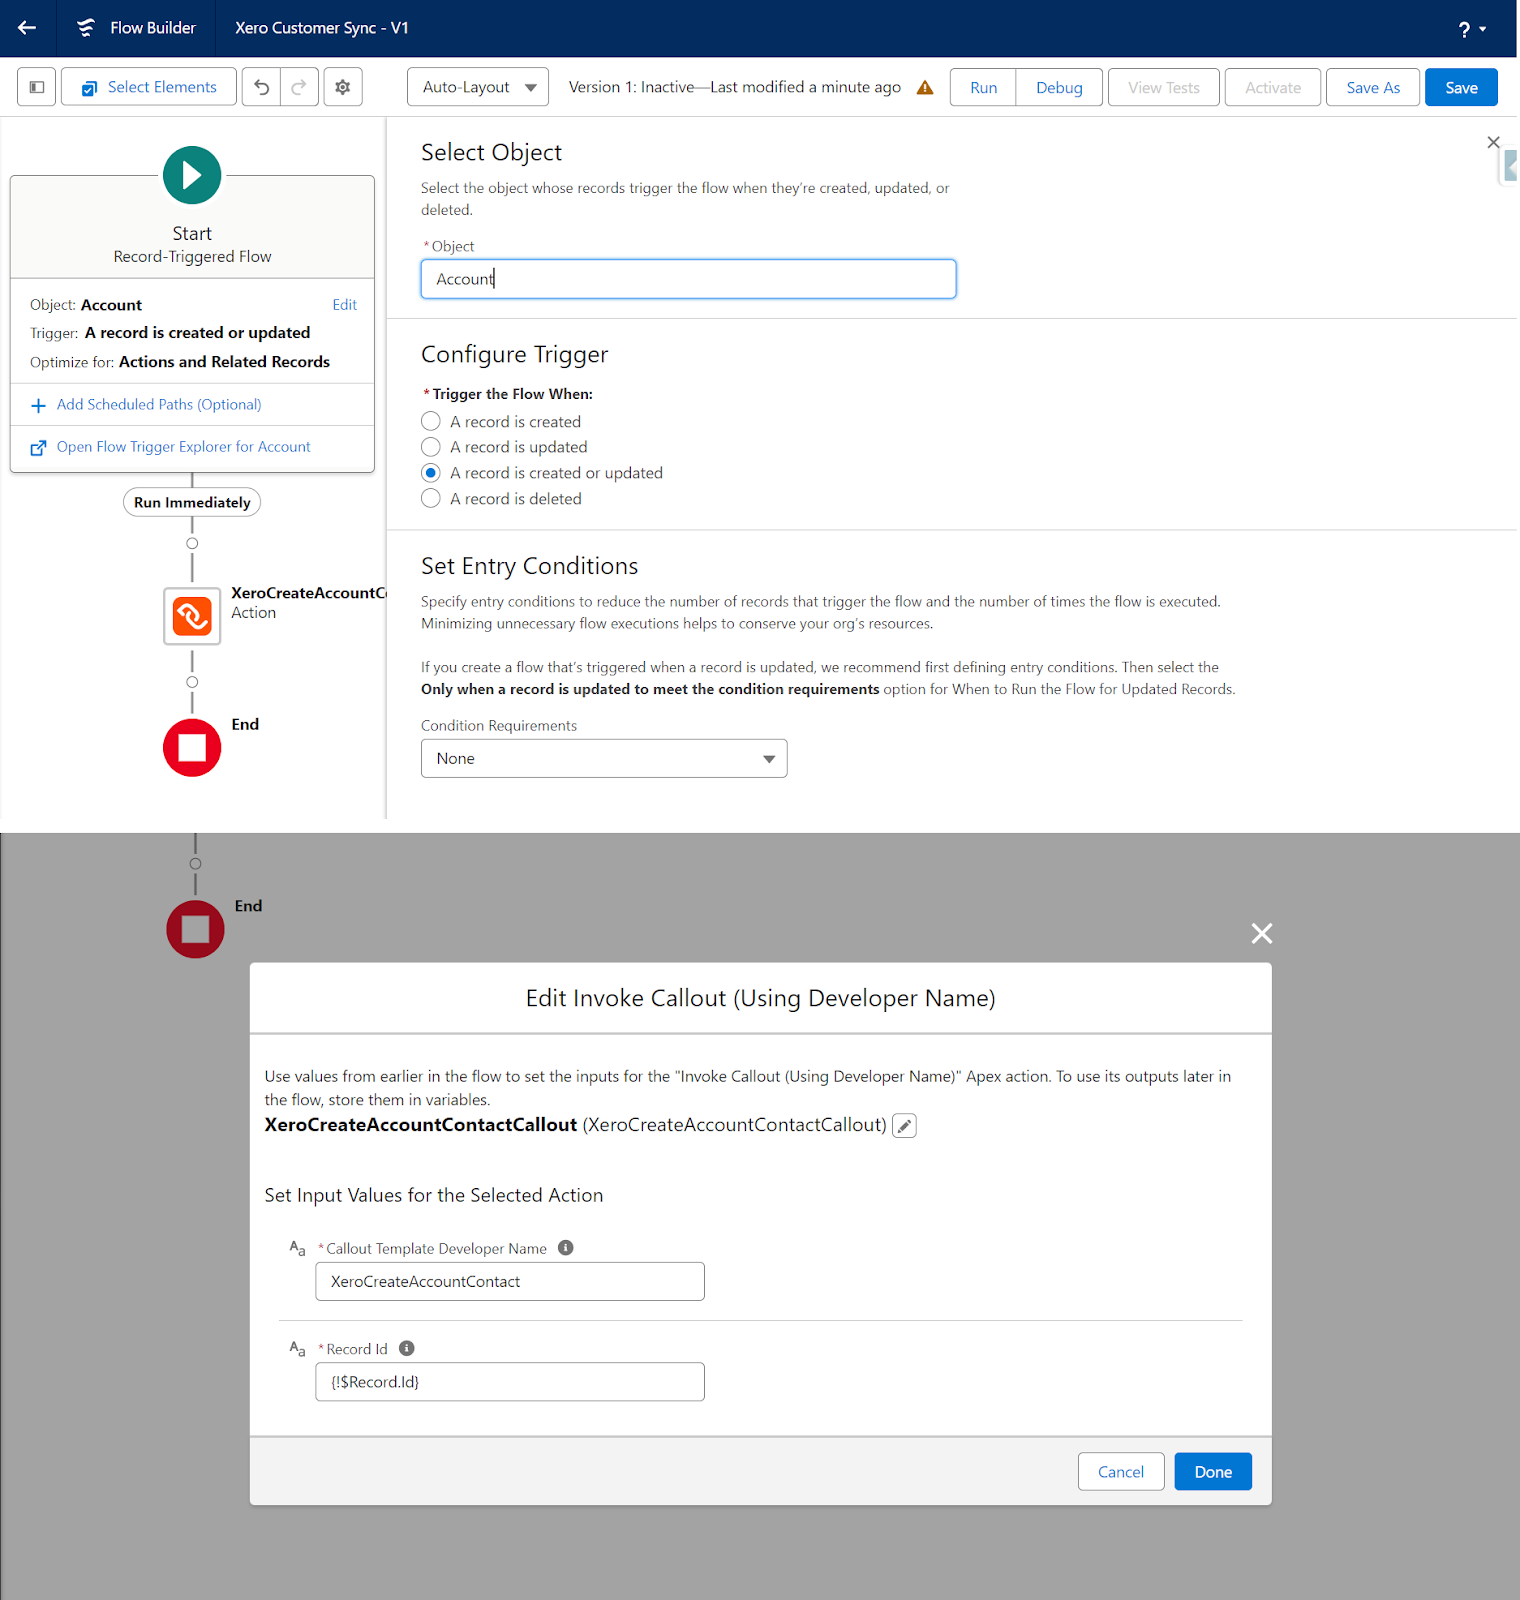
Next step is using the record id parameter of the record that started the flow. After this save and activate your flow. Make sure you have the Xero API added to your remote site settings.
Conclusion
In this post, we outlined a straightforward approach to integrate Xero accounting data and Salesforce CRM using the declarative tools provided by webhooks. The click-based configuration abstracts away the complexities of managing OAuth connections, crafting API payloads, handling responses and orchestrating end-to-end processes.
This allows integrations to be built rapidly without investing in dedicated dev resources. Changes can also be incorporated swiftly as needs evolve.
Bidirectional sync powered by near real-time automation ensures accuracy of data across sales and finance. With a solid data foundation, companies can derive actionable insights to accelerate growth.
Webhooks makes integration accessible to every Salesforce admin and developer. The time is now to connect your clouds!
Thank you for following this quick guide.
If you want to learn more about Declarative Webhooks, please follow the links below:


More Integration Guides
© Omnitoria, All Rights Reserved.