
In the digital era, the integration of e-commerce platforms with customer relationship management (CRM) systems is not just a convenience but a necessity for businesses looking to streamline their operations and enhance customer satisfaction. Among the myriad of platforms available, Shopify and Salesforce stand prominent.
Shopify simplifies online store management and e-commerce operations, while Salesforce provides comprehensive CRM solutions that enhance customer relationships and service management.
This blog post explores how to integrate Salesforce with Shopify using declarative webhooks, specifically focusing on automating the creation of new customers in Shopify whenever a new user is created in Salesforce.
Understanding Shopify
What is Shopify?
Shopify is a leading e-commerce platform that enables businesses of all sizes to design, set up, and manage their stores across multiple sales channels including web, mobile, social media, marketplaces, brick-and-mortar locations, and pop-up shops. The platform is renowned for its simplicity and power, providing robust backend support and comprehensive APIs for extensive customization.
Benefits of Shopify
Ease of Use: Shopify offers a user-friendly interface with drag-and-drop store builders and an intuitive admin area for managing the logistics.
Scalability: It grows with your business, from basic features for new merchants to advanced features for high-volume sellers.
Integrated Hosting: Shopify includes web hosting in all plans, ensuring that stores are fast, reliable, and responsive.
Secure and Compliant: Compliance with PCI standards and includes SSL encryption to secure personal and financial information.
Extensive App Marketplace: The availability of numerous apps and add-ons that can integrate seamlessly to extend store functionalities.
What is Salesforce?
Salesforce is the world’s leading CRM software and enterprise cloud ecosystem, designed to help businesses grow into more efficient, effective, and profitable organizations. Salesforce empowers companies to manage customer interactions, engage with prospects, and close deals faster.
Benefits of Salesforce
Customer Information Management: Comprehensive tools for tracking all customer information and interactions in one place.
Customization: Highly customizable, from custom reports and views to integrating external applications.
Cloud-Based: Offers all of its services through the cloud, ensuring access from any device with internet connectivity.
Advanced Analytics: Built-in AI tools provide valuable insights to help tailor marketing strategies and customer engagement.
How to Integrate Shopify and Salesforce
Outbound Integration – Customer Creation
The primary objective of this integration using declarative webhooks is to automate the process of customer creation in Shopify when a new contact is created in Salesforce. This not only improves efficiency, reducing manual data entry errors, but also ensures that customer data remains synchronized between your CRM and e-commerce platform.
Creating a Custom App in Shopify for API Access
To begin the integration process, you need to create a custom app in Shopify to generate an API token, which will be used to authenticate the webhook call from Salesforce.
Log into Your Shopify Admin Account: Go to your Shopify admin panel.
Navigate to Apps: From the Shopify admin dashboard, select ‘Apps’. Click on ‘Develop apps’ for app development.
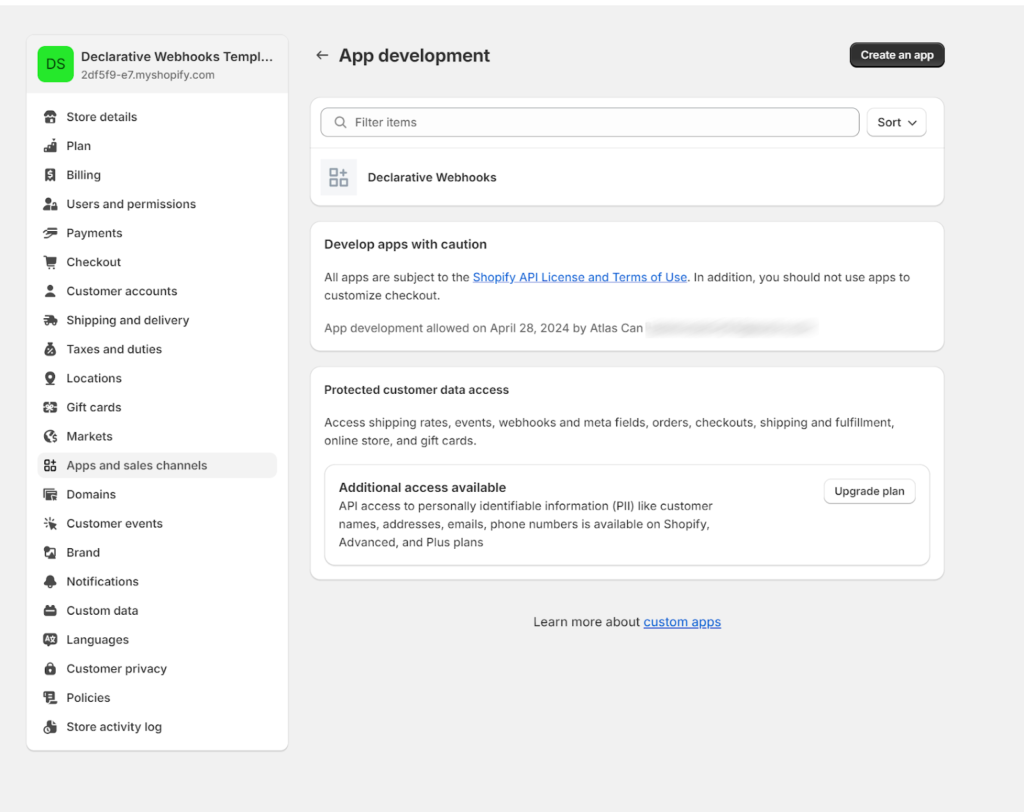
Develop App: Click on ‘Create an app’. Enter the name of the app and description.
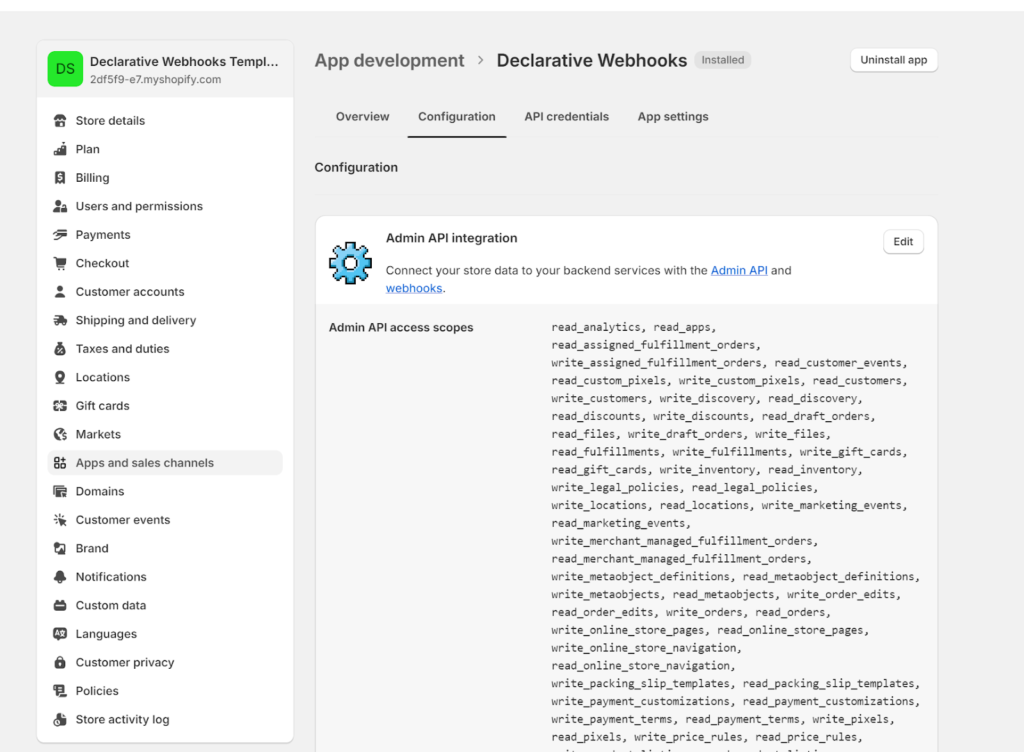
Configure API Scopes: In the app’s configuration, set the API scopes. For our purposes, ensure you enable read and write permissions for customers specifically.
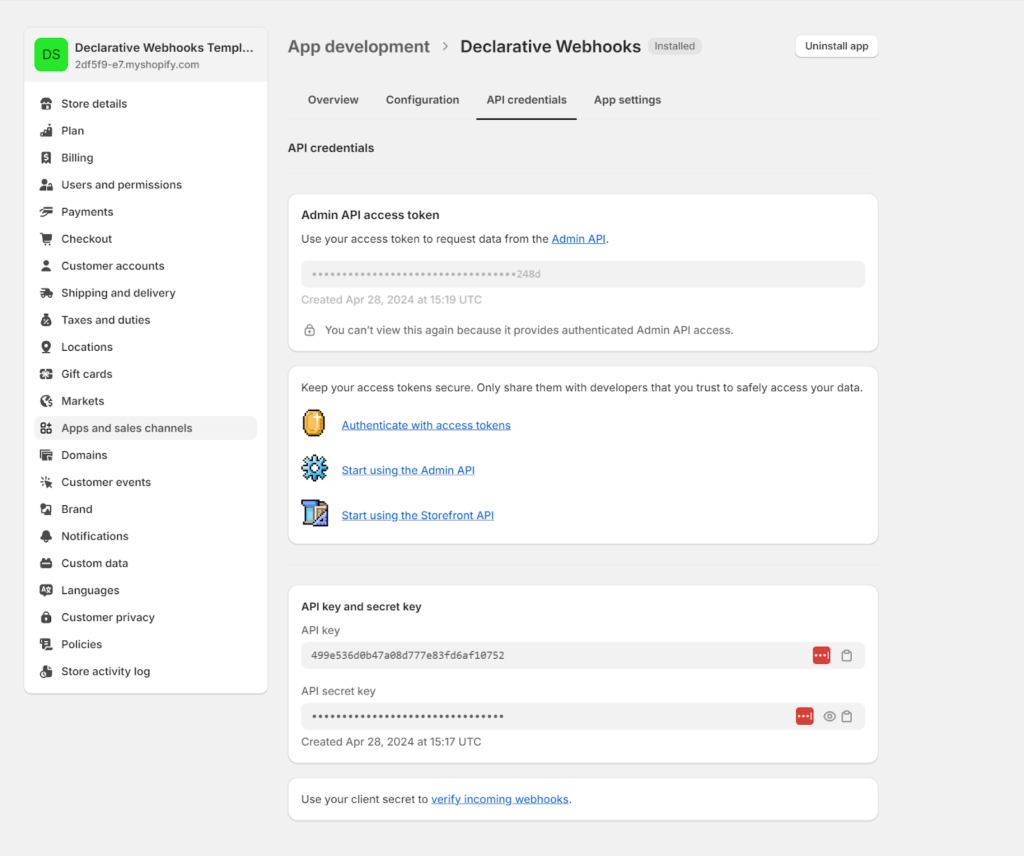
API Credentials: Once the app is created, Shopify will provide you with API credentials, including an API key and API secret key. Record these securely; you will need them to set up the integration.
Configuring Salesforce Declarative Webhooks
Let’s create a Callout Template, the first step is determining your URL, which is found in the address bar when you’re viewing your store.
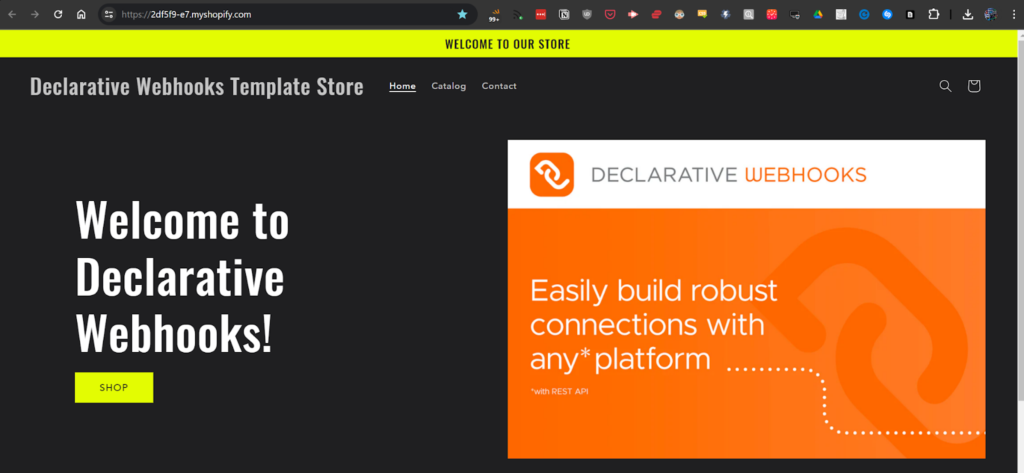
After grabbing the URL head over to Salesforce and enter it in the callout template record.
https://{{ShopifyURL}}.myshopify.com/admin/api/2024-04/customers.json
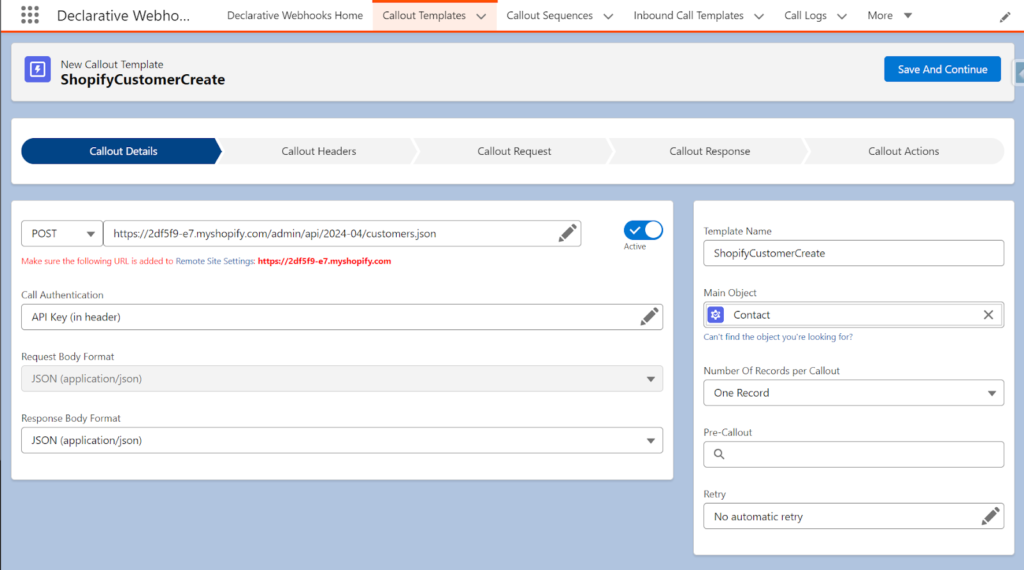
Choose authentication as API Key and enter your Shopify Access Token created for your custom app.
Pick the Main Object as Contact.
Next we need to define a request body, here’s a sample you can use to generate the app directly.
{
  "customer": {
    "first_name": "",
    "last_name": "",
    "email": "",
    "verified_email": "",
    "addresses": [
      {
        "address1": "",
        "city": "",
        "province": "",
        "phone": "",
        "zip": "",
        "last_name": "",
        "first_name": "",
        "country": ""
      }
    ]
  }
}
After the mapping this is how it should look like, we’re using the 2024-04 version of the REST API.
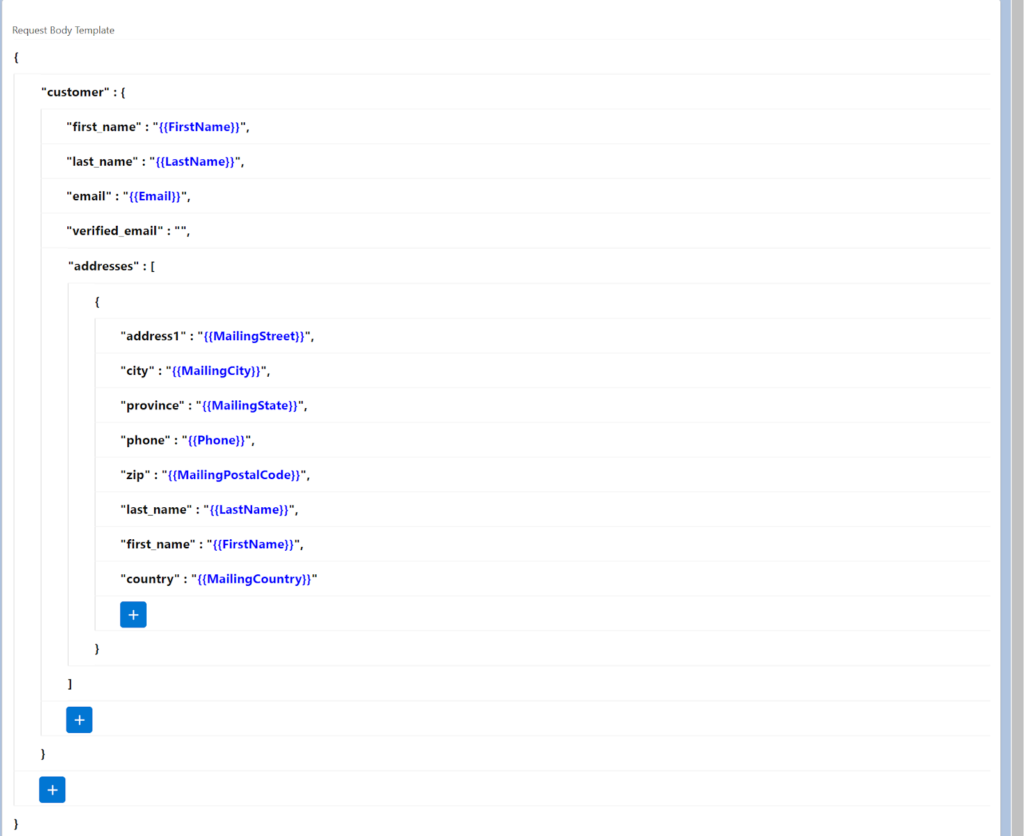
Now let’s create a Callout Response mapping – a sample response can be found in this link.
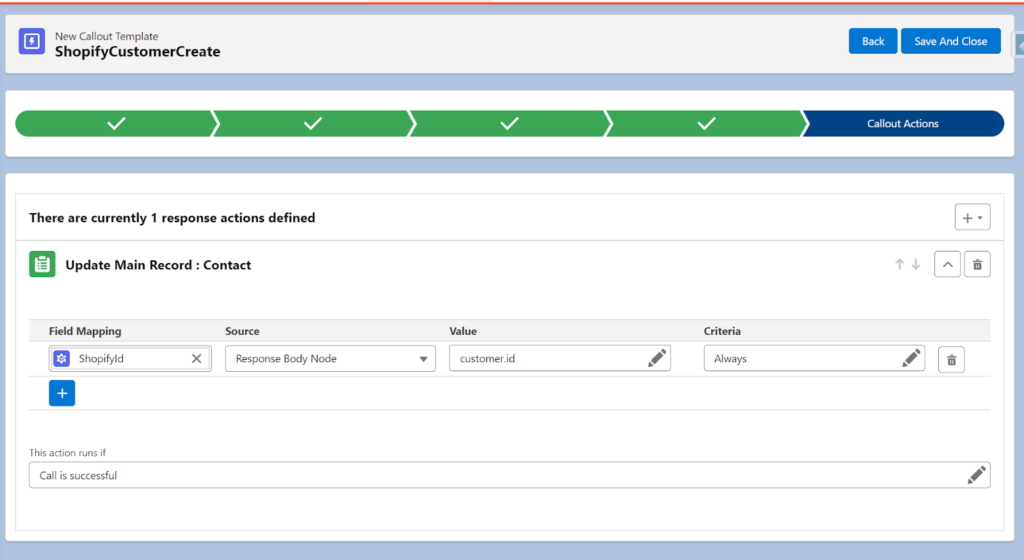
If the call is successful, we are updating the ShopifyId externalId which is a custom field we create beforehand in Salesforce for the Contact object.
Next is creating a record triggered Flow:
- Go to the Setup, Flow and create a new Record Triggered Flow.
- Pick Contact object and choose whenever a record is created for the entry criteria
- Add Declarative Webhooks Invoke Callout Apex Action
Enter the Developer Name of your callout template and provide the Id of the record that triggered the flow interview – which is a Contact record.
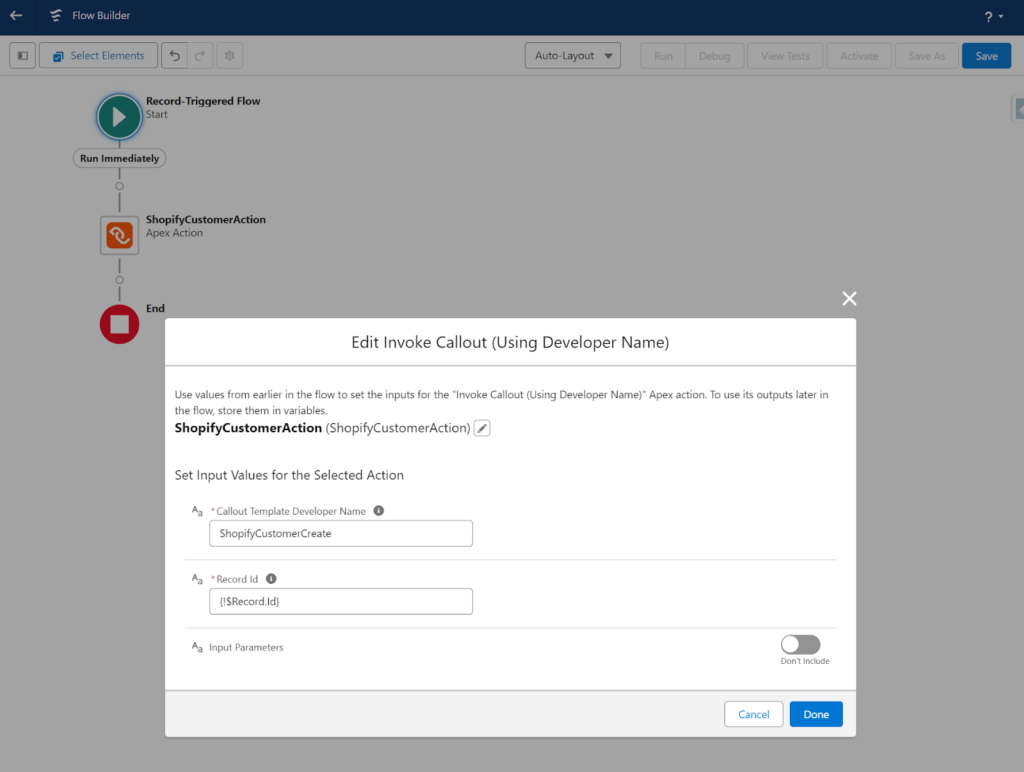
After you’re created the flow, Save and Activate it. Remember to add the Shopify URL domain to your remote site settings and you are good to go!
Next, we are going to create a webhook in Shopify to receive order data to Salesforce.
Inbound Integration: Syncing Shopify Orders to Salesforce
After you create your Shop in Shopify, you can use testing mode or use the bogus payment method to simulate orders coming in. This is very useful when building the integration between Salesforce and Shopify using Shopify Webhooks.
For Shopify store owners, one of the most effective tools at your disposal for testing payment systems is the Bogus Gateway.
This test payment provider allows you to simulate different transaction outcomes using fake payment credentials, ensuring your store can handle orders, process payments, and manage inventory correctly under various scenarios.
Before you can start testing, make sure your Shopify store is ready.
Access Your Shopify Admin: Log in to your Shopify admin panel by navigating to {{ShopifyURL}}.myshopify.com/admin.
Backup Your Data: Always back up your store’s data before making major changes, especially when setting up new payment methods or testing gateways.
To activate the Bogus Gateway, follow these steps:
Navigate to Settings: From your Shopify admin panel, click on ‘Settings’ located at the bottom left corner, and then select ‘Payments’.
Deactivate Existing Gateways: If you have any active payment gateways, you’ll need to deactivate them first. Click on ‘Manage’ next to the gateway you want to deactivate and then select ‘Deactivate’.
Activate the Bogus Gateway
Under the ‘Accept payments’ section in Payments settings, click on ‘Add payment methods’.
Type “Bogus” into the search bar and select the ‘(for testing) Bogus Gateway’.
Click on ‘Activate’ to set up the gateway for testing.
Simulating Transactions
With the Bogus Gateway activated, you can simulate transactions to test various aspects of your Shopify store’s functionality:
Simulate a Successful Transaction:
Go to Your Storefront as a Customer: Add items to your cart and proceed to checkout.
Use Test Credit Card Numbers: Input the credit card number as 1 to simulate a successful transaction.
Add Any CVV: Use any three-digit number (e.g., 123).
Enter Any Valid Future Date for Expiry.
Simulate a Declined Transaction:
Repeat the process above but use the credit card number 2 to simulate a transaction decline due to the card being declined.
Simulate an Incorrect Number Transaction:
Use the credit card number 3 to simulate a failed transaction due to entering an incorrect number.
Check Error Handling: Make sure that your store correctly displays appropriate error messages or prompts when dealing with declined or incorrect transactions.
Evaluate Customer Notifications: Test and verify that all customer notifications (e.g., order confirmation and status update emails) are sent correctly.
Shopify Order Creation Webhook Setup
Now that we know how to simulate incoming orders besides creating order data ourselves, we can create a webhook.
To create a webhook in Shopify to send order data to Salesforce whenever a new order is created, follow these steps:
- Log in to your Shopify admin panel.
- Click on “Settings” in the bottom left corner of your screen.
- Click on “Notifications” in the “Settings” menu.
- Scroll down to the “Webhooks” section and click on “Create webhook”.
- Choose “Order creation” as the “Event” and “JSON” as the “Format”.
- Enter the URL of your Salesforce endpoint, which will be the inbound template URL
- Copy and paste the JSON sample provided in the question into the “Webhook API version” field.
- Click on “Save webhook”.
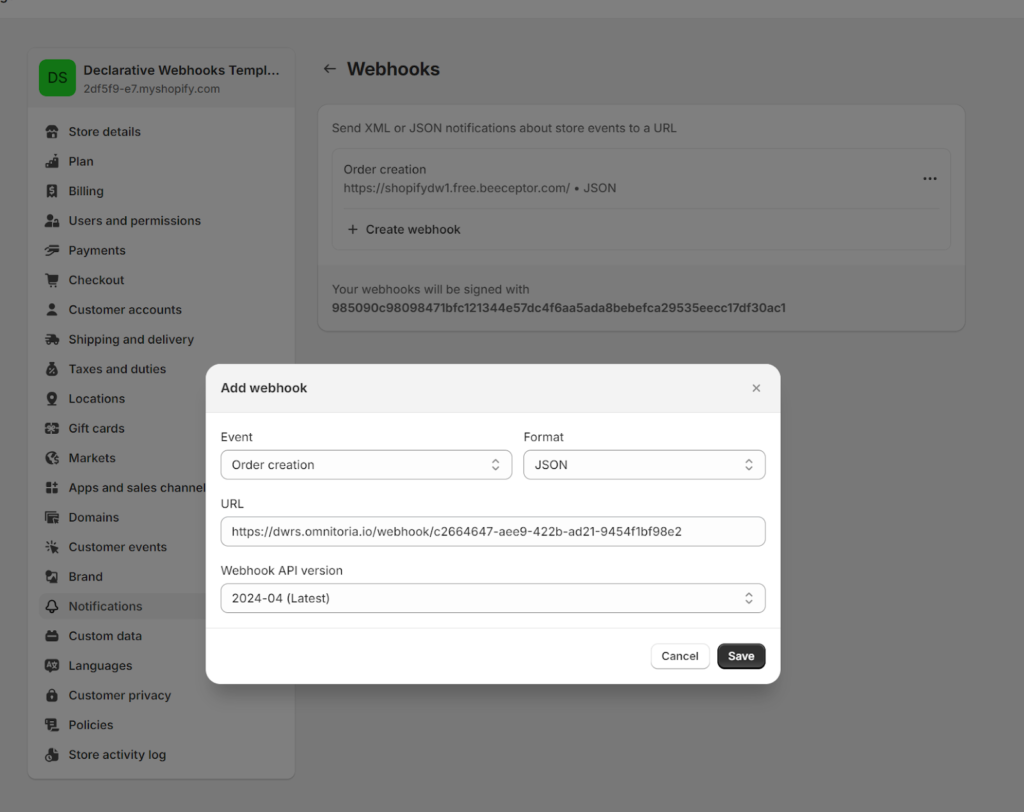
Now, whenever a new order is created in your Shopify store, Shopify will send the order data to your Salesforce endpoint in the JSON format provided.
This webhook will help you integrate your Shopify store with Salesforce and ensure that all new orders are automatically sent to Salesforce for further processing.
Salesforce Webhook Listener Setup
Go to the Inbound Call Templates Tab in Declarative Webhooks App and create a new record.
- On the Request Body tab inside the Inbound Call Record and define a request body
- Set Main Object as Order
- Set the name of the Inbound Call record
- Set the request body JSON: sample request body can be found here
- In the Call Actions tab map the JSON nodes according to the fields in the Order object
Here’s how it should look after it is done, note we are using another custom field on the Order Object to use it as an externalId.
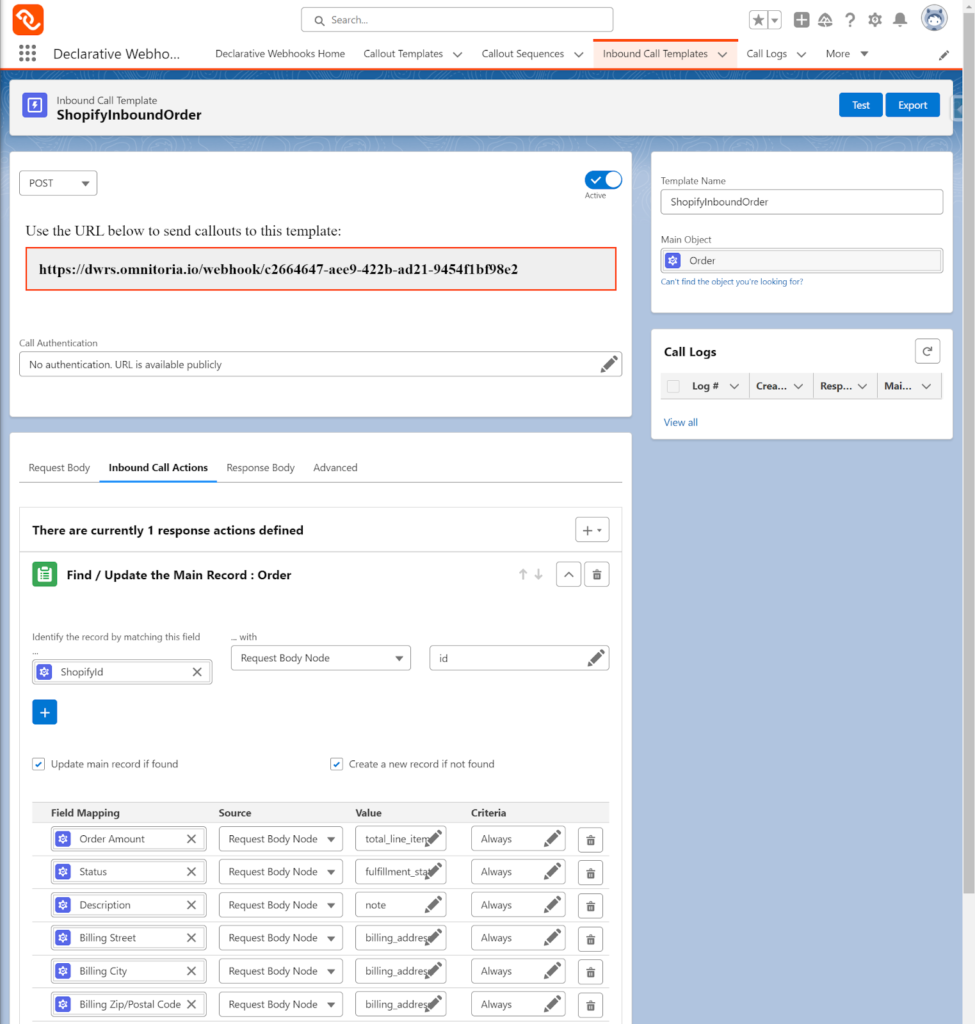
After you save the record copy the POST URL link and populate the Shopify Webhook address URL with this endpoint.
Remember to activate the inbound template and you are good to go!
Recap of Steps to Setup Shopify Integration with Salesforce
Creating a Custom App in Shopify: We started by creating a custom app in Shopify, which involved setting up the app’s parameters and generating API credentials. This app acts as a bridge for the data calls from Salesforce.
Configuring Outbound Declarative Webhooks in Salesforce: Using Declarative Webhooks and Salesforce Flow, we navigated through the process of creating a new outbound template. This template was designed to trigger the creation of a new contact in Salesforce, utilizing the features to format the JSON body correctly according to Shopify’s customer creation API.
Mapping Account Fields to JSON Body: In the template configuration, we mapped Salesforce contact fields (like Contact Name, Email, etc.) to the corresponding fields in the JSON structure required by Shopify. This mapping ensures that the data sent to Shopify is correctly formatted and useful.
Configuring Outbound Declarative Webhooks in Salesforce: Using Declarative Webhooks we process the incoming order data from Shopify via the webhook we configured, by subscribing to the order creation event, whenever a new order is created this data will be sent from Shopify to Salesforce and will be processed by Declarative Webhooks Inbound Call Template.
Authentication Using Shopify API Token: Authentication was handled by configuring the declarative webhook to use the API token provided by the Shopify app. This setup not only secures the data transfer but also ensures that both platforms authenticate and recognize each other.
Future Considerations
While the integration setup covered is for a simple scenario, in more complex business cases continuous monitoring and maintenance are essential to ensure the system adapts to any platform updates or changes in business processes.
Additionally, businesses may explore further automation possibilities, such as syncing order updates and inventory changes back to Salesforce, to fully leverage the capabilities of both platforms.
Thank you for following this quick guide.
If you want to learn more about Declarative Webhooks, please follow the links below:
More Integration Guides
© Omnitoria, All Rights Reserved.