Integrating Microsoft Teams and Salesforce with No Code Webhooks


Background on Microsoft Teams and Salesforce Integration
Microsoft Teams has become an essential collaboration tool for many organizations, allowing teams to communicate, meet, share files, and work together seamlessly.
Integrating Teams with Salesforce can unlock even more productivity by connecting your critical customer data with your team’s collaboration hub. With an integration in place, you can keep your teams updated on important Salesforce records, query Salesforce data directly from Teams, and even execute Salesforce flows from Teams.
There’s also a native app that Microsoft provides. The native integration allows users to access Salesforce records, such as accounts, opportunities, and cases, directly within Teams.
This means that users can view and update Salesforce data without leaving the Teams interface, saving time and reducing the need to switch between applications. However, the current integration has some constraints that may hinder its effectiveness for certain use cases.

One of the main limitations is the lack of advanced features and customization options. The integration provides basic functionality, such as viewing and updating records, but it may not support more complex workflows or custom objects specific to an organization’s Salesforce implementation.
This can be a significant drawback for companies that heavily rely on customized Salesforce setups and require seamless integration with their collaboration tools.
In this post, we’ll walk through how to set up a bidirectional integration between Salesforce and Microsoft Teams using the Declarative Webhooks app and Flow Builder. Our integration will consist of two parts:
- Outbound: Whenever a high-value Opportunity over $100,000 is closed won in Salesforce, automatically post a notification with key details to a Teams channel.
- Inbound: Allow users to send an email address to Declarative Webhooks, which will delete the associated contact record with the email address in Salesforce.
We’ll use Declarative Webhooks to handle the webhook connections, and Flow to process the data and trigger the workflows. No Apex code required!
Before diving in, if you’d like to see a demo of the finished product, here it is:
Benefits of Integrating Microsoft Teams with Salesforce
Integrating Microsoft Teams with Salesforce can provide several benefits to organizations, enhancing collaboration, productivity, and customer relationship management. Here are some key advantages of this integration:
- Streamlined communication: By integrating Teams with Salesforce, users can easily share Salesforce records, such as leads, contacts, and opportunities, directly within Teams conversations. This allows for seamless communication and collaboration around customer data without switching between applications.
- Improved data accessibility: Users can access relevant Salesforce data directly from Teams, reducing the need to navigate through multiple systems. This saves time and ensures that everyone has access to the most up-to-date customer information.
- Enhanced team collaboration: Teams provide a centralized platform for communication and collaboration. By integrating with Salesforce, teams can discuss and collaborate on sales opportunities, customer issues, and other CRM-related tasks within the context of their conversations.
- Increased productivity: The integration allows users to perform Salesforce actions directly from Teams, such as updating records, creating tasks, or viewing customer insights. This eliminates the need to switch between applications, reducing context switching and increasing overall productivity.
- Customized notifications: Users can set up customized notifications in Teams based on specific events or changes in Salesforce, such as when a new lead is assigned or a deal is closed. This ensures that team members stay informed and can take timely actions.
- Improved customer service: By having access to customer data within Teams, support teams can quickly respond to inquiries and resolve issues more efficiently. The integration enables them to have the necessary context and information at their fingertips.
- Seamless meeting management: The integration allows users to schedule and join meetings directly from Salesforce records, making it easier to coordinate customer-facing meetings and internal discussions related to specific deals or accounts.
- Enhanced reporting and analytics: Teams can be used to share and discuss Salesforce reports and dashboards, enabling teams to make data-driven decisions and collaborate on sales strategies and customer insights.
- Customization and extensibility: The Teams-Salesforce integration can be customized and extended using APIs and custom apps, allowing organizations to tailor the integration to their specific needs and workflows.
Overall, integrating Microsoft Teams with Salesforce can significantly improve communication, collaboration, and productivity across sales, customer service, and other teams, ultimately leading to better customer relationships and business outcomes.
Before we dive in, make sure you’ve installed the Declarative Webhooks app in your Salesforce org. Choose to install for System Administrators only. Also ensure you have a Teams environment with permission to add custom webhooks and bots.
Microsoft Teams Setup
Sign Up for Microsoft Teams
1. Go to the MS Teams website and click the “Sign up for free” button.
2. Sign in with your existing Microsoft account or create a new one.
3. Fill in the required information, such as your company name and size.
4. Choose a domain name for your Teams organization (e.g., yourcompany.onmicrosoft.com).
5. Verify your email address and complete the sign-up process.
Create a User Group
1. Go to the admin center.
2. Navigate to “Groups” and click on “Add a group”.
3. Choose “Microsoft 365” as the group type and click “Next”.
4. Enter a name and description for the group, then click “Next”.
5. Add users to the group by typing their names or email addresses, then click “Next”.
6. Review the group settings and click “Create group”.
Add Users to Microsoft Teams
1. Go to the admin center.
2. Click on “Users” in the left-hand menu.
3. Click on “Add user” and enter the user’s information, such as name and email address.
4. Assign the user a license that includes Microsoft Teams.
5. Click “Add” to create the user account.
Create a Team
1. Open the Microsoft Teams app and sign in with your admin account.
2. Click on “Join or create a team” at the bottom of the left-hand menu.
3. Click on “Create a team” and choose “Build a team from scratch”.
4. Select the team type (e.g., “Private” or “Public”) and click “Next”.
5. Enter a name and description for the team, then click “Create”.
Add Users to the Team
1. In the Microsoft Teams app, navigate to the team you just created.
2. Click on the “…” next to the team name and select “Manage team”.
3. Click on the “Members” tab and then click “Add member”.
4. Type the names or email addresses of the users you want to add, then click “Add”.
Assign Team Owner
1. In the “Manage team” menu, click on the “Members” tab.
2. Find the user you want to make an owner and click on the “…” next to their name.
3. Select “Make owner” from the dropdown menu.
If you are lucky, your Microsoft Teams environment is now set up.
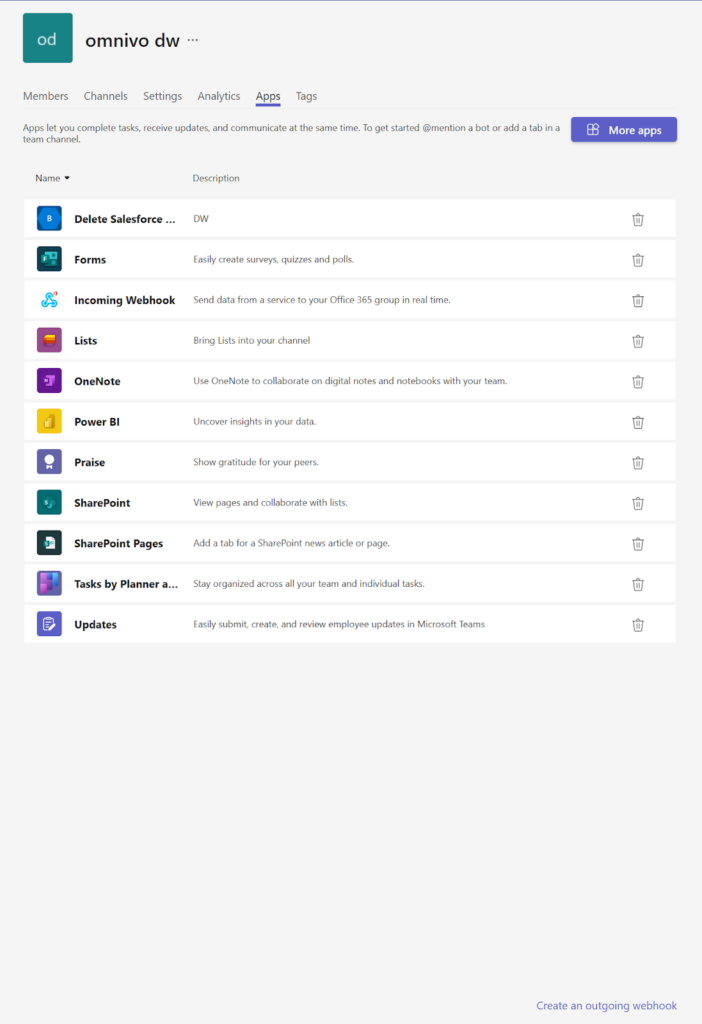
Next, we need to install apps in our team’s environment for enabling inbound and outgoing webhooks (terminology is the same as inbound templates and outbound templates).
Setting Up Inbound Webhooks for Microsoft Teams Channel
First, navigate to the Teams channel where you want the webhook to post messages. You’ll need to have the appropriate permissions to add connectors in this channel.
Next to the channel name at the top, click the “…” ellipsis menu icon to open the channel options menu. From the dropdown, select the “Connectors” option. This will open the Connectors page showing all available connectors for this channel.
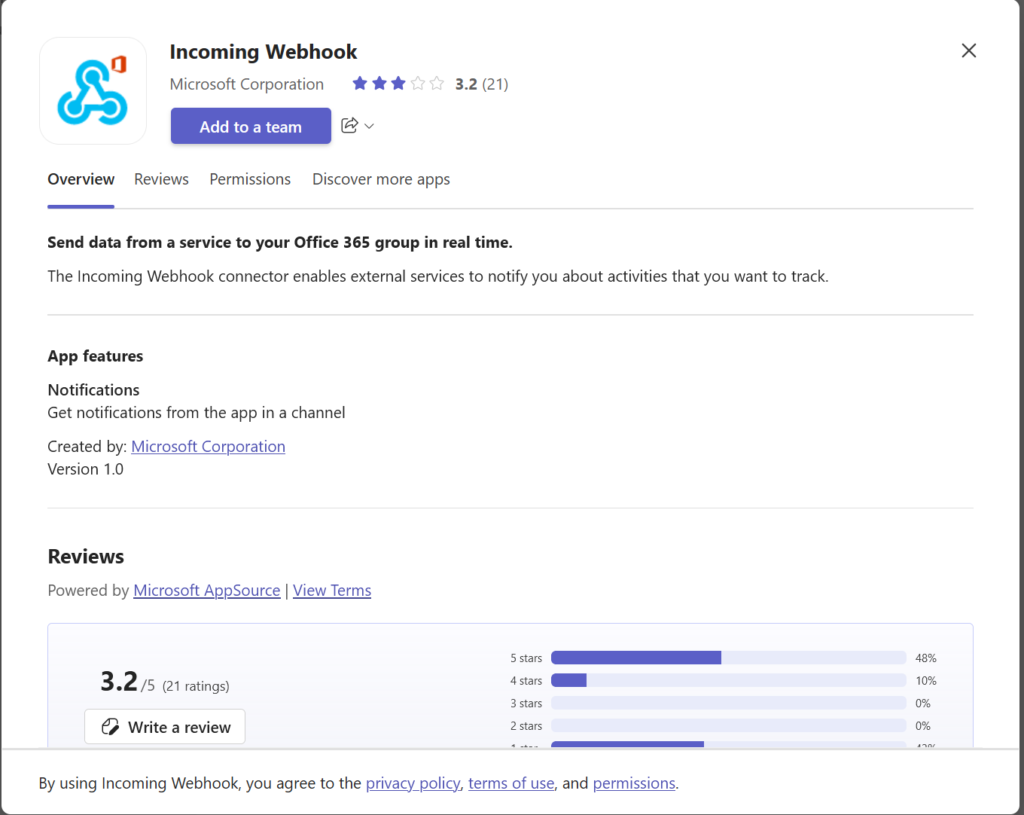
In the search box on the Connectors page, type “incoming webhook” to find that specific connector. The Incoming Webhook connector should appear in the results. Click the “Add” button on the Incoming Webhook connector card.
A configuration dialog for the new incoming webhook will open. Here you need to provide a few details:
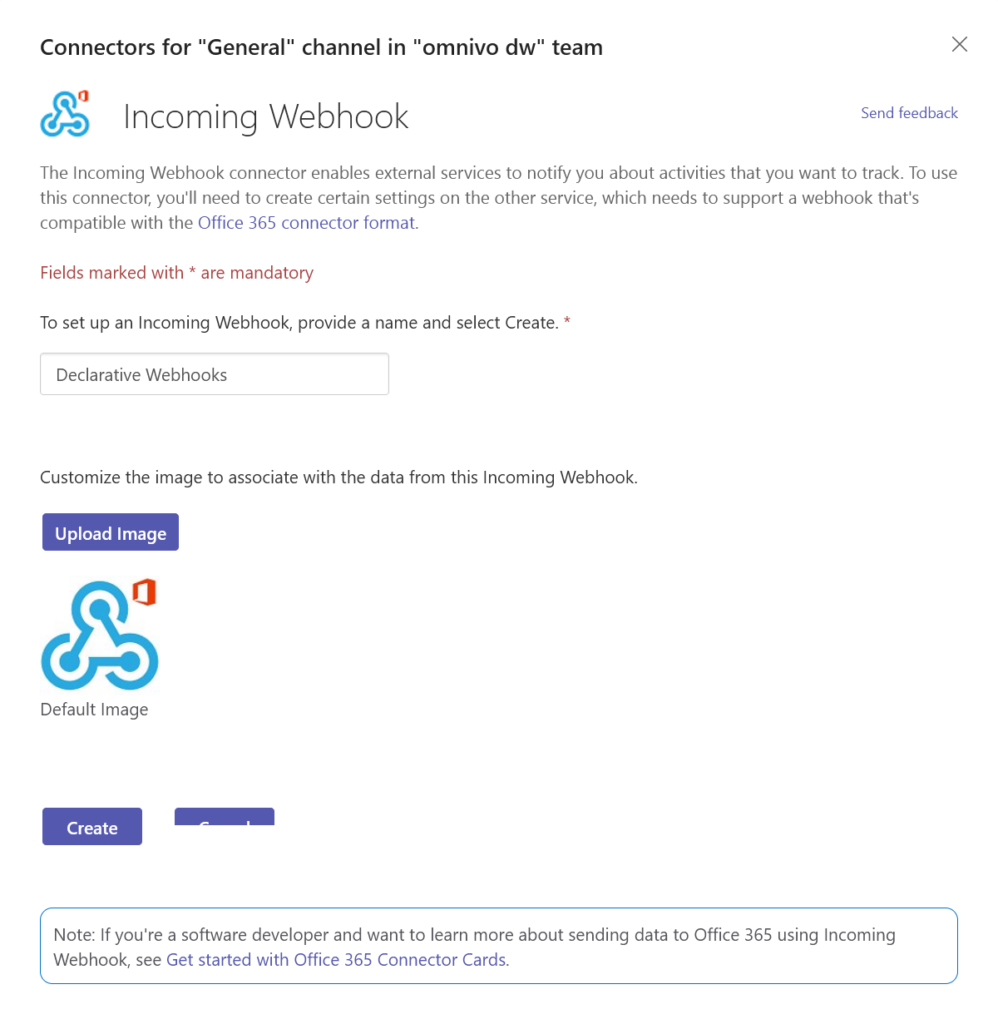
Name: Enter a name for your webhook that describes its purpose, e.g. “Declarative Webhooks Opportunity Alerts”
Icon (optional): You can upload a custom icon for the webhook that will appear with its posts
After providing a name and icon, click the “Create” button at the bottom.
After creating the webhook, Microsoft Teams will generate a unique URL for it. This is the endpoint URL that external services can send JSON payloads to in order to post messages via the webhook into your Teams channel.
Make sure to copy this URL and store it securely, as anyone with this URL can potentially post to your channel. Do not share it publicly.
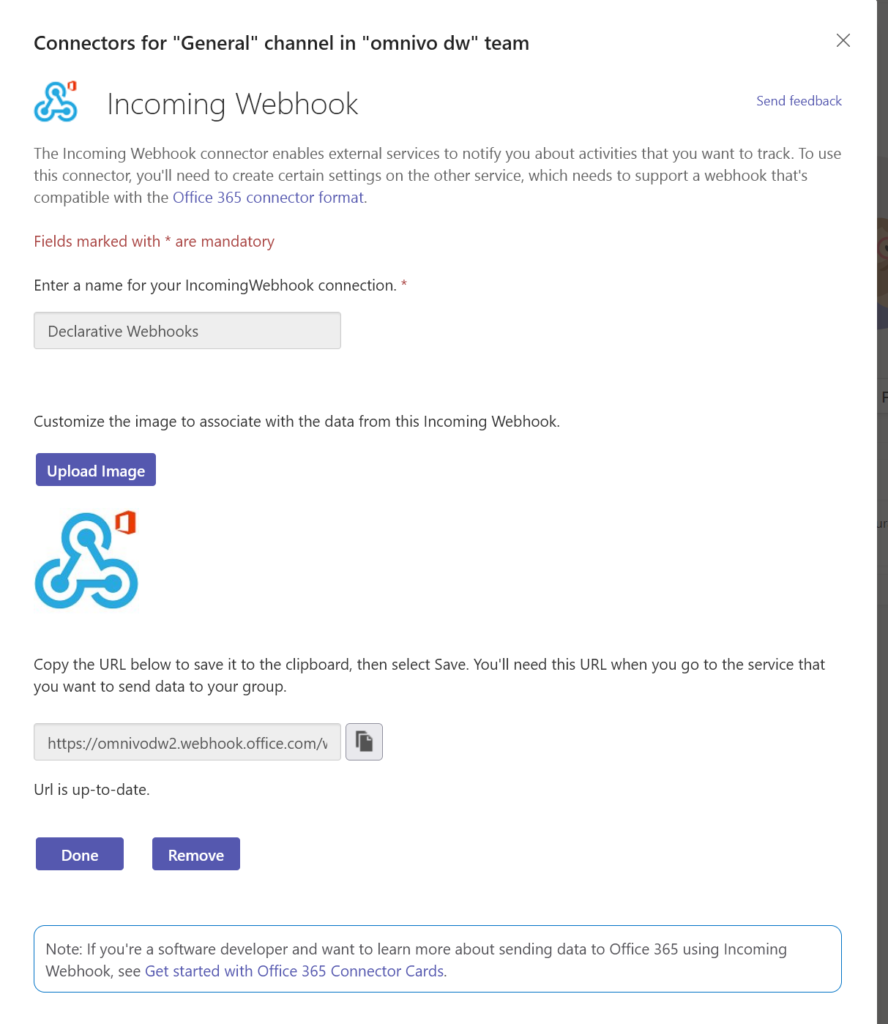
You’re all set! The incoming webhook is now enabled and ready to use. Provide the unique URL you copied to any external application or service you want to allow posting messages to this Teams channel. The external application needs to make an HTTP POST request to the webhook URL, passing a JSON object in the request body that defines the message to post. A simple example payload:
{
“text”: “Hello world from an incoming Teams webhook!”
}
The message will appear in the Teams channel as coming from the name and icon you configured on the webhook. In our example we will use an Adaptive Card that has a more complex JSON body.
You can repeat this process to create multiple incoming webhooks in different channels or teams. Each will get its own unique URL to post to.
Some key points to keep in mind:
Incoming webhook URLs are sensitive, as they allow posting to your channel. Treat them like passwords and do not commit them to public source control or share them in public forums.
You can disable or delete an incoming webhook at any time by going back to the Connectors page for the channel and removing the Incoming Webhook connector.
There are additional options you can use in the JSON payload to format your message, like markdown text, images, action buttons, and more. Refer to the Teams developer documentation for full details.
Incoming webhooks are a simple but powerful way to post notifications and messages from external systems into Microsoft Teams channels, helping keep your team informed and engaged. They serve as the foundation for many useful integrations and automated workflows with Teams.
Post to Microsoft Teams When a Salesforce Opportunity is Closed Won
First let’s set up the outbound integration to automatically notify a Teams channel whenever a high-value opportunity in Salesforce is over $100,000 and status is updated with closed won status.
Now hop over to Salesforce to set up the outbound template in Declarative Webhooks. This template will define the webhook endpoint and payload.
In Salesforce Setup, navigate to the Declarative Webhooks app and click into the “Outbound Templates” tab.
Click the “New Template” button to start configuring a new outbound webhook.
After giving it a name, In the Webhook URL field, paste in the Microsoft Teams webhook URL you copied in Step 1.
Set the Call Method to “POST”, since we’ll be posting data to Teams.
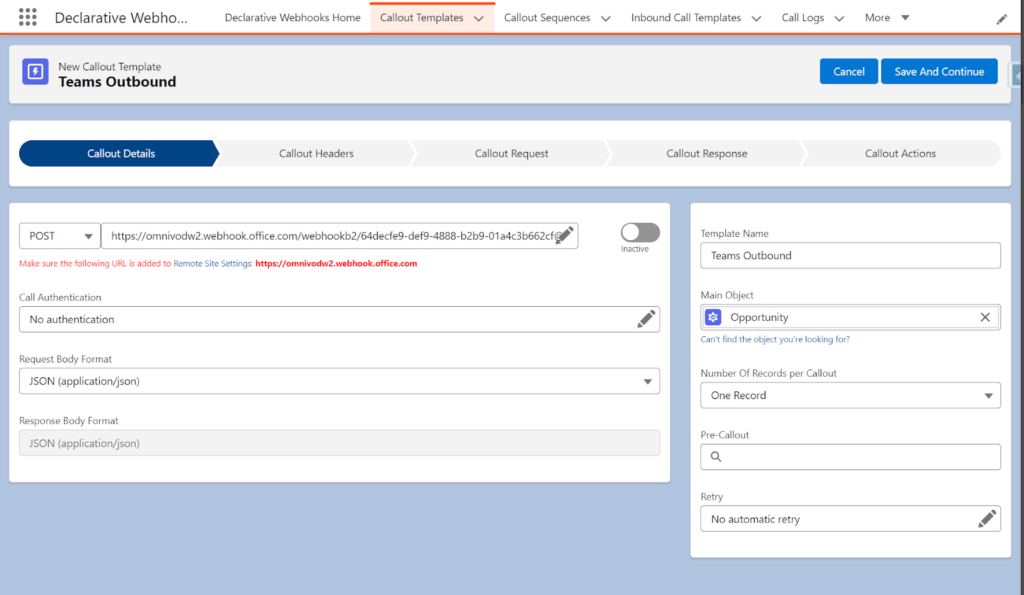
Pick the Main Object as Opportunity, since we will use the Opportunity’s amount field for this automation.
You can find a sample payload for the structure of the webhook here. Now the key part – constructing our payload.
In the Payload section, click the pencil edit button to open the Payload Builder. Here we’ll define the message card we want to send to Teams. Enter the following JSON, which defines an Adaptive Card in MSTeams.
After mapping this payload we will use Declarative Webhooks formula builder, which will generate the payload message as follows.
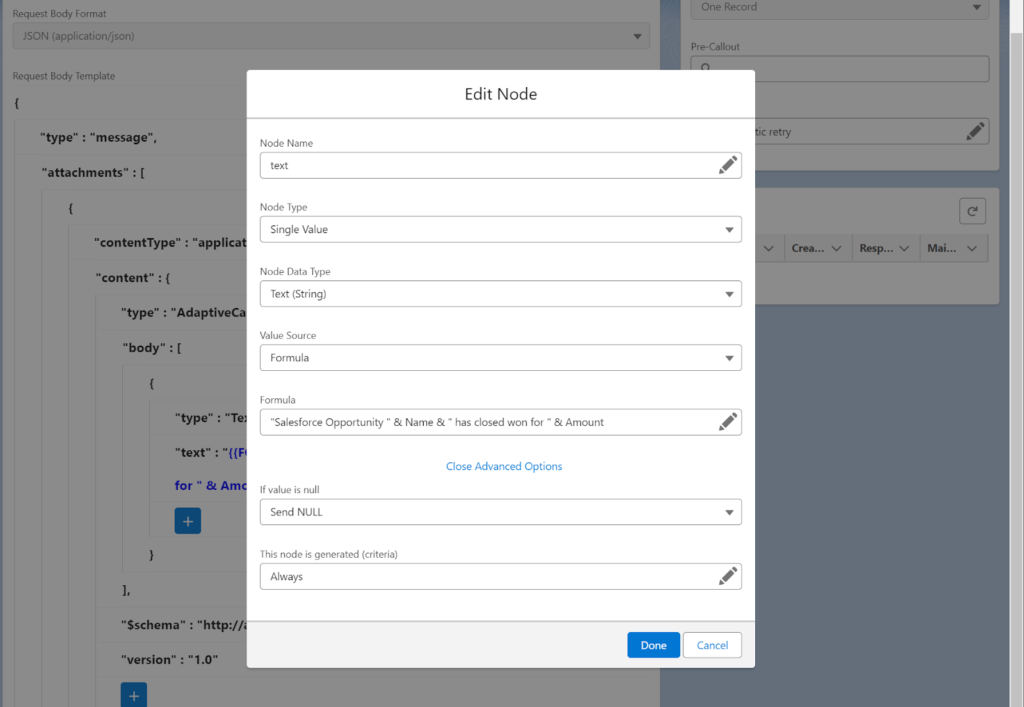
The final JSON template should look like this:

Skip the response section since we do not need it for this scenario. After saving the template remember to check your remote site settings and add the Teams Webhook URL generated to the remote sites.
We are now set on the Declarative Webhooks configuration. The next step is building a flow that will use our template whenever an Opportunity is closed won over a certain amount in just a few clicks.
Salesforce Flow Setup to Trigger Our Webhook
The last step is setting up automation in Salesforce to trigger our webhook at the right time, i.e. when a big opportunity is won. We’ll use Flow to define this.
In Salesforce Setup, navigate to the Flows section and click “New Flow”.
Select the “Record-Triggered Flow” type, choose Opportunity as the object, and set it to trigger whenever a record is updated or created.
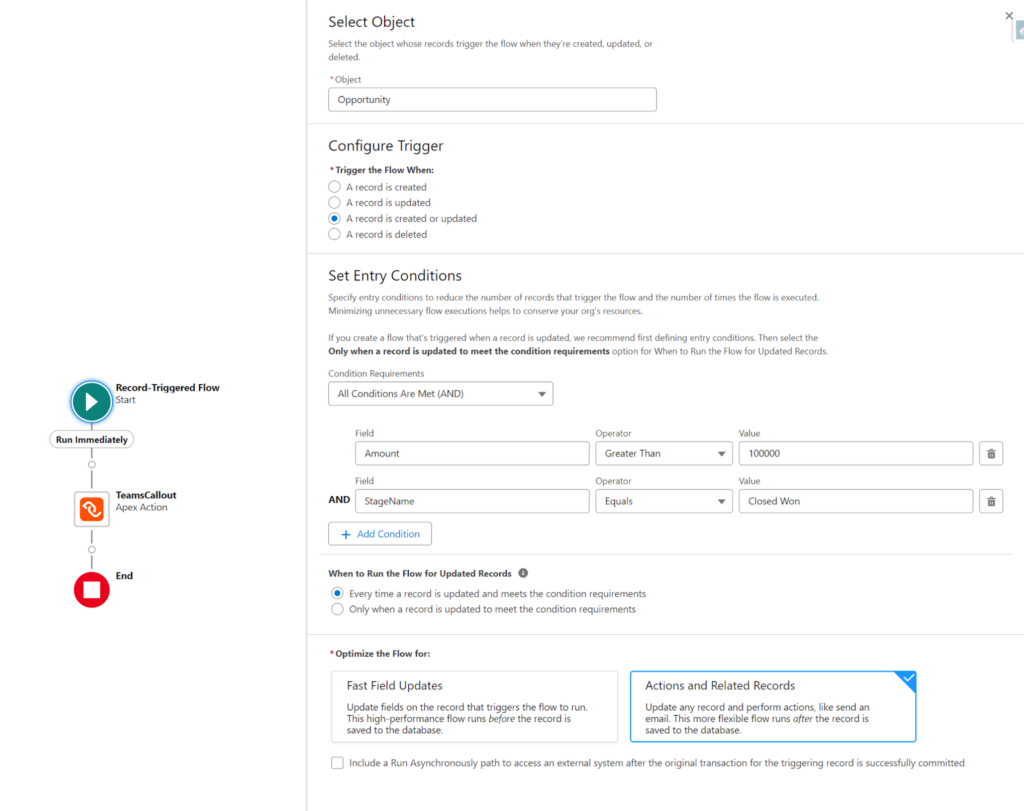
We will also set some Entry Conditions:
The new value of StageName is equal to “Closed Won”, AND
The Amount field is greater than 100,000
This condition will evaluate to true only when a big opportunity over our $100K threshold moves to a closed won state.
If the condition is met, we want to fire our webhook. So add an Action element to the “If True” branch.
For the action type, select “Declarative Webhook” and then choose the template we just created earlier.
For the input value, pass in the Opportunity record ID field so Declarative Webhooks knows which record to pull data from.

Give your flow a name like “Notify Teams on Big Opportunity Win” and save it.
That’s it! Activate your flow – now whenever a new Opportunity is closed with the amount we have set earlier a Teams message will be sent to the relevant channel.

With Declarative Webhooks the possibilities are as much as the technical depth of platforms allows, offering a lot of functionality and use cases for you and your business.
Inbound Integration from Microsoft Teams to Salesforce
With the outbound integration use case from Salesforce to Microsoft Team, we’ll now be covering the reverse direction inbound from Microsoft Teams to Salesforce. In this example, we will query and perform operations inside Salesforce directly from Microsoft Teams without ever leaving the application!

Microsoft Teams Automation Features
Microsoft Teams offers a range of workflow and integration features that enable organizations to automate processes, connect with external systems, and extend the functionality of the platform. Let’s explore some of these features:
Workflows
Power Automate: Teams integrates with Power Automate (formerly known as Microsoft Flow), allowing users to create and automate workflows directly within Teams. These workflows can be triggered by various events, such as a new message in a channel or a specific keyword mentioned in a conversation.
Approvals: Teams provides a built-in approval workflow feature, enabling users to create, manage, and track approval processes. This feature allows team members to submit requests, assign approvers, and receive notifications when approvals are completed.
Webhooks
Incoming Webhooks: Teams supports incoming webhooks, which allow external systems to send messages and notifications directly into Teams channels. This enables integration with various third-party services, such as monitoring tools, project management systems, or custom applications.
Outgoing Webhooks: Teams also supports outgoing webhooks, which allow Teams to send messages and data to external systems based on specific triggers or events. This enables Teams to interact with other services and automate actions based on conversations or user interactions.
Bots and Messaging Extensions
Bots: Teams allows the integration of bots, which are automated programs that can interact with users, answer questions, and perform tasks. Bots can be built using the Microsoft Bot Framework and can be customized to fit specific business needs.
Messaging Extensions: Messaging extensions enable users to search and share external content directly within Teams conversations. This allows seamless integration with other systems, such as CRM platforms, document management systems, or knowledge bases.
Connectors
Teams provides a variety of built-in connectors that allow integration with popular third-party services, such as GitHub, Trello, Jira, or Twitter. These connectors enable real-time updates, notifications, and data synchronization between Teams and the connected services.
Custom connectors can also be developed to integrate Teams with specific line-of-business applications or internal systems.
Graph API and SDK
Microsoft Graph API: Teams integrates with the Microsoft Graph API, which provides a unified endpoint for accessing data and functionality across various Microsoft 365 services. This allows developers to build custom integrations and workflows that interact with Teams and other Microsoft applications.
Teams SDK: The Teams Software Development Kit (SDK) enables developers to build custom apps, bots, and extensions for Teams. It provides a set of APIs and tools to create rich and interactive experiences within the Teams platform.
Third-Party Integrations
Teams has a growing ecosystem of third-party integrations and apps available in the Teams App Store. These integrations cover a wide range of categories, such as project management, customer support, analytics, and more.
Organizations can also develop custom integrations using the Teams developer platform to meet their specific requirements.
Automating Salesforce Contact Deletion via Microsoft Teams
Here’s a high-level overview of what we’ll be building:
In Microsoft Teams, a user will send a message in a channel in the format, for example: “@Delete Salesforce DW jdoe@example.com”
“@Delete Salesforce DW” is the name of the automation that triggers our outgoing webhook in Teams
The email after the webhook name is the email of the Salesforce contact to delete.
Teams will send this message payload via an outgoing webhook to an inbound template we’ll configure in Declarative Webhooks in Salesforce.
The inbound template in Declarative Webhooks will parse the Teams message and pass the email address to a Salesforce Flow.
Let’s dive into the detailed steps and by the end you will be able to integrate with the Salesforce and Microsoft teams in a few clicks!
Outgoing Webhook in Microsoft Teams
First, we need to set up the outgoing webhook in Teams that will send the message to Salesforce.
In Teams, navigate to the App Studio and create a new webhook.
Name it “Delete Salesforce DW” – this is the name users will include in their message to trigger the webhook.
Set the endpoint URL to the inbound template URL we’ll generate in Declarative Webhooks (we’ll come back to this).
Save the webhook.

Inbound Template in Declarative Webhooks
Next, let’s create the inbound template in Declarative Webhooks to receive the message from Teams.
In Salesforce, navigate to the Declarative Webhooks app and go to the Inbound Templates tab.
Click New to create a new inbound template.
Name the template “TeamsMessageDeleteInbound1”.
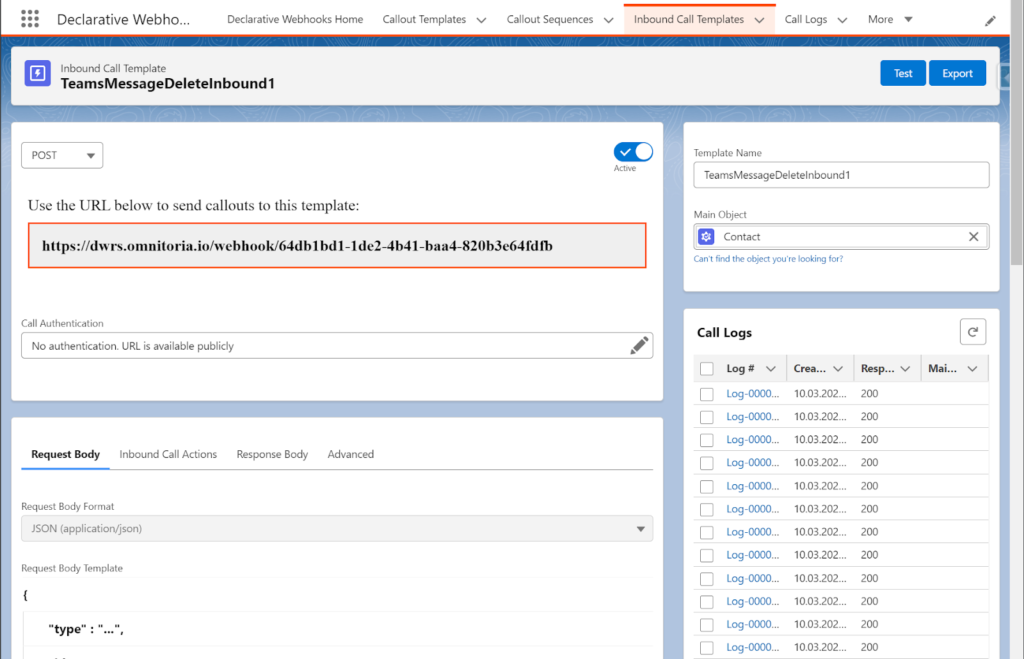
For Authentication Type, choose “No Authentication” (the Teams webhook will be pre-authorized and we are not authenticating with Salesforce in this example).
Under Payload Handling, select Payload Type “JSON” and choose the Apex class “MS Teams Webhook” to parse the Teams message payload.
In the Salesforce Actions section, add an action to Launch Flow and select the flow “Delete Contacts DW” (we’ll create this next).
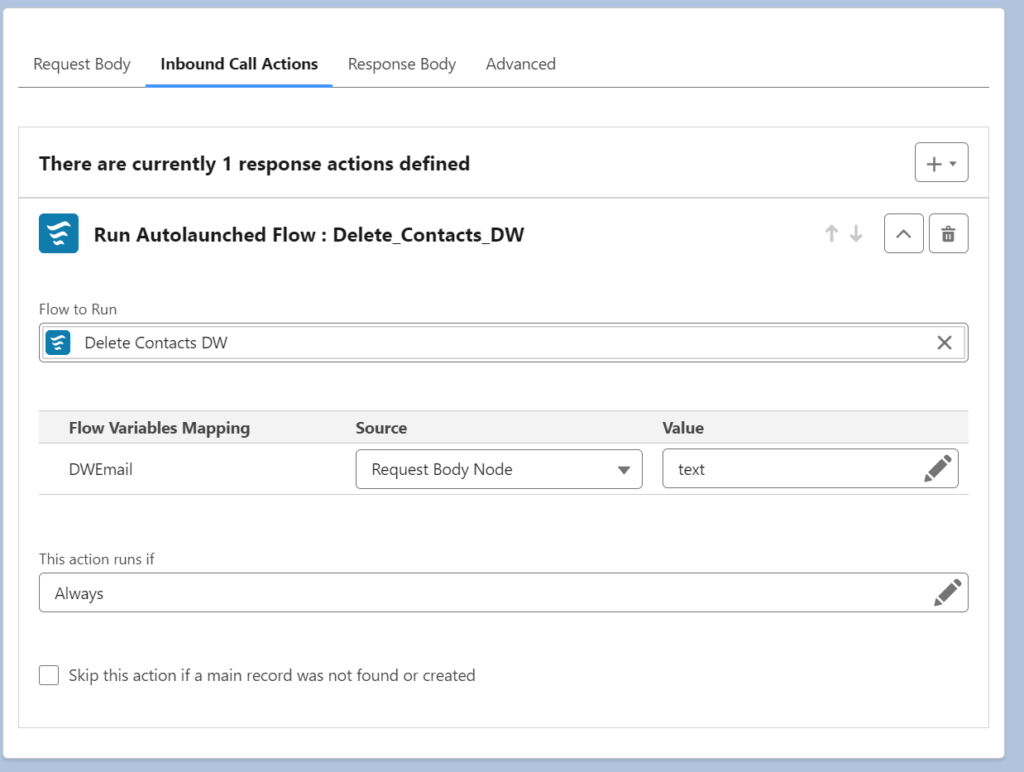
Map the text request body node to the DWEmail flow variable.
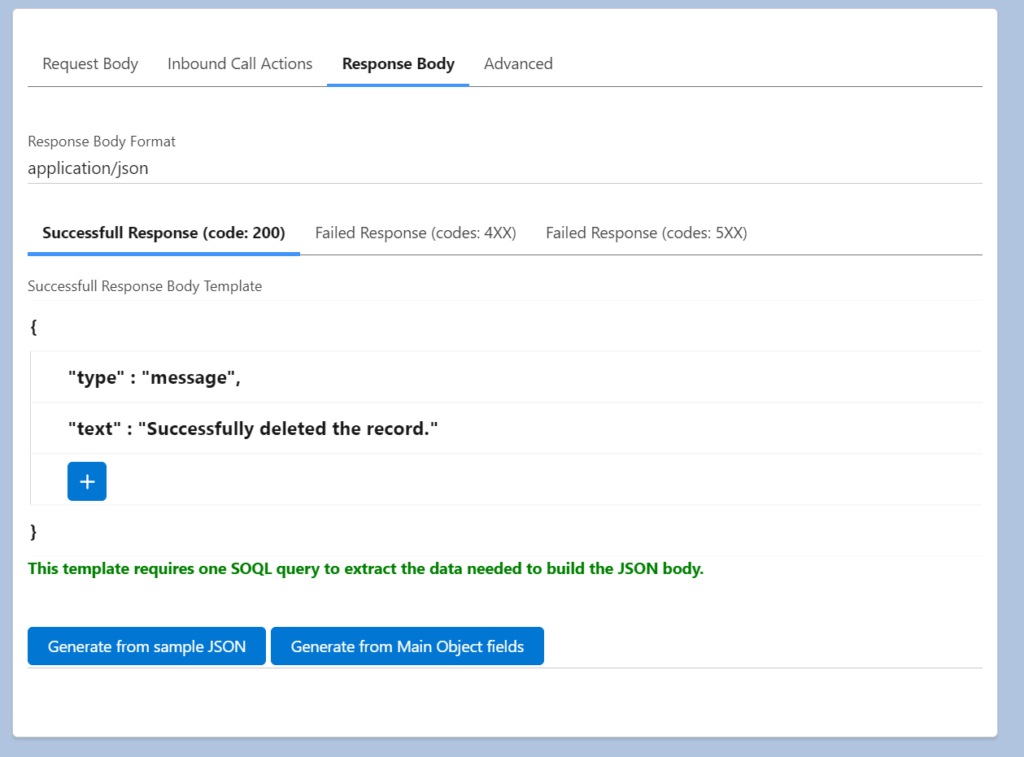
In the Response Body tab, create this mapping for successful response.
Save the template. Copy the generated inbound URL – we’ll use this in the Teams webhook.
Delete Contacts Salesforce Flow Setup with Declarative Webhooks
Now let’s create the flow that will actually process the request and delete the contact.
In Salesforce Setup, navigate to Flows and create a new flow named “Delete Contacts DW”.
Create a new Text variable called DWEmail – this will hold the email address passed from the inbound template.
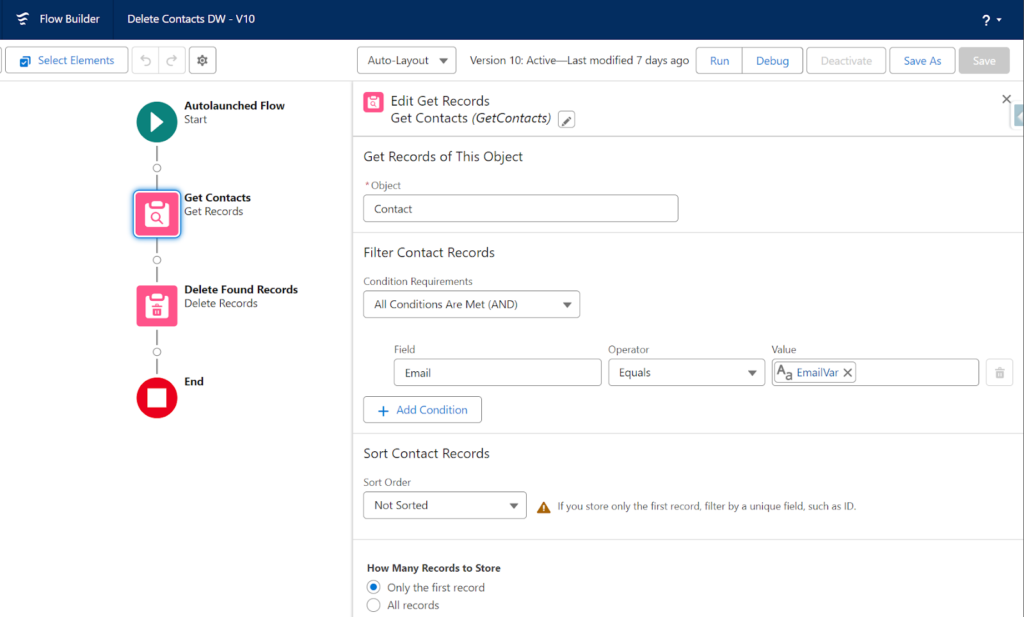
Create a Formula resource to extract just the email portion from the DWEmail variable, as the full Teams message will be in the format “<at>Delete Salesforce DW</at> email@domain.com”.
Set the Formula to: MID({!DWEmail}, 31, LEN({!DWEmail}))

This starts at character 31 (after the webhook name and space) and takes the rest of the string.
Store the result in a Text variable called EmailVar.
Add a Get Records element to find the contact:
- Object: Contact
- Filter Condition: Email equals {!EmailVar}
- Store the results in a variable called GetContact.
Add a Decision element to check if a contact was found:
- Outcome Conditions: {!GetContact} Is Null (true if no contact found)
If a contact was found, add a Delete Records element:
- Set the Record Collection to Delete to {!GetContact}
Save and Activate the flow.
Update and Test the Integration
Go back to the outgoing webhook in Microsoft Teams and update the endpoint URL to the Inbound Template URL from Declarative Webhooks that you copied earlier.
In Teams, in the channel where you added the outgoing webhook, type a message in the format “@Delete Salesforce DW contactemail@example.com”, replacing the email with one of an actual contact in your Salesforce org.
The message should trigger the outgoing webhook, which will call the inbound template in Salesforce, launching the flow.
Check in Salesforce – the contact with the email you specified should have been deleted!
With Declarative Webhooks the possibilities are as much as the technical depth of platforms allows, offering a lot of functionality and use cases for you and your business.
I hope you enjoyed this guide and I will see you in the next post!
Thank you for following this quick guide.
If you want to learn more about Declarative Webhooks, please follow the links below:


More Integration Guides
© Omnitoria, All Rights Reserved.