Salesforce Zoom Integration for Webinar Campaign Management

Zoom is an essential tool for webinars and virtual events, providing a platform for organizations to engage with their audience, regardless of physical location. In this digital age, the importance of smooth integration between our communication tools and customer relationship management (CRM) systems has never been more acute.
Salesforce, the world’s leading CRM platform, is key to managing customer interactions, sales, and marketing for countless organizations. This is where the integration of Zoom and Salesforce becomes a powerful combination, particularly when using a tool known as Declarative Webhooks.
In this blog post, we will explore how Declarative Webhooks can facilitate the seamless integration of Zoom and Salesforce, specifically focusing on automating the addition of webinar sign-ups as campaign members in Salesforce. We’ll delve into the capabilities of Declarative Webhooks, describe a business use case for the integration, and provide a comprehensive guide on setting it up efficiently.
Before we dive into the intricacies of integrating Zoom with Salesforce, let’s take a look at what we’ll be building:
Declarative Webhooks: A Bridge Integrating Zoom and Salesforce
Declarative Webhooks is a tool that allows for easy integration between Salesforce and external systems like Zoom without the need for custom code. This tool enables Salesforce administrators to set up webhook callouts that trigger on Salesforce events, which makes it perfect for creating real-time, event-driven integrations. By leveraging Declarative Webhooks, organizations can automate processes that would otherwise require manual data entry or complex development.
Business Use Case: Automating Salesforce Campaign Member Creation from Zoom Webinars
Imagine a scenario where an organization hosts webinars using Zoom to educate potential customers about new products or services. Each time someone signs up for a webinar, their information is crucial for the sales and marketing team to nurture leads and track engagement.
Traditionally, this information would have to be manually entered into Salesforce, or a complex integration would be required. This is time-consuming and prone to human error.
With Declarative Webhooks, we can automate this process. When a participant registers for a Zoom webinar, their information is instantly captured and a new campaign member record is created in Salesforce, linked to the specific campaign for the webinar. This not only saves time but also ensures data accuracy and provides real-time insights to the sales team.
We are assuming a contact or lead already exists in Salesforce similar to our previous examples integrating MailChimp and Salesforce, we will add this record as a campaign member to its specific campaign in Salesforce using the information sent from Zoom by using only a few clicks.
There will be a section about code for webhook validation for this example since it’s required by Zoom but don’t worry, we got you covered. Let’s begin!
How to Integrate Zoom and Salesforce
Here’s how the integration works:
A prospective customer signs up for a webinar on Zoom.
The registration triggers a webhook that sends the participant’s data to Salesforce.
Salesforce receives this data and, using Declarative Webhooks automatically creates or updates a campaign member record associated with the webinar campaign.
The sales and marketing teams immediately see the new lead within Salesforce and can begin their follow-up process.
Setting Up the Integration between Zoom and Salesforce
The setup process involves creating a webhook in Zoom that points to a listener URL generated by Declarative Webhooks in Salesforce. Here’s a step-by-step on how to integrate Zoom registrations with Salesforce campaign members:
Setting Up the Integration (continued)
Define the Zoom Webhook
Log in to your Zoom account and navigate to the Zoom Marketplace.
Search for the Salesforce app and install it or, if you prefer to work with webhooks, go to “My Apps” and select “Webhook Only”.

Click “Create” to set up a new webhook and define the event types that will trigger the webhook. In our case, we would choose the event type corresponding to a new webinar registration.
As the first step, fill out the necessary information on this screen and go to the feature tab.

In the feature tab, save your secret token as we will use this later to validate the webhook payload.
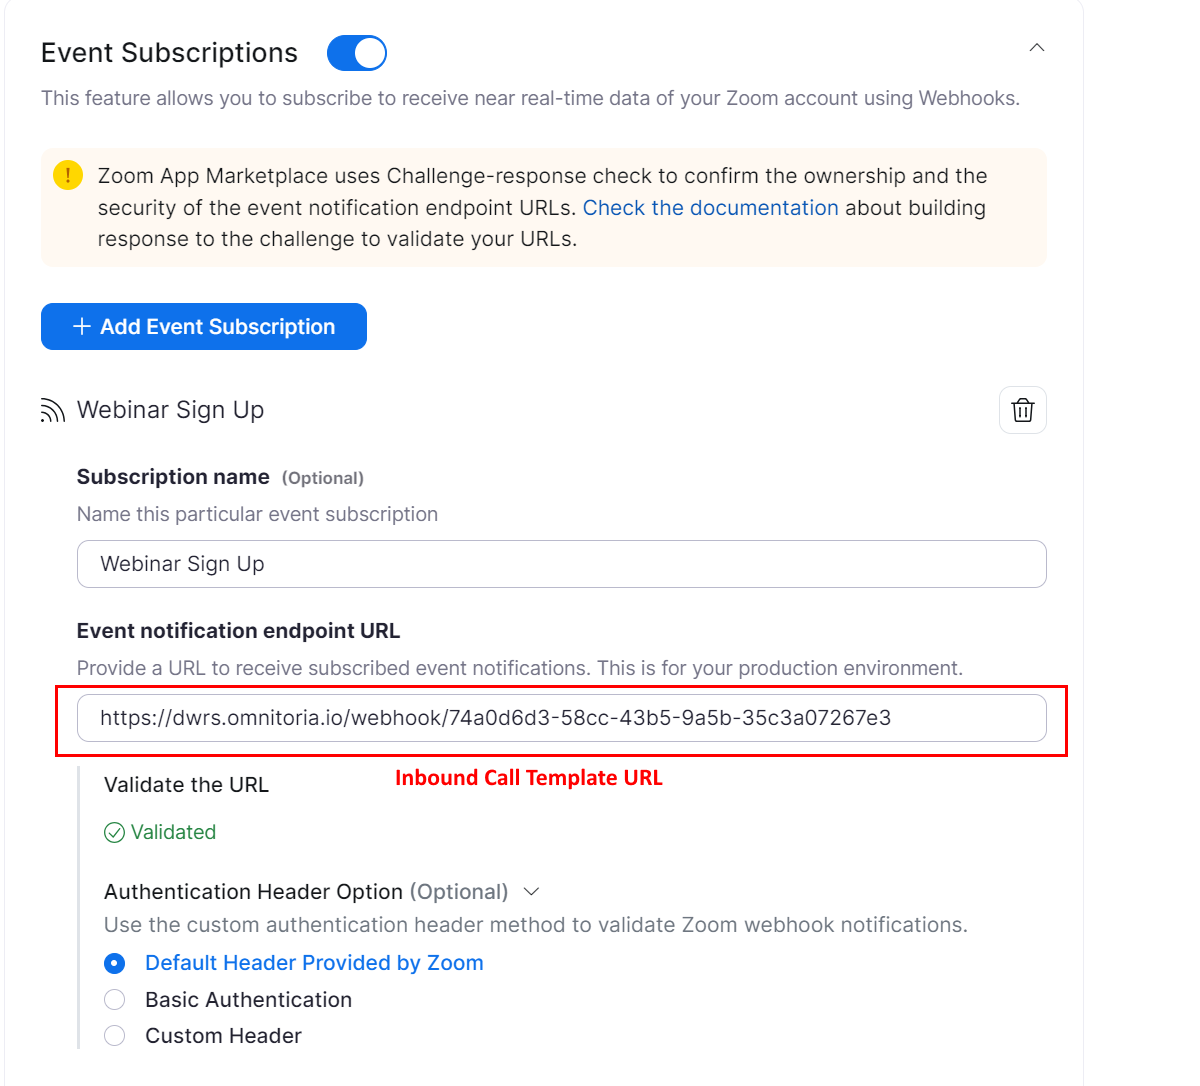
Turn on the event subscriptions and choose the event types for webinars, this event will fire the webhook payload whenever a webinar registration has been created on the Zoom side.

Save your changes and you should see this screen after you create an inbound template and validate it.
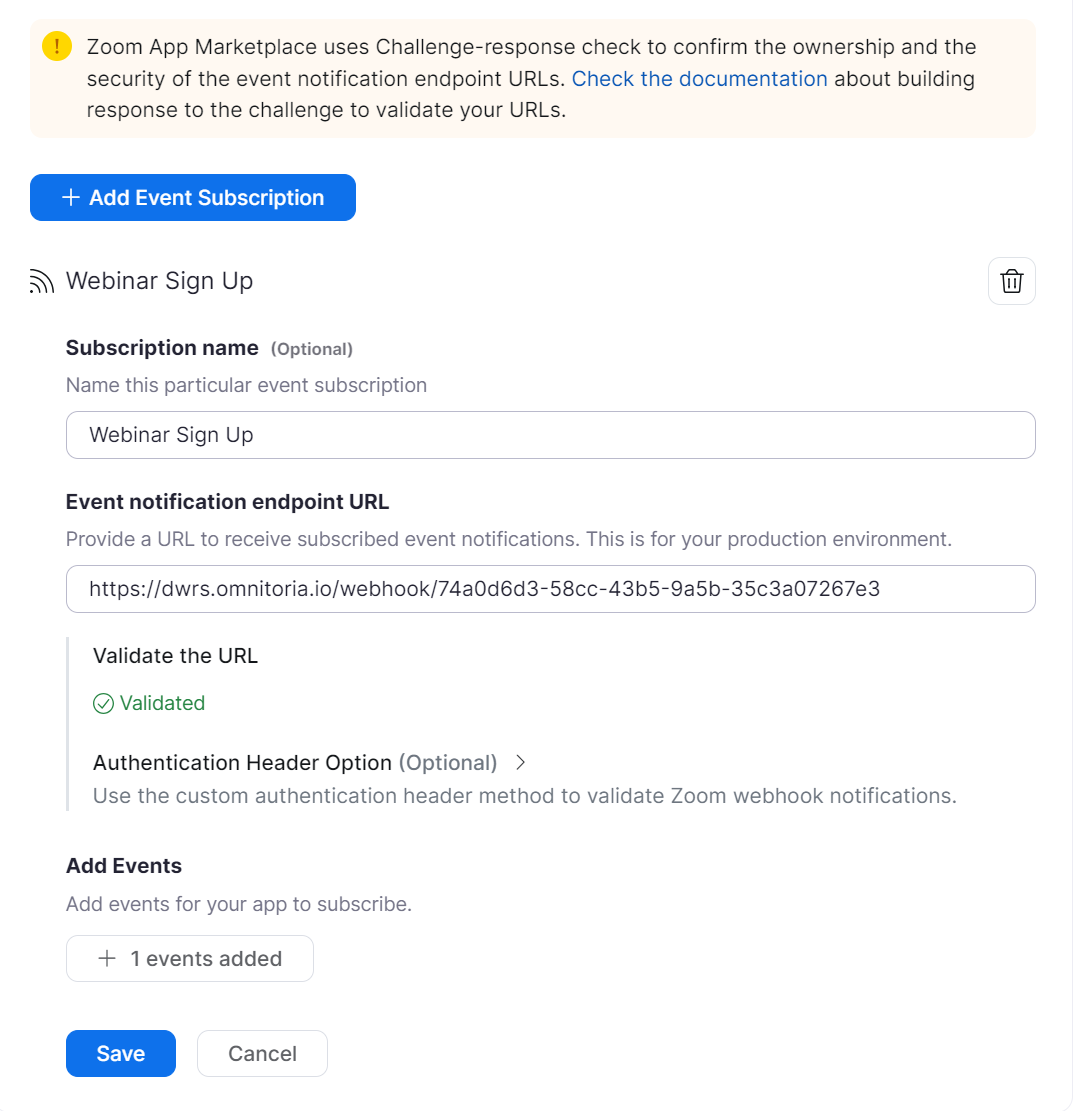
To receive the payload from Zoom, we need to create an Inbound Template in Declarative Webhooks which will provide the URL for this field. We will set up the template and map the template fields in the next sections.
Configure the Inbound Call Template in Salesforce
In Salesforce, before we validate our webhook on Zoom we will need to create a custom label for the secret token Zoom provides.
Go to the Setup > Custom Labels

After creating our label that will be used for validation by an Apex Class we can create the Inbound Template.
Open the Declarative Webhooks app from the App Launcher and create a new webhook endpoint that will listen for incoming data from Zoom. After you save the empty template a URL field will appear in the record page.
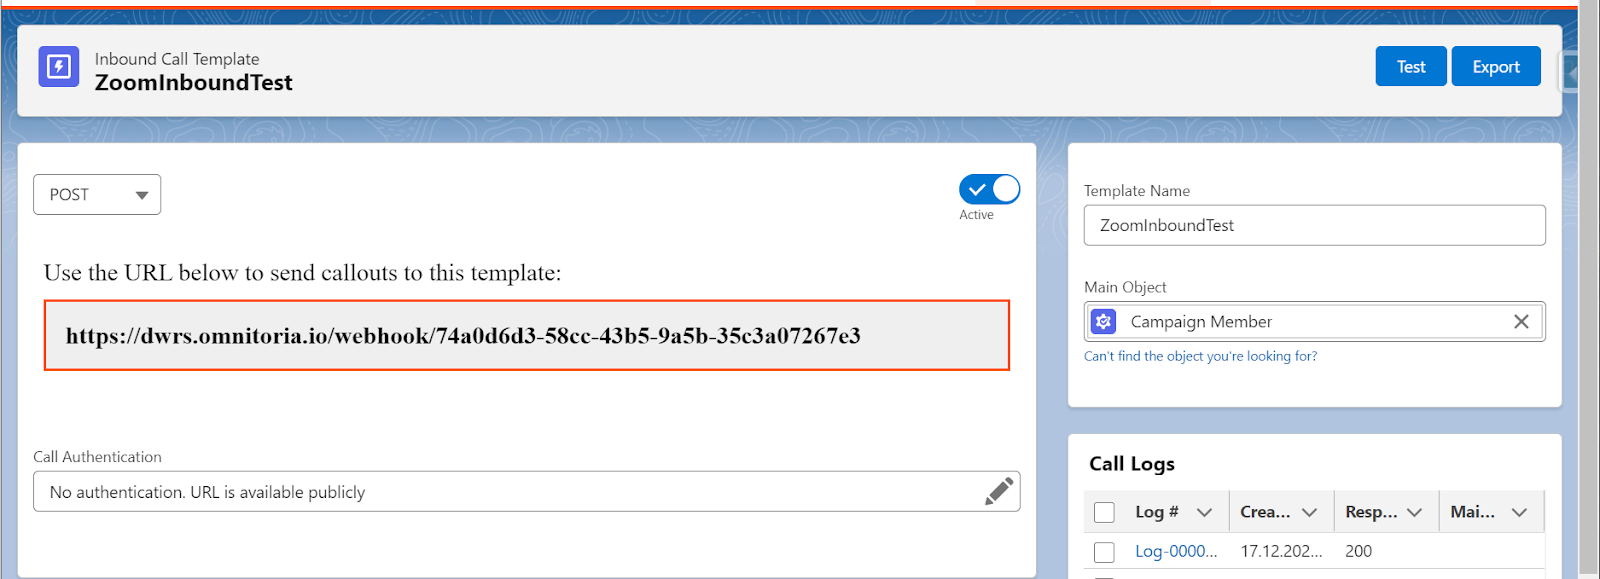
Define the Salesforce object that will be used, the CampaignMember object.
Zoom requires validation for using its webhooks, luckily Declarative Webhooks allow webhook validation whether it needs to be done by code or a header token challenge.
For our use case, we’re going to use an Apex Class to verify the webhook. Go to the Advanced tab in the inbound callout record page and enter this value for the validation condition: NODE:”event” = “endpoint.url_validation”
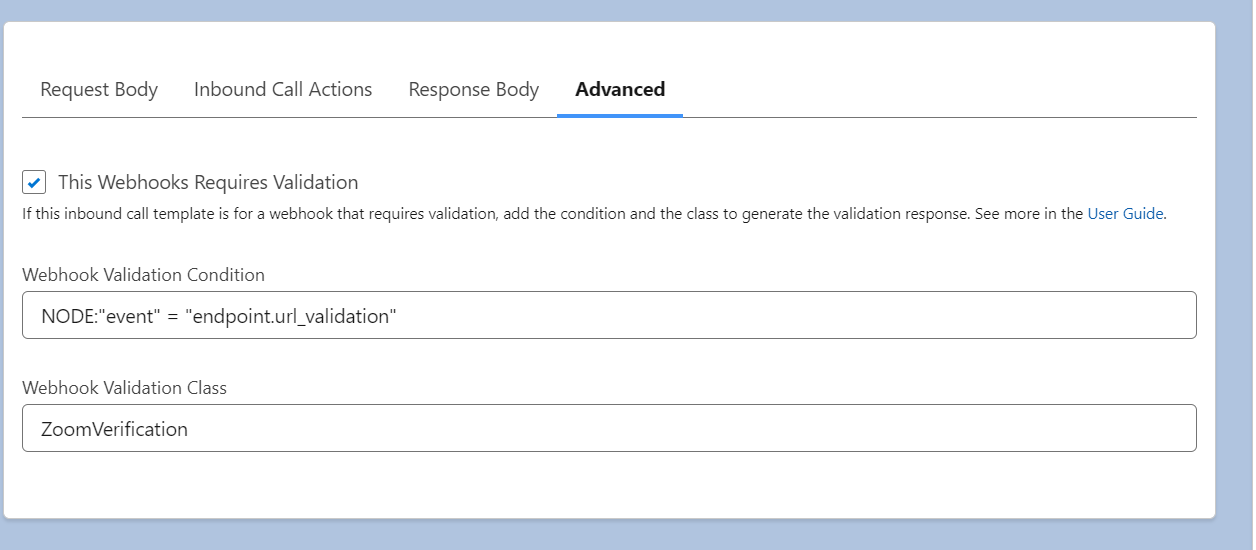
After you created the custom label and entered the details for the webhook verification, create an Apex class by using the code here.
You can create an Apex class easily by going to Setup > Developer Console > New > Apex Class.
Map Zoom Fields to Salesforce
Go to the Request Body tab in the inbound call record page and click the Generate from sample JSON button. According to the Zoom documentation, we will use this JSON payload to map our fields and later use them in our automation.
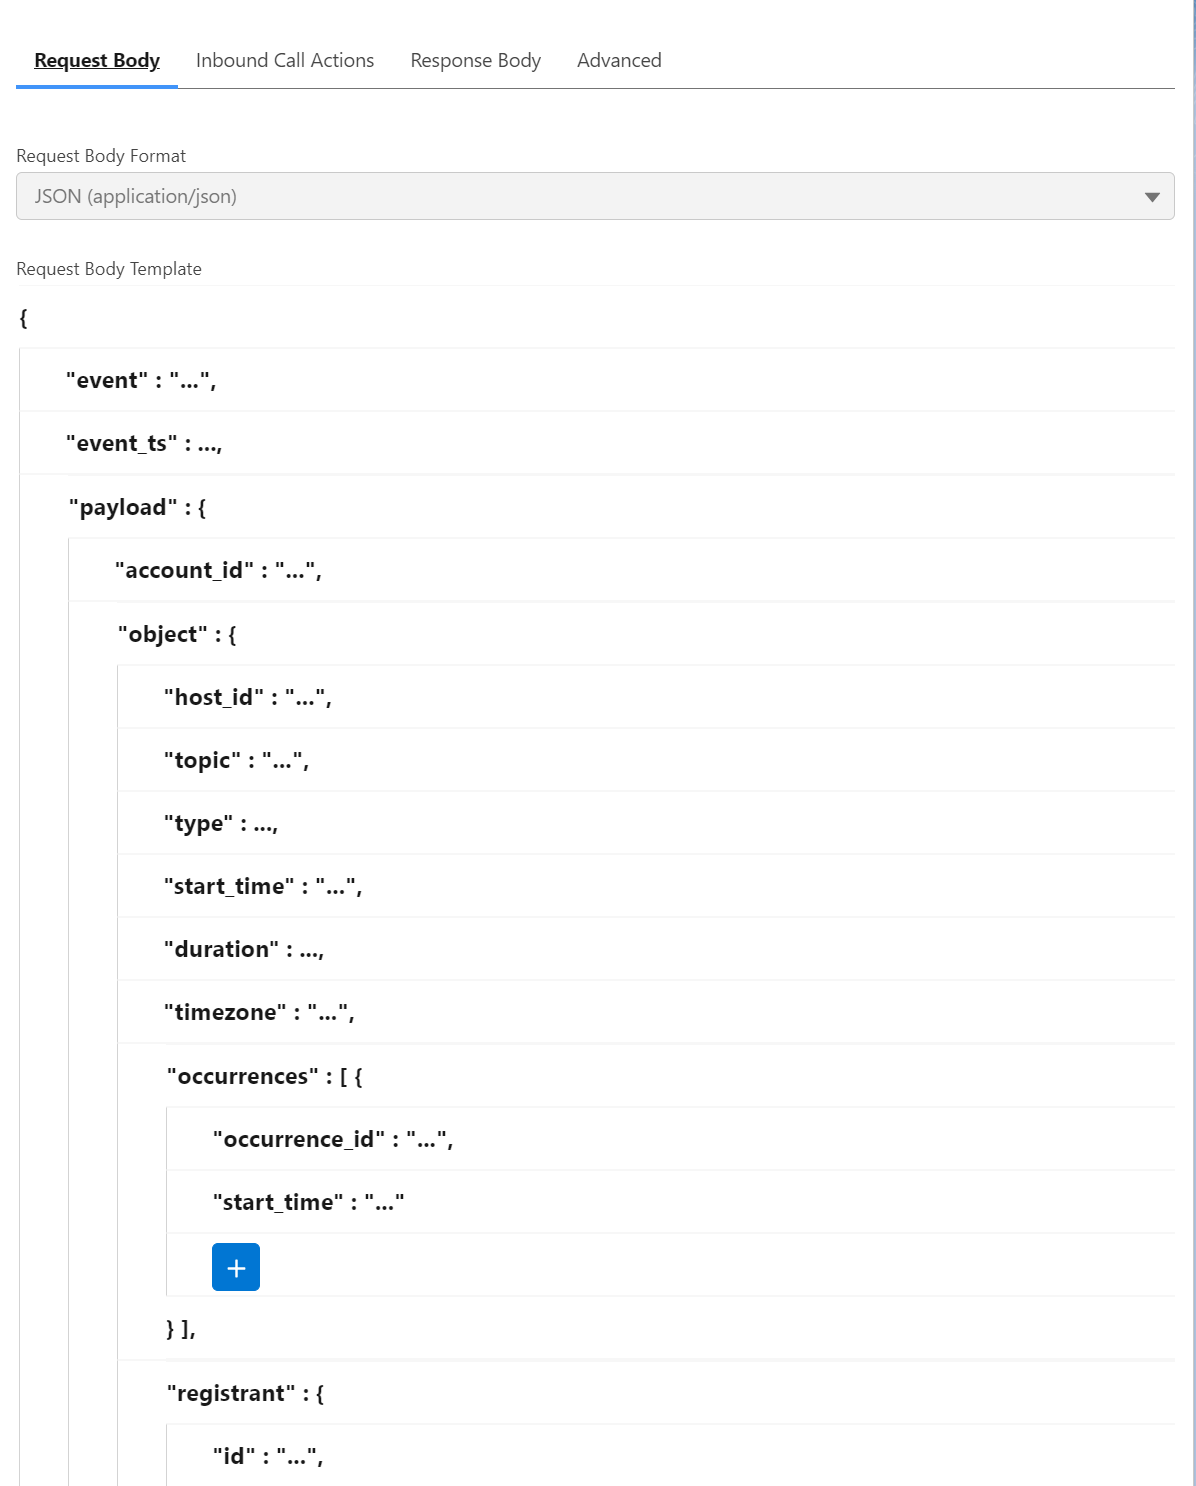
This is how part of the structure should look after mapping. Now we need to return a response to Zoom to validate our webhook so we can use it in our example.
Go the Response tab in the inbound call record page and select Built using an Apex Class and give our earlier created Apex Class’ name.

Finally, go to the Webhook setup page in Zoom from earlier and enter the Inbound Call URL from earlier.
Use the Default Header Provided by Zoom option and press the validate button.
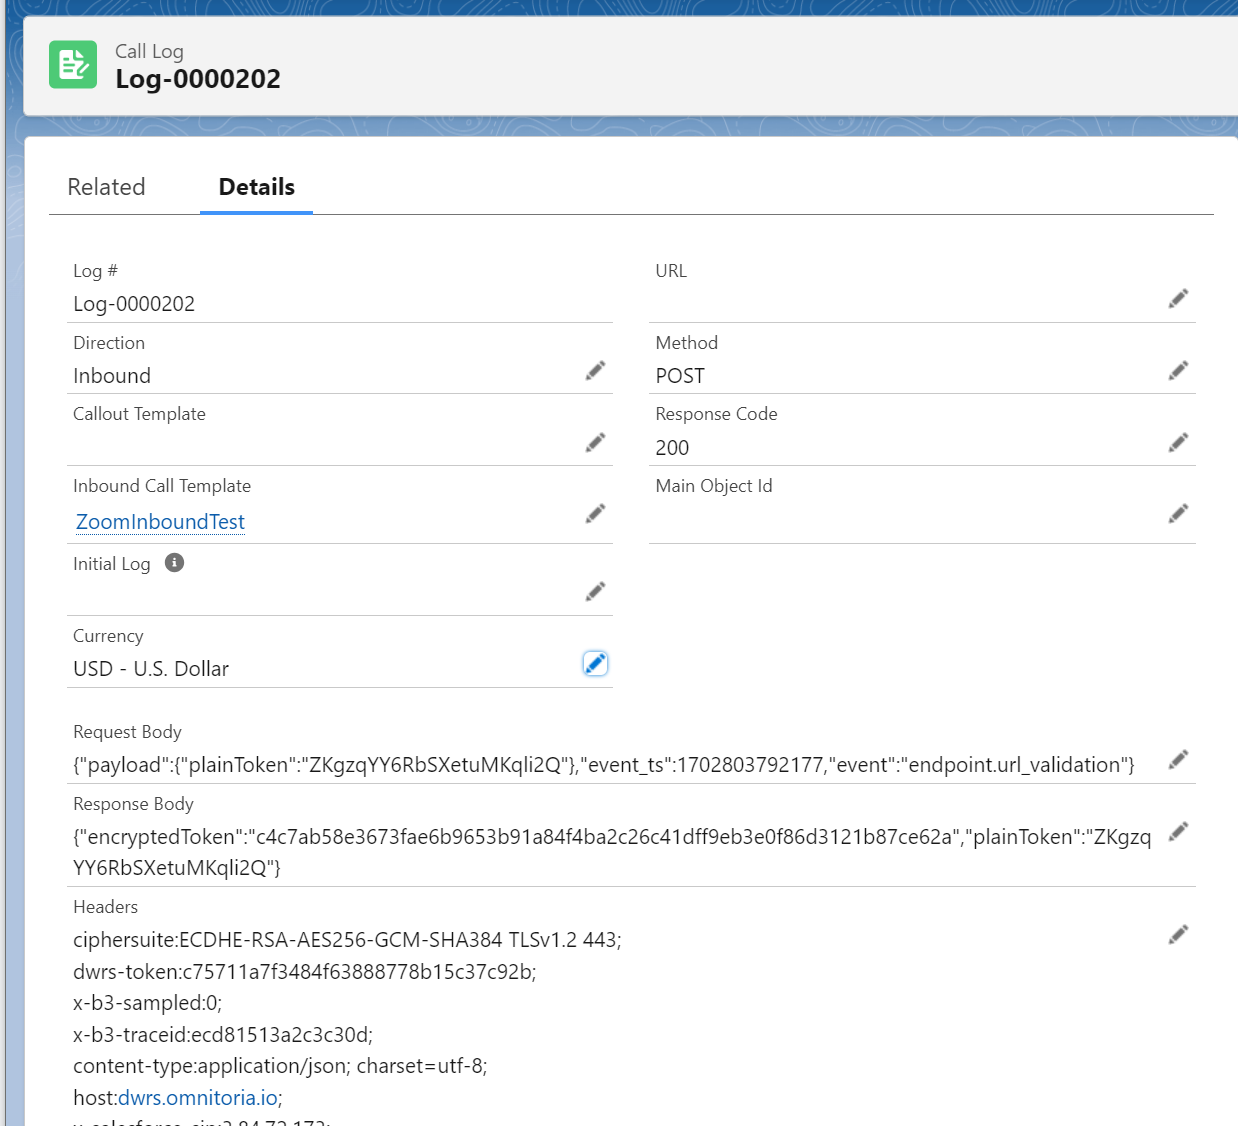
You should now see in the inbound template log tab a new log. If the Zoom is giving an error about validation you can check the Call Log tab in the record page for troubleshooting. Here’s how it should look like:
Now that we have set up our webhook and can receive the payload from the Zoom app, the next step is building a flow that will look up the email of the user who signed up and the webinar name for the appropriate campaign this lead or contact should be added to.
In this flow, we need to determine which Campaign our CampaignMember is going to be added to first. Place a Get Records element on the flow canvas. Here’s how it should look like:
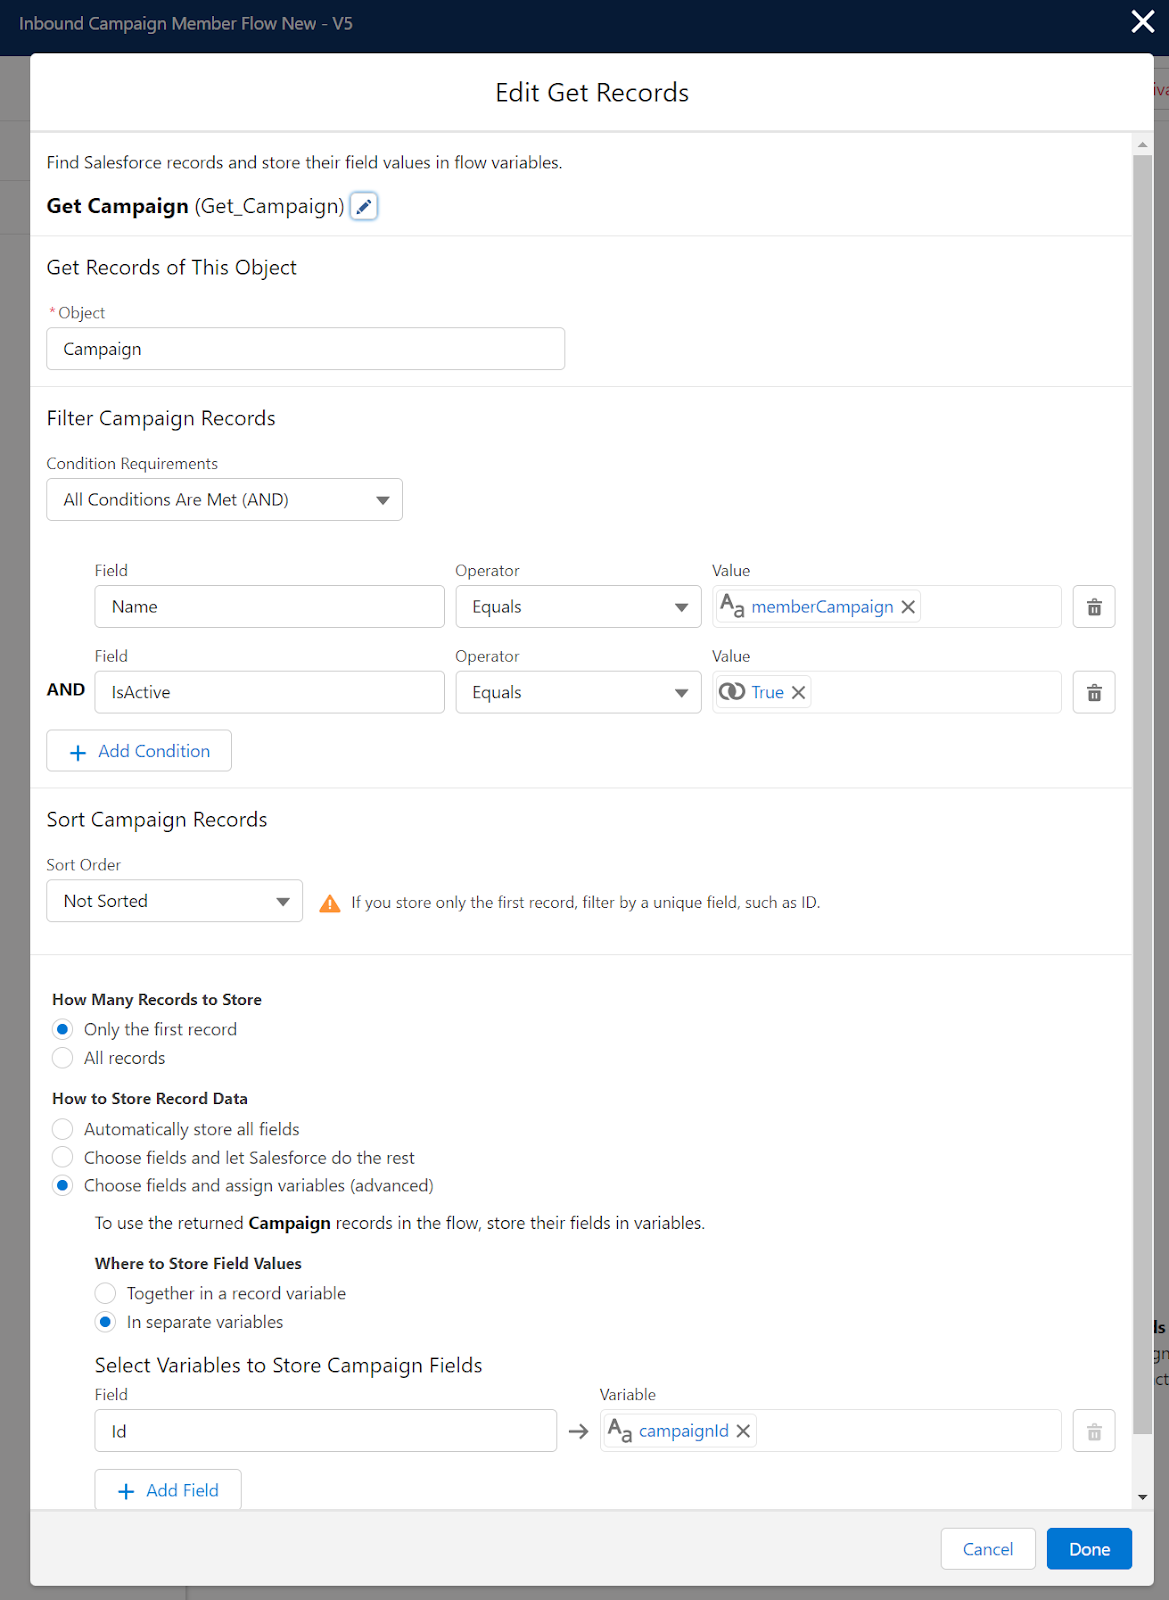
We’re filtering for active campaigns that match our memberCampaign parameter. We’re also storing the ID of the returned records on the campaignId variable.
Now, we have the ID of the Campaign we will reference when creating the CampaignMember record.
In the next step, we will query if a Lead record exists in Salesforce, depending on the outcome we will refer to the Lead or Contact record. We will need a Get Record and a Decision element.
Here’s what these steps should look like:


For the outcome that a lead exists, we’re going to create our CampaignMember using the campaignId and leadId.
Place a create record element and map the values such as below:

After this is done we have covered the scenario where we reference the Lead record, let’s look at the other outcome branch. Drop a Get Record element where we query for the Contact our campaign member is going to be connected to.
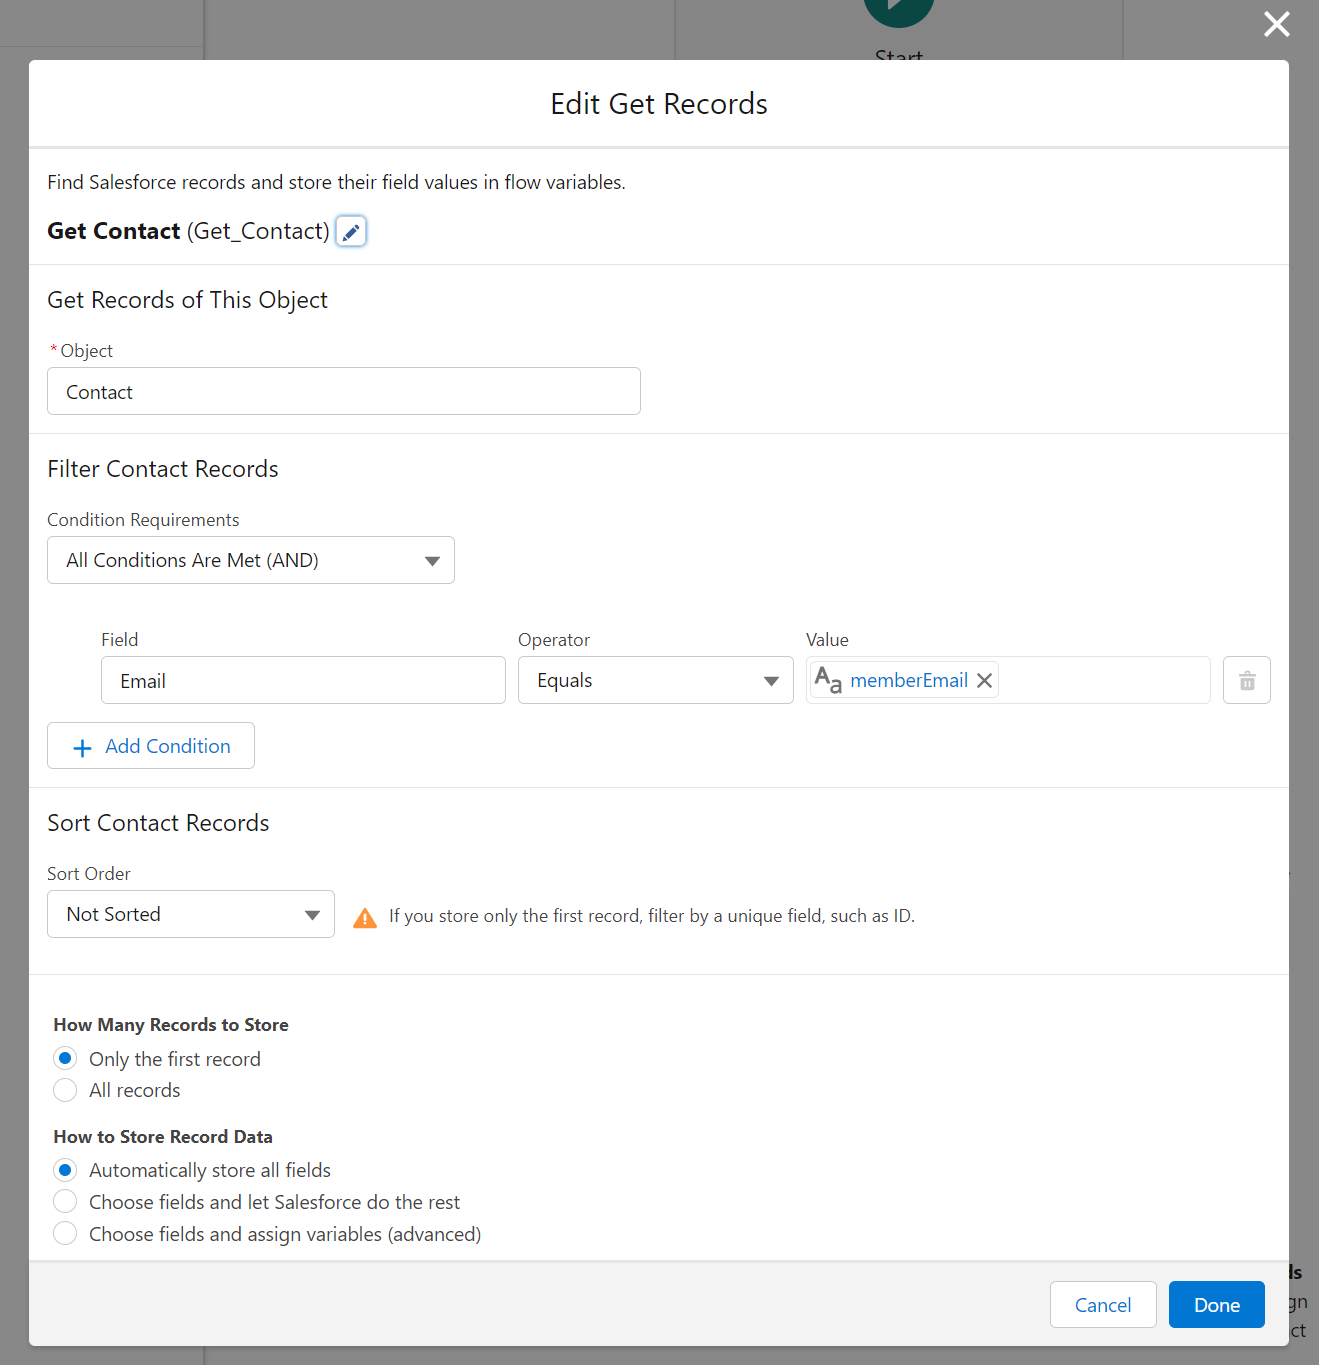
Here we’re doing the same as earlier and saving the found record for the next step.
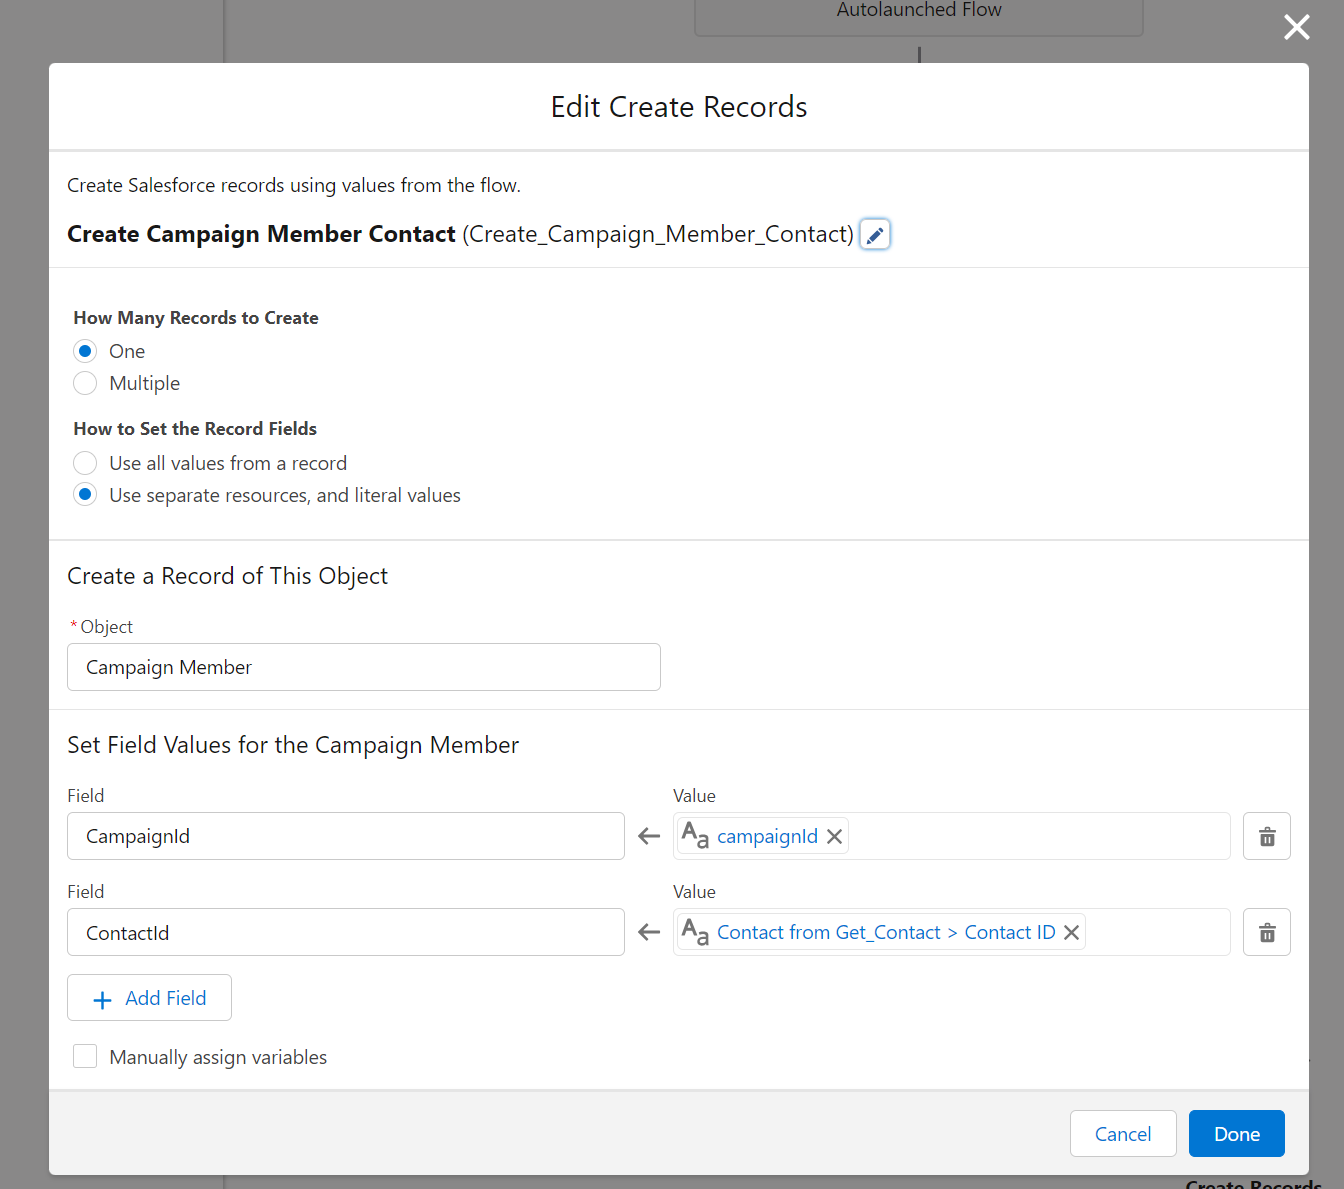
In this step, we’re referencing the campaignId queried earlier and reference the Contact record for our campaignMember record. Now let’s tie it all together, which the final version of all elements combined should look like this:

Now we need to run this flow after our webhook receives an event by Zoom. Go to the Inbound Call Actions tab and choose the flow we just created previously.

MemberCampaign parameter will be the campaign name that the flow will search for which is mapped to the topic node of the Zoom event payload.
MemberEmail is mapped to the registrant email node to the Zoom event payload.
Test and Activate the Webhook
Before activating the webhook, it’s important to test the integration in a controlled environment to ensure that data flows correctly and desired actions occur.
Once tested, activate the webhook and monitor the results as live data flows from Zoom to Salesforce.
I hope you enjoyed the article and see you in the next one!
Thank you for following this quick guide.
If you want to learn more about Declarative Webhooks, please follow the links below:


More Integration Guides
© Omnitoria, All Rights Reserved.