Build a Salesforce & Jira Integration with Webhooks

Hello everyone, I’m Atlas Can, today we are going to build and integration between Jira and Salesforce using webhooks to receive the issues created in Jira as cases in Salesforce. Once we’ve done that we’re going to flip the integration around and create a new Jira issue from Salesforce using the Jira REST API.
Why Integrate Jira and Salesforce?
Jira is a project management software developed by Atlassian. It is primarily used for issue tracking, bug tracking, and agile project management. With Jira, teams can track their work, collaborate with team members, and manage projects across different teams.
Salesforce, on the other hand, is a cloud-based customer relationship management (CRM) software that helps organizations manage their customer data, interactions, and processes.
Integrating Jira with Salesforce can provide several benefits, particularly for organizations that use both systems. For example, if a customer submits a support ticket that creates a Case in Salesforce, the integration can automatically (or manually at the discretion of the support team) create an issue in Jira for the development team to investigate. This ensures that appropriate issues are escalated to the right team, and that customer support inquiries are properly tracked and managed with visibility in both Jira and Salesforce.
Use Case for Integrating Jira and Salesforce
Imagine a company that uses Salesforce for managing their customer support and Jira for tracking internal project development. One day, a customer contacts the support team regarding an issue with the product. A support agent logs the issue as a case in Salesforce, which triggers the integration with Jira, automatically creating a corresponding issue there.
When a customer reports a problem, a support agent creates a case in Salesforce, documenting the issue, customer details, and other relevant information. The case includes a title, a description of the problem, the product or service related to the issue, the customer’s contact information, and the case status.
Once the case is created in Salesforce, the integration with Jira comes into play. Declarative Webhook will map the Salesforce case fields to the corresponding Jira issue fields. This mapping ensures that all relevant information from Salesforce is carried over to Jira, such as case title, description, priority, and other custom fields.
As soon as the case is mapped and synced, a new issue is created in Jira. The issue will have all the details from the Salesforce case, including a link back to the original case if needed.
This way, both teams can easily access the necessary information without switching between platforms. The Jira issue can be assigned to the appropriate team or individual, who will work on resolving the issue.
The integration streamlines communication between customer support and development teams. With a shared view of the issue, team members can collaborate more effectively, reducing the time it takes to resolve the problem and improving customer satisfaction.
Also by automating the case-to-issue creation process, the integration eliminates manual data entry and reduces the risk of errors. It also simplifies the workflow, as team members don’t need to switch between platforms to access information or update the case status.
The integration provides real-time visibility into the status of customer issues. This transparency allows managers to track the progress of issue resolution and identify bottlenecks or delays in the process, leading to better decision-making and resource allocation.
Real-life examples of how companies have benefited from integrating Jira and Salesforce
Skael, a software development company, integrated Jira and Salesforce using Declarative Webhooks. This streamlined their operations and improved collaboration between teams. When a deal was closed in Salesforce, a project was automatically created in Jira, enabling faster project kick-offs and better customer satisfaction. The integration provided a comprehensive view of customer interactions and project progress, leading to transparency and prompt issue resolution.
What you need to know about how integrations work
What are webhooks in Salesforce?

Webhooks are user-defined HTTP callbacks that enable real-time communication between applications. They’re triggered by specific events, like updates or new data, in a source application. A webhook in Salesforce is no different than any other webhook except that it is either sent or received from the Salesforce platform.
When an event occurs, the source application sends an HTTP request, typically a POST, to a pre-configured URL, the webhook receiver. The receiver processes the request, which may include JSON or XML payloads, and takes appropriate action.
Webhooks provide a lightweight, efficient mechanism for event-driven data exchange, eliminating the need for periodic polling and allowing applications to react instantly to changes. They’re commonly used in integrations, notifications, and automation workflows.
What is a REST API and why do we use them?

REST API provides numerous benefits compared to SOAP, especially when dealing with Salesforce, making it the go-to choice for modern and efficient data communication. Being a stateless and lightweight protocol, REST consumes less bandwidth and delivers quicker responses, perfectly suiting mobile and web applications.
The adoption of JSON, rather than XML, simplifies data reading, comprehension, and processing for both developers and machines. Thanks to its cacheable nature, REST API enhances performance by decreasing server burden, and its adaptability to diverse platforms, languages, and frameworks eases integration efforts.
REST API encourages uniformity, modularity, and the ability to scale, facilitating the management and growth of Salesforce applications. You can take a look at Salesforce’s platform REST APIs here using this link.
Declarative Webhooks can serve as an updated version of Salesforce SOAP-based outbound messages and allows you how to send something akin to outbound messages with REST API.
Jira Integration Setup and Configuration
Now that we know more about webhooks and REST APIs in general, it’s time to set up our very own with Jira and Salesforce. Remember, if you’re trying this in your Jira account you need admin permission and can use the trial version for advanced features for free. You also need your Salesforce account with Declarative Webhooks installed from the Salesforce AppExchange.
Steps to configure a Jira integration to Salesforce with webhooks
Jira Webhook Setup
- Log in to your Jira account.
- Click on the gear icon (Settings) in the upper-right corner of the screen (needs admin access).
- In the sidebar, under the “System” section, click on “Webhooks.”
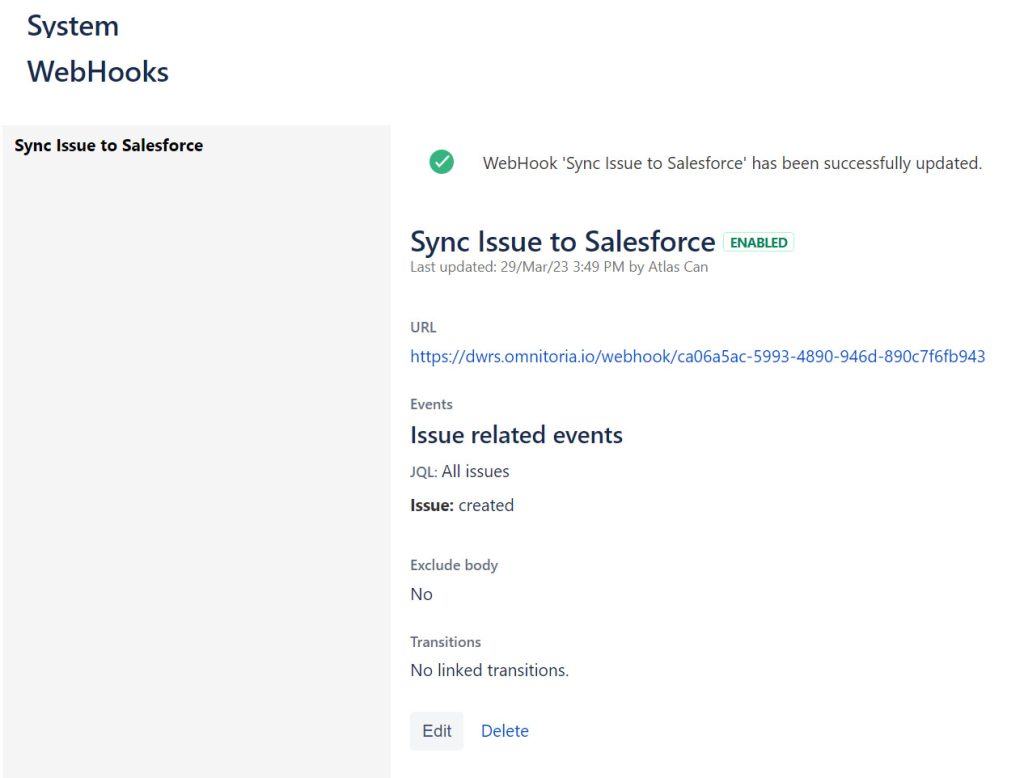
- Click on the “Create a webhook” button.
- Name: Give your webhook a descriptive name.
- URL: Enter the URL where Jira should send the webhook notifications. This should be the endpoint of the application that will process the incoming data. We are going to fill this part later after we create our Inbound Call Template.
- Status: Check the “Enabled” box to activate the webhook.
- Events: Choose the events that will trigger the webhook. You can select from issue-related events, comment-related events, user-related events, and more. Select the checkboxes next to the events you want to trigger your webhook. We are going to pick the issues created as an option to send the event.
- Optionally, you can configure advanced webhook settings but this is not required for this scenario:
- Exclude body: Check this box if you don’t want to send the issue data in the webhook payload.
- Timeout: Set the number of milliseconds Jira will wait for a response from the webhook’s target URL before timing out.Once you have configured the webhook settings, click the “Create” button to save your webhook.
- Jira will now send webhook notifications to the specified URL whenever the selected events occur.
Create an Inbound Call Template in Salesforce
Our next step is creating our template because we are receiving information from an external system, we are going to create an Inbound Callout Template.
Want to see what information Jira will send to our endpoint? You have a couple of options. If you haven’t setup a Declaritive Webhooks inbound template yet, you can use beeceptor to sign up for a free account and register an endpoint. After getting the URL from this service provider, we put the webhook URL address in Jira.
You can also setup a “skeleton” Declarative Webhooks Inbound Call Template with no request body or mapping. You can use the Declarative Webhooks URL associated with your Inbound Call Template and use that webhook URL in Jira instead. Once a request is made to that URL, you can see the upcoming requests to your endpoint by looking at the Call Logs tab. This is a great way to conduct general API testing before fully configuring your template. Even better, when you inspect your first Call Log you can simply copy and paste it into the JSON builder to more quickly build your Inbound Call template.
After you create an issue in Jira with this webhook configured, you can see the incoming data, which will be useful for data mapping during our template creation. You can also find the template I have created here.
Enter Inbound Call Template Details
In the first step, we are going to determine the method and the JSON body format of the inbound connection. Some applications have a different format that you can determine by looking at the HTTP headers (application/x-www-form-urlencoded, application/json), vendor webhooks usually cannot authenticate to Salesforce, so we are going to go with the public option for our demo.
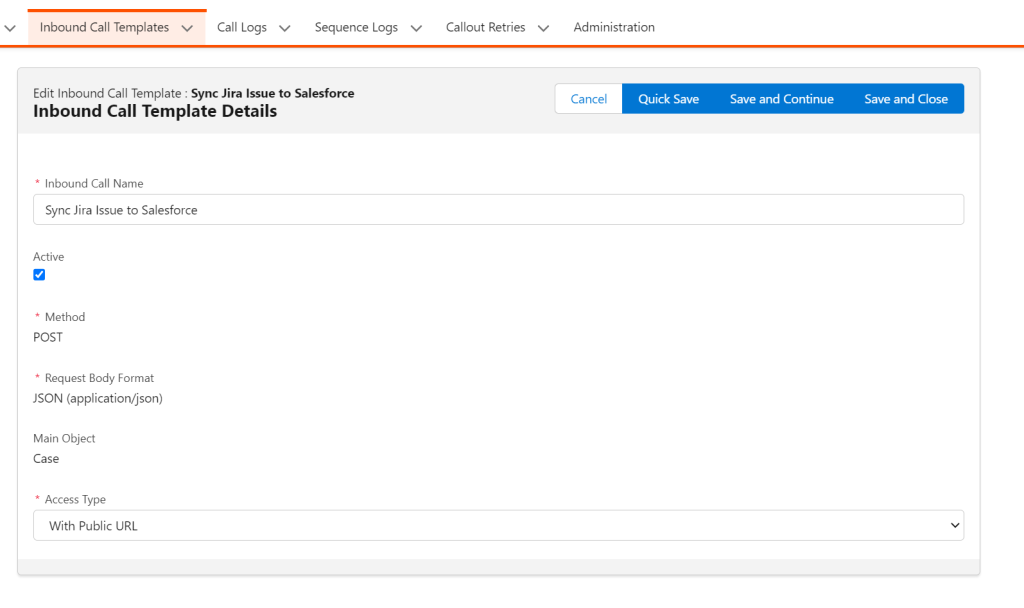
Because we are working with the case object we’re picking a main object, but this could also be a custom one.
Configure the Request Body
Once you get a successful payload or an example of this webhook event, you can map the fields by using the import method.
You can find the sample from the documentation or if you want to see the real thing, you can use a public endpoint as explained above.

The most important part of setting up the template is the mapping we are doing from the JSON data to an object in Salesforce. We are going to create a new case whenever an issue is created in Jira.
Map the Jira Webhook to Salesforce and Configure Inbound Actions
As you would see from the incoming data from the webhook, for this scenario we are mapping the issue.fields.description and issue.fields.summary of the Case object’s standard Description and Subject field.
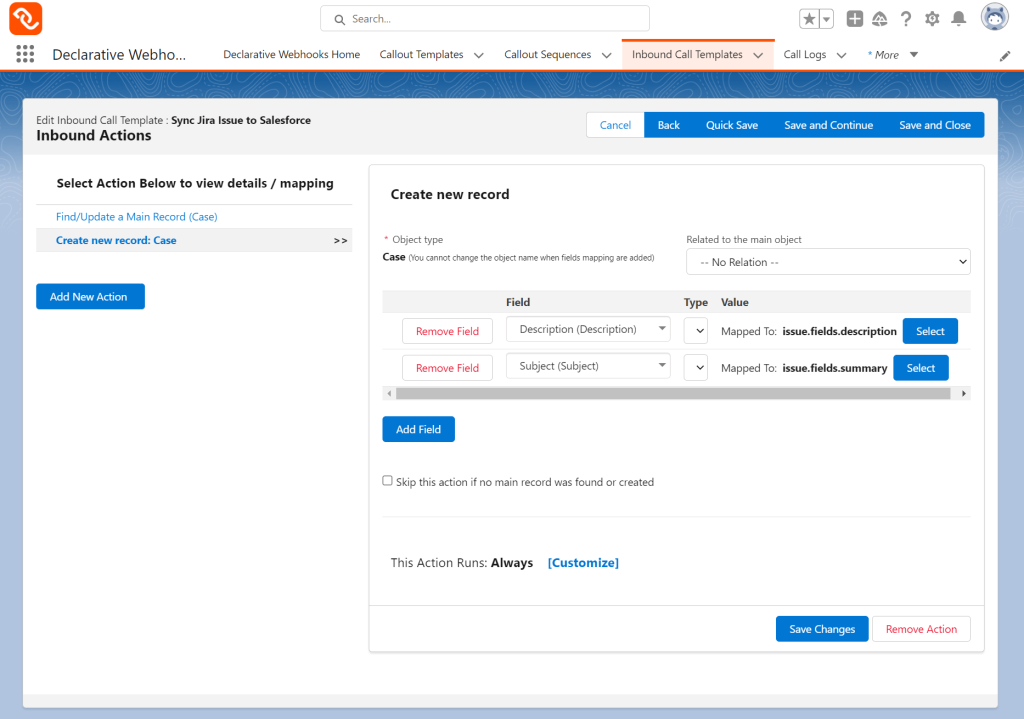
Configure a Success Response
Let’s also map a success response in our template, we don’t need to return a response to Jira since webhooks usually work as fire and forget, but it’s a good functionality to have when you’re integrating with an external system, since we are creating a Case record in Salesforce this is the response Salesforce would return.

After you created the Inbound Template either by importing from the link or grabbing the payload data from another endpoint, your template should look like this.
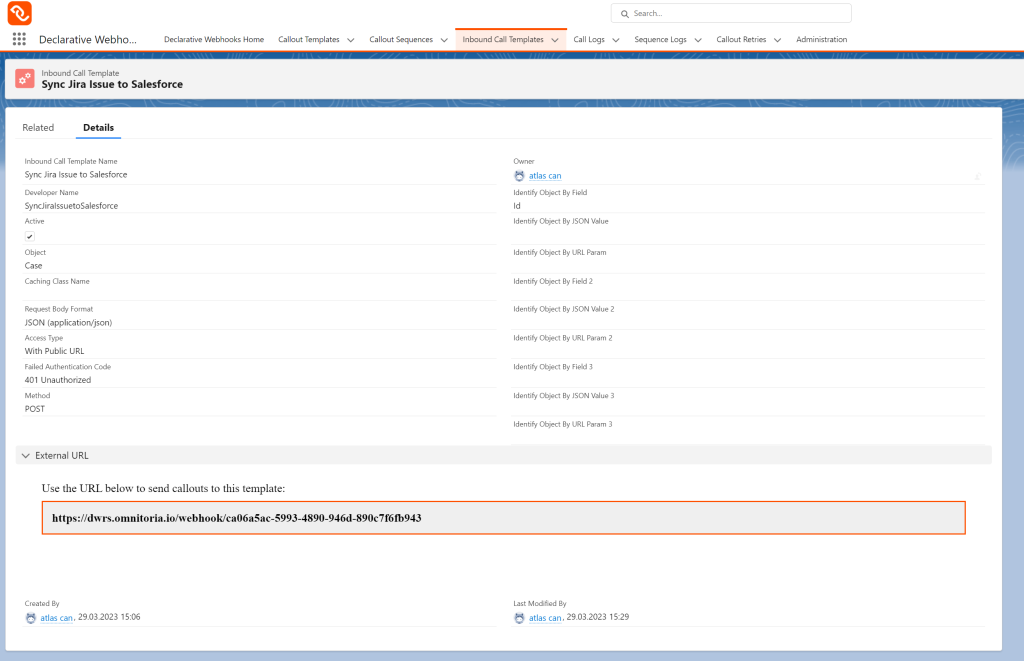
External URL field is where we are going to now update the Jira webhook to send data to our Salesforce endpoint, powered by Declarative Webhooks.
Jira to Salesforce Integration in Action
Our Jira to Salesforce integration is ready go. Now let’s create an issue in our Jira and see the case created in Salesforce.

Here’s the case created in Salesforce, with only a few clicks using Declarative Webhooks!

Steps to configure a Salesforce to Jira integration with the Jira REST API
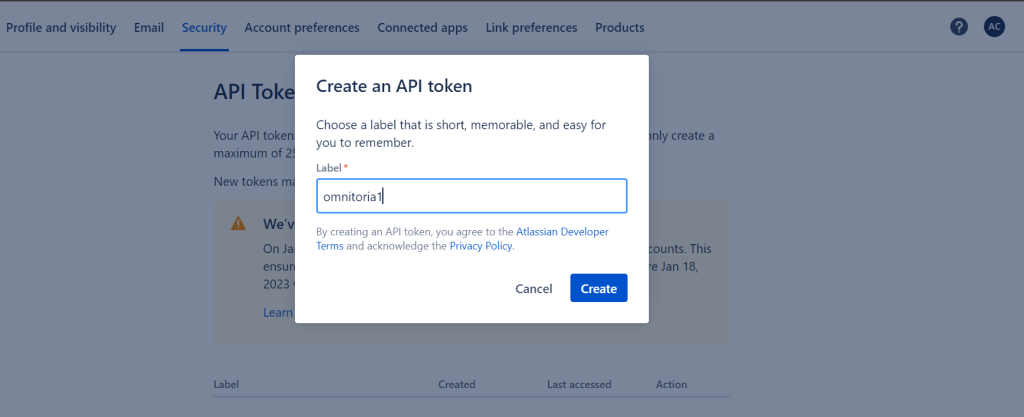
Before we start building the integration, you need to generate an API token in Jira. To do this, follow these steps:
- Log in to your Jira account
- Go to your account settings by clicking on your profile picture in the top right corner
- Click on Manage Account
- Click on Security
- Click on Create and manage API tokens
- Click on Create API token and give it a descriptive name
- Copy the generated API token, as you’ll need it for authentication later
We also need to find the base URL for integrating with Jira, to find the Jira base URL for integration, you will need access to your Jira instance as an administrator.
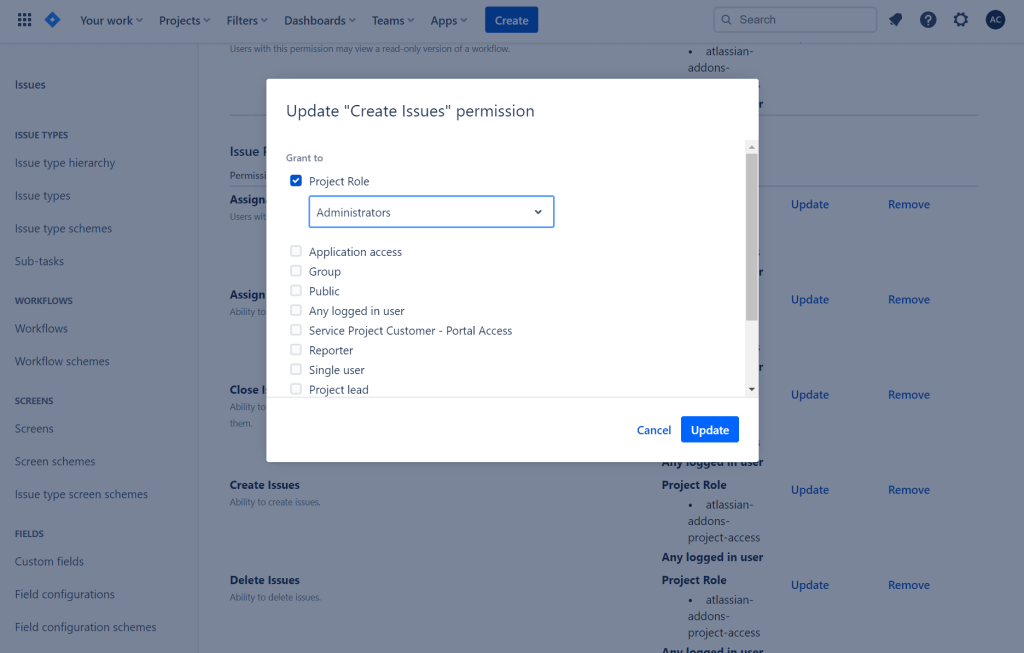
You can reach the permissions page by clicking on your project folder in JIRA > Project Name > Project Settings > Permissions. For our scenario, we’re adding our own user to the project.

After this is done we are also giving our user access to create Jira Issues from the Permissions tab. Normally this is not recommended but for our test scenario as we are giving access to this user through the admin role rather than using the project role.
The base URL is essential for integrating with other applications, such as using REST APIs or linking with third-party tools. For the JIRA cloud, you can easily find your base URL in your address bar.

Here’s how to find your Jira base URL if it’s self-hosted:
- Log in to your Jira instance as an administrator. This could be Jira Cloud or Jira Server (self-hosted)
- Click on the gear icon in the top-right corner of the screen to open the administration menu
- Select “System” from the drop-down menu
- In the left-hand menu, click on “General Configuration” under the “SYSTEM” section.
- Look for the “Base URL” field on the General Configuration page. The displayed URL is your Jira base URL.
- For Jira Server: http://:/Make sure to replace , , (if applicable), and (if applicable) with the correct values for your specific Jira instance
Note: If you’re using Jira Server (self-hosted), ensure that the base URL is accessible from the systems you intend to integrate with. In some cases, you might need to configure firewall settings or use a public-facing domain name for the integration to work
To create a new issue in Jira, we need the project key of the project you want to create the issue. To find the project key, log in to your Jira account and navigate to the desired project by clicking on ‘Projects’ in the top navigation bar. The project key is displayed in the project header, right next to the project name.

Steps to configure Salesforce to make a callout to the Jira REST API
Create a Callout Template in Salesforce
Now that we have the Jira API token and project key and base URL, let’s create a Callout Template in Salesforce using Declarative Webhooks.
Log in to your Salesforce account.
- Go to App Launcher > Declarative Webhooks.
- Click ‘Callout Templates’ and then click ‘New’.
- Enter the following details for the callout:Callout URL: https://your-domain.atlassian.net/rest/api/3/issueCallout
- Authorization Type: Basic
- Callout Authorization Username: Your Jira email address
- Callout Authorization Password: Your Jira API token
- Source Object: CaseRecords: One Record per callout
- Request Headers: Content-Type with the value application/jsonClick ‘Save and Continue’.

In the field mapping screen, create the JSON request body using the Salesforce Case fields and the Jira project key. Here’s an example of a JSON request body:
{
    "fields": {
        "project": {
            "key": "OM"
        },
        "summary": "Creating From Collection",
        "description": {
            "type": "doc",
            "version": 1,
            "content": [
                {
                    "type": "paragraph",
                    "content": [
                        {
                            "type": "text",
                            "text": "This is an autogenerated issue from a demo."
                         }
                    ]
                }
            ]
        },
        "issuetype": {
            "name": "Task"
        }
    }
}
Replace JIRA_PROJECT_KEY with the actual project key you obtained previously.
In the response mapping screen, you can create mappings from a sample JSON response or leave it empty if you don’t need to process the response data. Here’s a sample for a successful request.
{
"id": "10001",
"key": "OM-2",
"self": "https://omnivo-test.atlassian.net/rest/api/3/issue/10001"
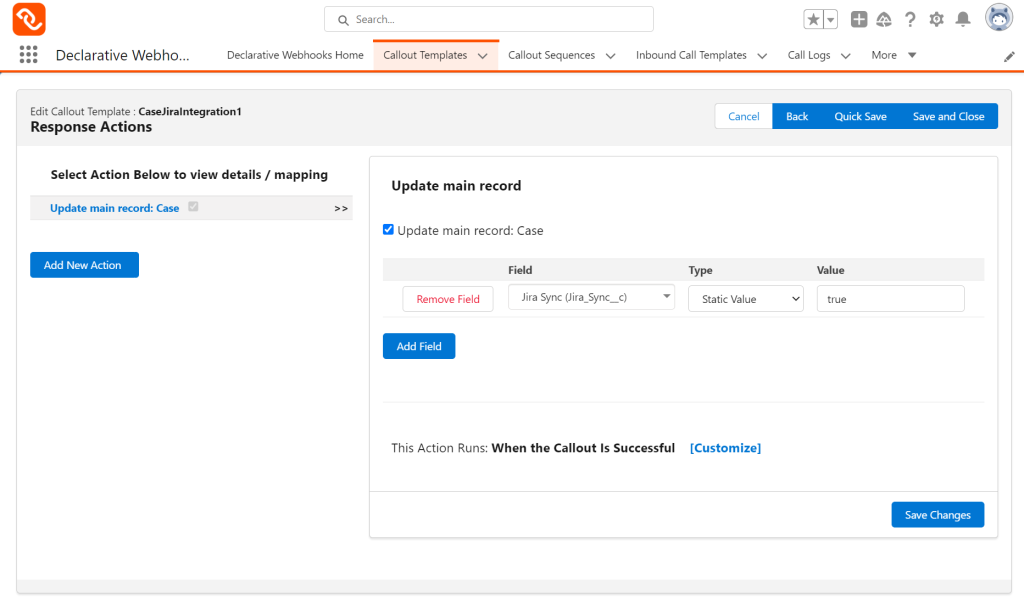
}We are also going to update a field on the record that started the integration if the callout is successful, for this demo you can create a Jira_Sync__c custom boolean field and set it to true if the callout is successful and you could also map the Jira issue id to a custom field.
By the way, you can find this template in this link, Declarative Webhooks allow you to import/export callout templates, which is very handy!
Creating Record-Triggered Flows in Salesforce to Call the Jira API
Now that we have created the Callout Template, we need to create a Record-Triggered Flow to fire the callout when a new case is created in Salesforce.
Record-triggered flows in Salesforce are helpful for Jira integration because they provide an automation mechanism that allows you to respond to specific events or criteria related to Salesforce records. They enable you to automate processes and perform actions based on changes in records.
In Salesforce, go to Setup > Process Automation > Flows.
- Click ‘New Flow’.
- Select ‘Record-Triggered Flow’ and click ‘Next’.
- Configure the flow with the following settings:
- Object: Case
- Trigger the Flow when: A record is created
- Entry Conditions: Configure any conditions you need, e.g., Case.Status equals New
- Click ‘Done’ and then add an Apex Action flow element to the canvas.
- Configure the Apex Action with the following settings:
- Apex Action using Callout Template Id or Developer name: The Id of the Callout Template you created or the Developer Name you can find on the template record page in the app
- Record Id: Case.Id ({!Record.Id})
- Connect the elements, save the flow, and activate it.

Test your Salesforce to Jira Integration
With everything set up, it’s time to test the integration: In Salesforce, create a new case with the appropriate conditions to trigger the flow.
Here’s my example below, also notice because the response is successful we are updating the record automatically via Declarative Webhooks template settings.
You can define a range for the HTTP status codes – for example, Jira returns 201 if an issue is created so you can customize this based on the API you’re connecting to.
Remember to add the Jira callout URL to your remote site settings in setup and activate the callout template and the flow!

After you create a case with “New” status in Salesforce, log in to Jira and check if a new issue has been created.

To view the callout logs, go to App Launcher > Declarative Webhooks > Call Logs.
If everything works as expected, you have successfully created a new Jira issue from a Salesforce case using Declarative Webhooks!

Jira Webhook Best Practices for Salesforce
We should also point out that even though it’s very easy to build integrations with Declarative Webhooks and we are almost done with our sample but there are some points to consider with webhooks or any time you’re integrating two systems. For example in Jira:
- Use HTTPS: Always use HTTPS for your webhook URL to ensure secure transmission of data between Jira and your application.
- Filter events: Select only the specific events that are relevant to your use case to minimize the number of webhook calls and improve performance.
- Use JQL filters: Limit webhook triggers to a specific set of issues by providing a JQL (Jira Query Language) filter when configuring the webhook.
- Handle errors gracefully: Design your webhook receiver to handle errors, such as network issues, timeouts, or invalid payloads, and implement appropriate retry or logging mechanisms.
- Optimize processing time: Minimize the time it takes to process webhook requests by offloading heavy tasks to background processes or queues.
- Monitor and log: Keep track of webhook requests and their status for debugging and auditing purposes. Use monitoring tools to detect and resolve any issues promptly.
- Keep webhook URLs secure: Treat webhook URLs as sensitive information, since they can potentially be used to send unauthorized data to your application.
- Document and maintain: Clearly document your webhook implementation, including the purpose, expected payloads, and processing logic. Keep your webhook code up-to-date and well-maintained.
Conclusion
In this tutorial, we demonstrated how to create a Salesforce case from a Jira issue and vice versa using Declarative Webhooks with a fairly simple scenario.
Keep in mind Declarative Webhooks is a powerful tool allows you to build complex integrations with just a few clicks, without the need for any code and this was a simple exercise!
As always thank you for reading and I will see you in the next post.
Thank you for following this quick guide.
If you want to learn more about Declarative Webhooks, please follow the links below:


More Integration Guides
© Omnitoria, All Rights Reserved.