Hello everyone, I’m Atlas Can and today we are going to talk about Outbound Messages using REST API and JSON and how to use them with Declarative Webhooks!
Salesforce Outbound Messages Explained
Outbound messages are a method of sending data to an external endpoint, typically in XML format. They are commonly used to send an object’s field data to an external application in response to specific events.
In Salesforce, outbound messaging is a key feature of workflow rules. These rules are designed to monitor changes in certain fields and then initiate automated actions within the Salesforce platform. Some of the actions that can be triggered by workflow rules include the sending of email notifications, the creation of task records, and the transmission of outbound messages.
In other words, Salesforce’s workflow rules have the capability to keep an eye on specific fields and react to changes in them by performing a variety of predefined actions. Among these actions is outbound messaging, which can be used to communicate information to external systems or applications.
You can also use outbound messages for Record-Triggered Flows. Still, the process for setting them up similar to workflow rules is cumbersome, you need to set up an endpoint URL and authorization is basic compared to JSON-based APIs.
A typical scenario in which outbound messaging using workflow rules is employed is to synchronize a third-party system with Salesforce. This could involve transmitting information when an account record is created or when a lead is converted within Salesforce.
However, there are some limitations to using outbound messages. Firstly, there is no way to log responses, so it can be difficult to determine if a callout has failed or needs to be retried.
Additionally, the order of messages cannot be guaranteed, which can lead to inconsistencies in data. Outbound messages also lack response processing capabilities, which means they are a “fire and forget” process. Lastly, SOAP/XML is an outdated and less user-friendly protocol compared to modern JSON-based APIs.
To overcome these limitations, businesses can consider other integration options. Custom Apex code is one option, but it can be complex, costly, and difficult to scale.
Another option is to use webhooks, which are an efficient and scalable way to connect Salesforce to third-party platforms. Although webhooks are not natively supported by Salesforce, there are several apps available on the Salesforce AppExchange that can help facilitate this integration.
Thankfully, there is now a much better way to do your REST integrations now with Declarative Webhooks. This might sound difficult and looking up the API documentation or setting up the integration logic can be tricky, especially for the first time!
Salesforce Integration Scenario: Enter MailChimp
This is why this blog series will help you set up and configure your very own integrations. I picked a scenario I faced during my consulting work in previous years: A client is asking for an integration with their MailChimp account and using the free AppExchange but for some reason, there is an issue with the integration.
Since you cannot look at the code inside of a managed package product, you can either build a custom integration with Apex or you can try Declarative Webhooks, completely for free. In this scenario, we will sync a contact from Salesforce to an Audience in MailChimp whenever a new contact gets created in Salesforce.
You can use this scenario below to send the subscription confirmation as an email if you send the payload with a `pending` status. For our scenario, we are going to sync a contact who is created in Salesforce and needs to be confirmed for subscription and added to the Audience/List in MailChimp. You can experiment with different values, for example with “subscribed” status value.
Sounds confusing? Don’t worry, I’m with you at every step with detailed explanations!
The first step is logging into your MailChimp account and creating an API Key.

While you’re there, also grab the URL from your address bar, mine is “https://us17.admin.mailchimp.com/”. This will be useful later because it actually gives you the server instance you’re on, which will be needed to make the callout to MailChimp API.
In the API keys section, create an API key with a descriptive label. You can have more than one API key for various scenarios but keep in mind, you’ll only be able to see the full API Key immediately after you generate it. After that, you won’t see the actual key, only the name you’ve given it.
Now in MailChimp, you can have more than one Audience/List. How are we going to determine which audience we are going to sync with? For this, we also need to get the Audience ID. You can find this if you go to Audience > All Contacts > Pick the Audience > Audience Name and Defaults.
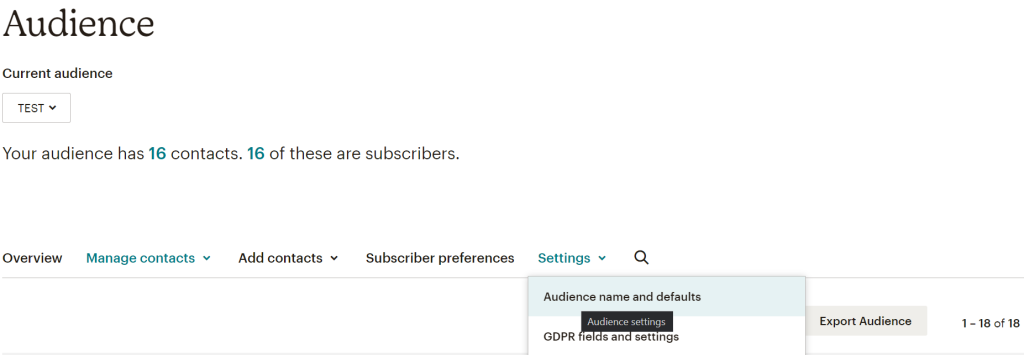
This Audience Id is needed for this integration only. Here’s an example:

We also need to look at the API documentation to determine what information is needed to make our callout. If you click on the `Add member to list` section, you will see that list_id, email_address, and status are required.
- Our Contact’s email address will be mapped to email_address
- Audience/List in our account above is going to be mapped to list_id
- To send a confirmation email to our subscriber, we are going to send with status parameter with a “pending” value as shown in the documentation
This is all we need from MailChimp for this scenario. Now let’s go to Salesforce > App Launcher > Declarative Webhooks and create our first callout.
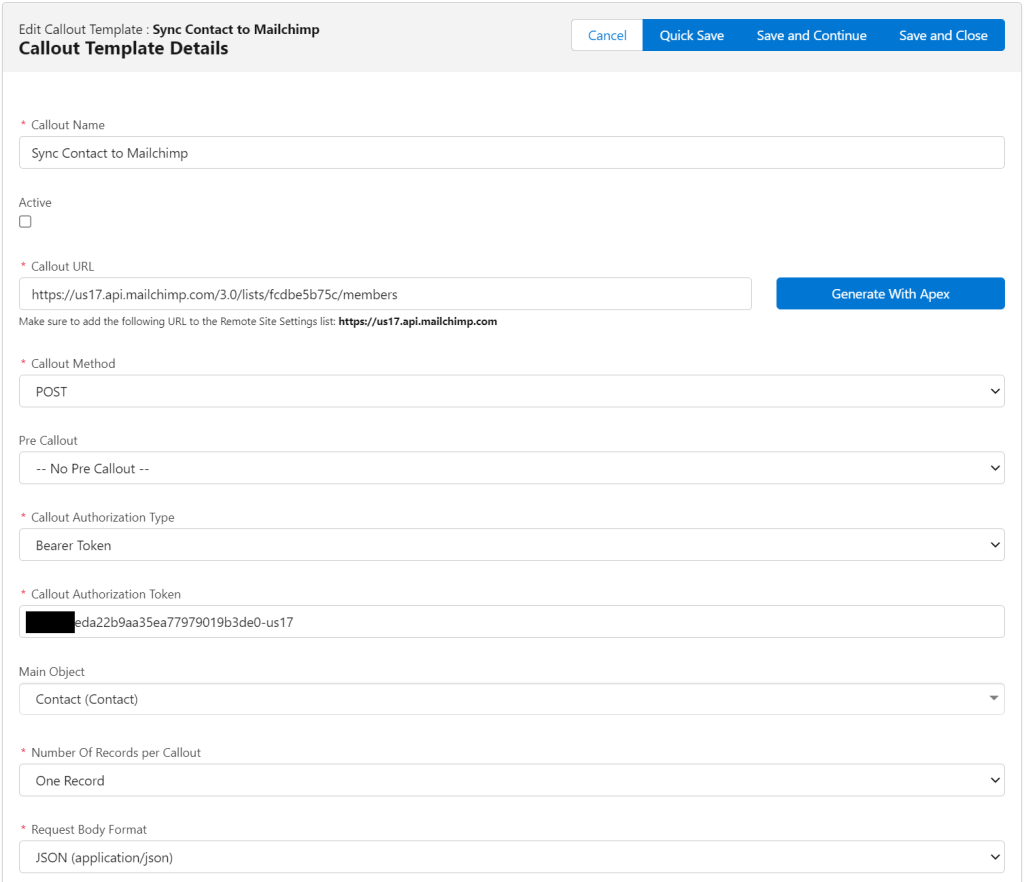
Inside the app, go to Callout Templates and click new. Let’s go over the fields in the image.
Callout URL
As shown in the Mailchimp API documentation, we are going to use the path provided there and use an HTTP POST method. /lists/{list_id}/membersIn the example, we have our Mailchimp Instance, the API address and our Audience Id, and the path to the API, so the final URL is down below:
https://us17.api.mailchimp.com/3.0/lists/fcdbe5b75c/members
Callout Authorization Type field is important, use the MailChimp API key you got earlier there.We are going to use the Contact object and pick One Record per callout since it’s appropriate for this example. We also have examples of JSON callouts and responses in the documentation so we are going to use this format.
Creating a Callout Template
Now, you will be presented with Callout Headers, we are going to use JSON format as it’s appropriate with the documentation examples so type application/json.

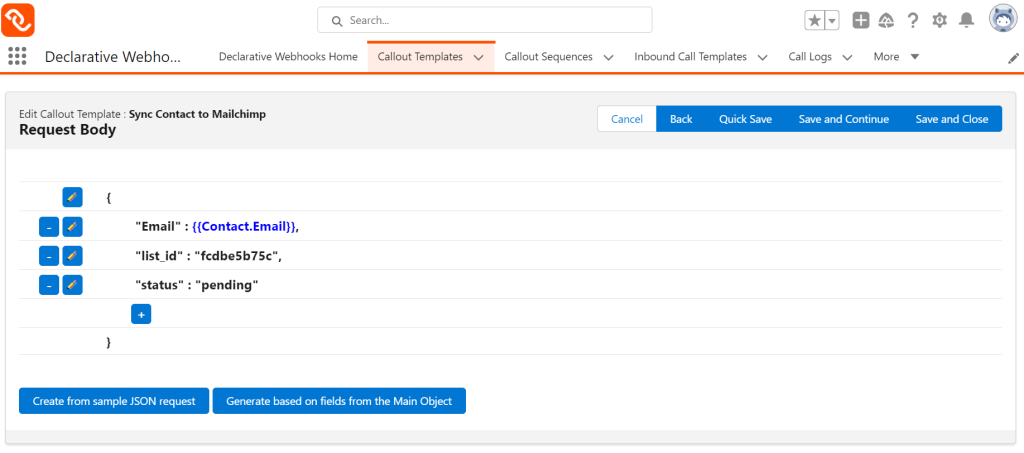
Click Save and Continue and you will be presented with the field mapping screen. This is where we are going to generate the request body. You can create the request body from the sample JSON request from the documentation, but for simplicity, we are just going to use Contact’s email field. The rest of the parameters are hardcoded, but you can also store them in a field and do the mapping.
We are sending the request with “pending” status and the Audience ID we got from MailChimp so that contacts will get a confirmation email before being added to the list.
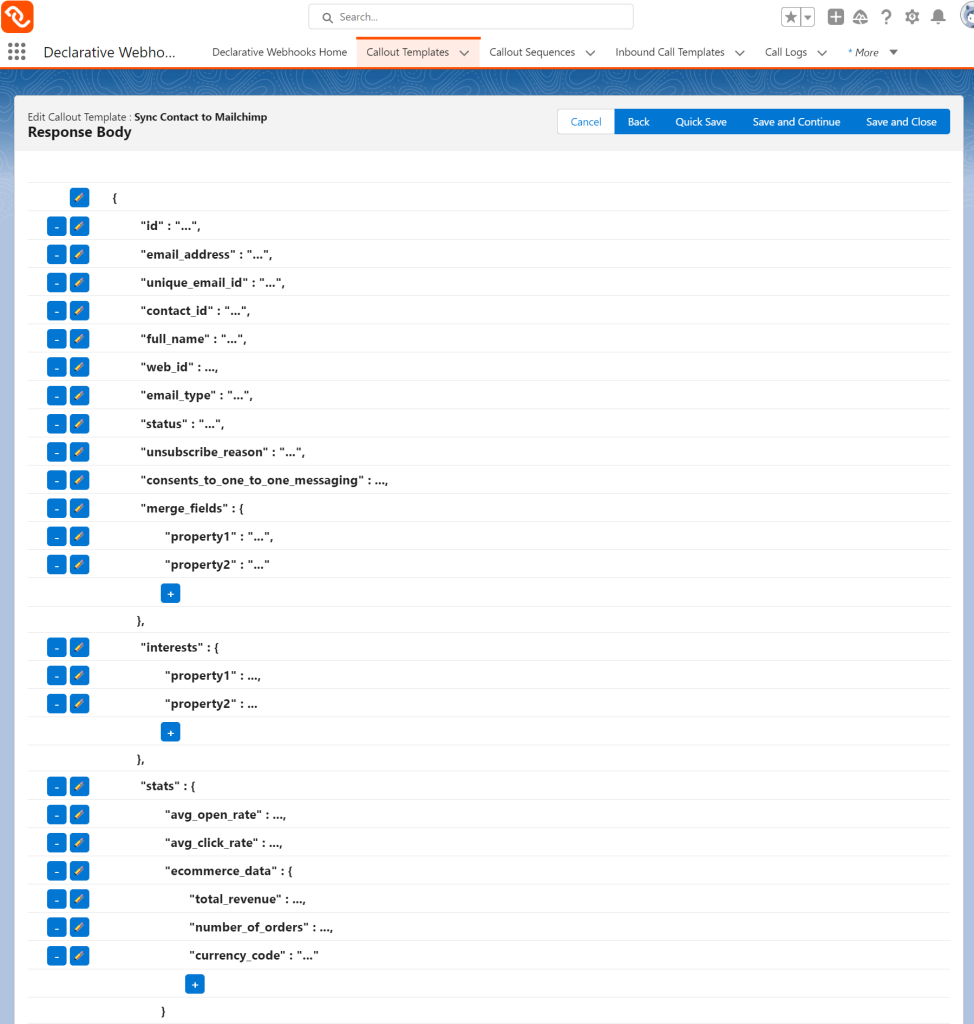
In the next step, we are going to create a mapping for the response. This is important and should be done as best practice for every integration you build, low code or otherwise.
This time, we are going to use the `Create from sample JSON request` feature, copy and paste the sample JSON response from the documentation and we are set.
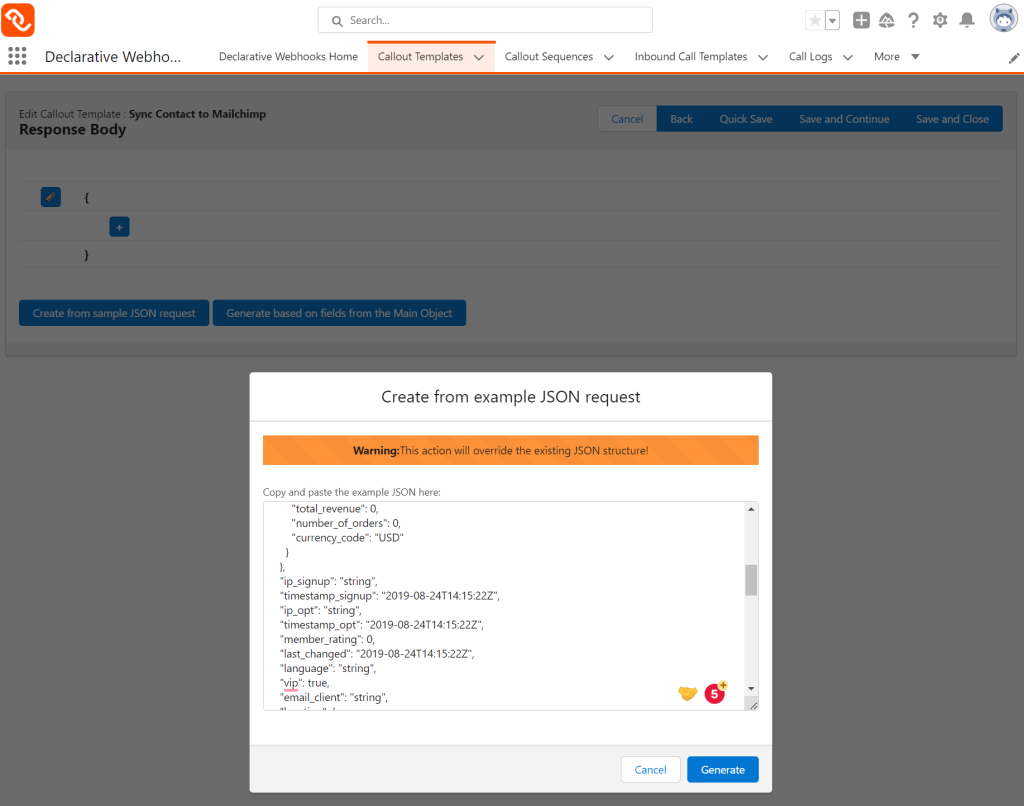
Creating mappings from sample JSON is a handy feature that saves a lot of time for the mapping and It should look like this when it’s done:
Perform the Callout
There are many ways to do this: we can create a record-triggered flow since this fits our use case best. But also keep in mind Declarative Webhooks allow you to create complex integration logic and scheduling with Callout Sequences that can be branched out and scheduled.
For this scenario, we’re going to create a Record-Triggered Flow. Go ahead and create one.
- Object: Contact
- Trigger the flow when: A record is created
- Entry Conditions: Email field when “Is Null” is false
- Optimize the flow for Actions and Related Records
Next, find the Callout Sequence Id from the Callout Templates record. Next, add an Apex Action flow element and provide the Callout Sequence Id. Add also the record Id of the Contact record that has started this flow. It should look similar to the below:
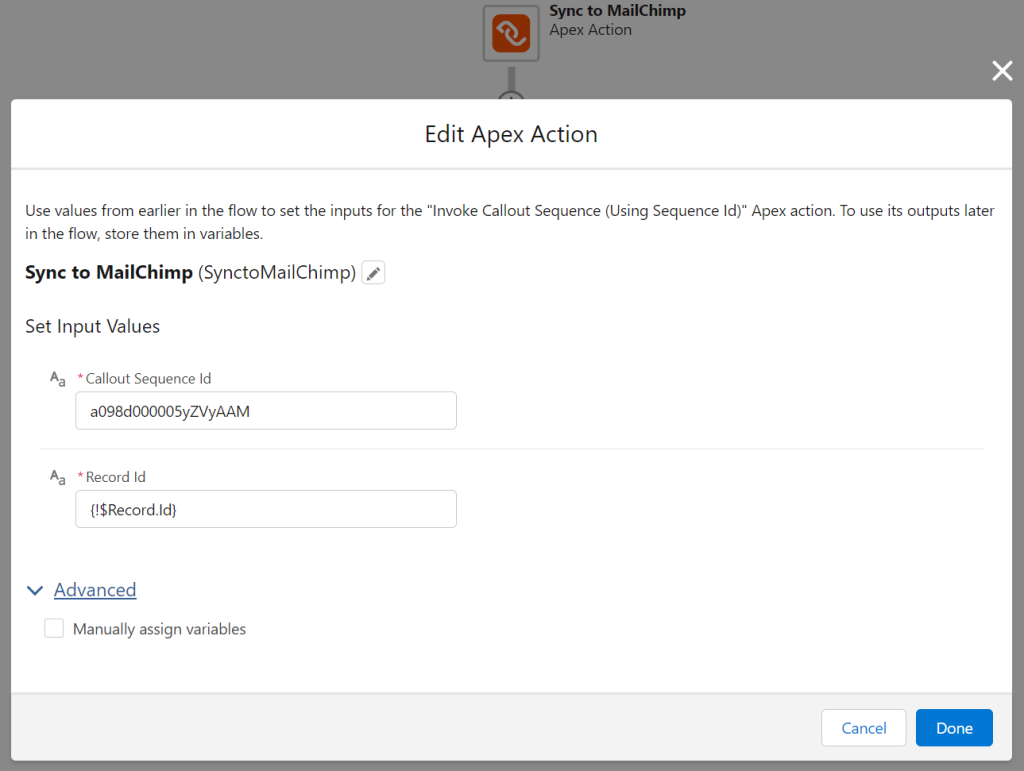
Now save the flow and activate it. We should now test our integration by creating a contact. Create a contact with the email field populated and voila! Our integration should be working.
Troubleshooting
But wait, it isn’t. What could be the issue? Head over to the logs by App Launcher > Declarative Webhooks > Call Logs. It should have records like the below:
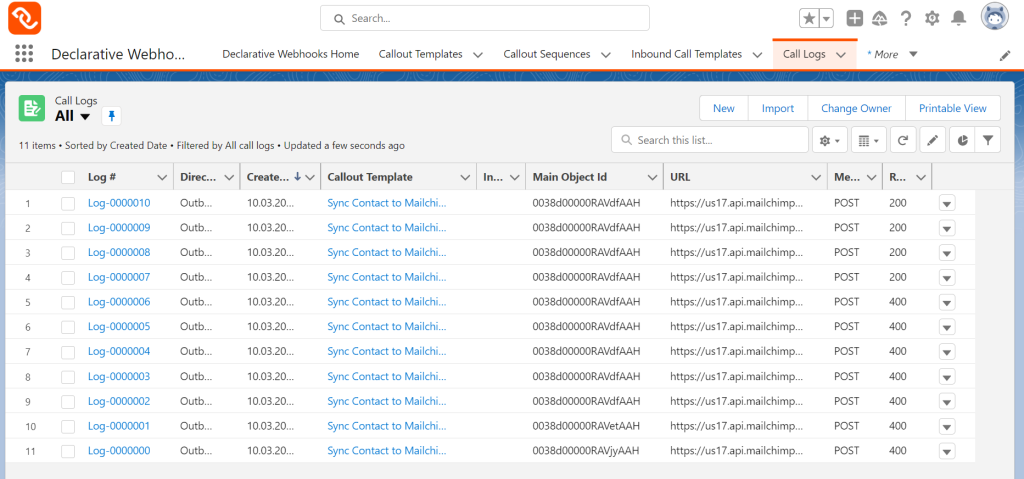
Do you see any records? If not, that’s normal because if you have been following the steps carefully so far, you will notice that I haven’t actually activated the Callout Template!

Make sure you always build your integration logic, and flow structure done correctly first and then activate the integration.
There is also another very important step. You need to add the MailChimp URL to your Remote Site list by going to the Setup page.
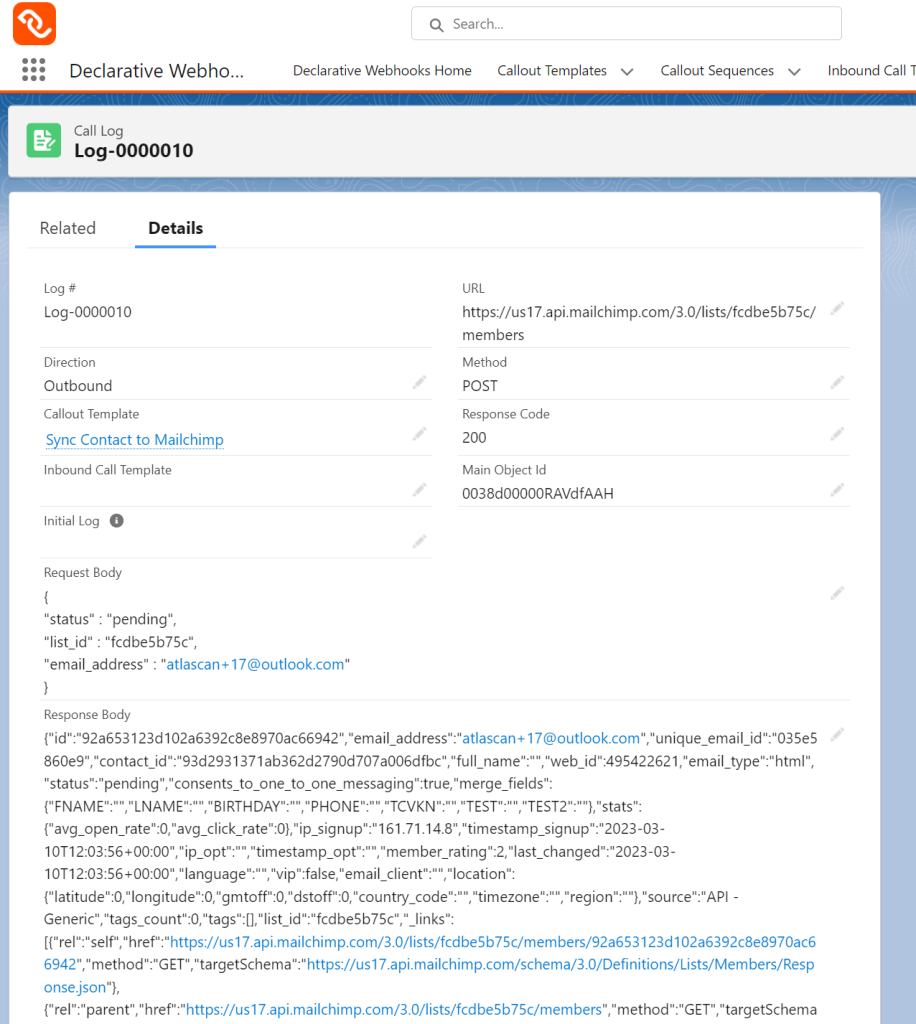
Now, try creating another contact if everything is set up correctly, you should see the log record with an HTTP 200 response code and the contact will receive an email to accept being added to the subscriber list!
Conclusion
I hope this has been useful and I will be back with more integration examples! The above example is just one of the many integrations we can build with Declarative Webhooks.
Take advantage of advanced features to build integrations with retry, logging, and complex integration logic with only clicks and without code.
Thank you for following this quick guide.
If you want to learn more about Declarative Webhooks, please follow the links below:
More Integration Guides
© Omnitoria, All Rights Reserved.