Stripe Webhooks to Salesforce Integration
Hello everyone, I’m Atlas Can and today we are going to discuss and show how to automate an integration between Salesforce and Stripe using webhooks and the Stripe REST API!
Integration Scenario: Creating a Stripe Customer in Salesforce
In this first part, we will focus on creating a Stripe customer in Salesforce when a new customer is created in Stripe.
We will walk you through the process of using Stripe webhooks to create a Stripe Customer as an Account in Salesforce, storing their Stripe ID in a custom field. We will assume that you already have a Stripe and Salesforce account and that you have installed Declarative Webhooks from the Salesforce AppExchange.
Understanding Stripe Webhooks
Stripe webhooks allow you to receive real-time notifications about events that occur within your Stripe account. In this tutorial, we will use webhooks to send event data to Salesforce, which will then create a customer record using Declarative Webhooks.

Exploring the Concept of Webhooks
Webhooks are user-defined HTTP callbacks that enable real-time communication between different applications by sending automated messages or data when a specific event occurs. They serve as a way for apps to “subscribe” to updates and changes in another system, allowing the receiving app to act on the information instantly without the need for continuous polling or manual data syncing.
When an event triggers a webhook, an HTTP request (usually a POST) is sent to the designated URL with a payload containing relevant information about the event. The receiving application then processes the data and takes the appropriate action, such as updating its records or sending notifications.
Webhooks are particularly useful in scenarios where timely updates are crucial, as they provide near-instantaneous communication between systems. They are widely used in various applications, including payment processing, customer relationship management (CRM) systems, content management systems (CMS), and more. By leveraging webhooks, developers can create seamless, automated workflows that enhance user experiences and streamline business processes.
Benefits of a Salesforce and Stripe Integration
The integration of Salesforce and Stripe enables you to streamline customer management and enhance your customer experience. By automating the creation of a customer in Salesforce when a new customer is created in Stripe, you can ensure that your CRM stays up-to-date and reduce the risk of data inconsistency.
Furthermore, this integration allows you to leverage Stripe’s robust payment infrastructure within your Salesforce CRM. You’ll be able to easily track customer payment information and gain insights into your customer’s purchasing behavior. This will help you make data-driven decisions to optimize your sales and marketing strategies.
In addition to customer management, Stripe offers various supplementary services such as fraud detection, invoicing, and subscription management. By integrating these services with Salesforce, you can create a seamless, end-to-end customer experience.
How to Configure Stripe Webhoooks
To start, log in to your Stripe account, navigate to the Dashboard, and click on “Developers” in the left-hand menu. From there, click on “Webhooks” and then “Add endpoint.”
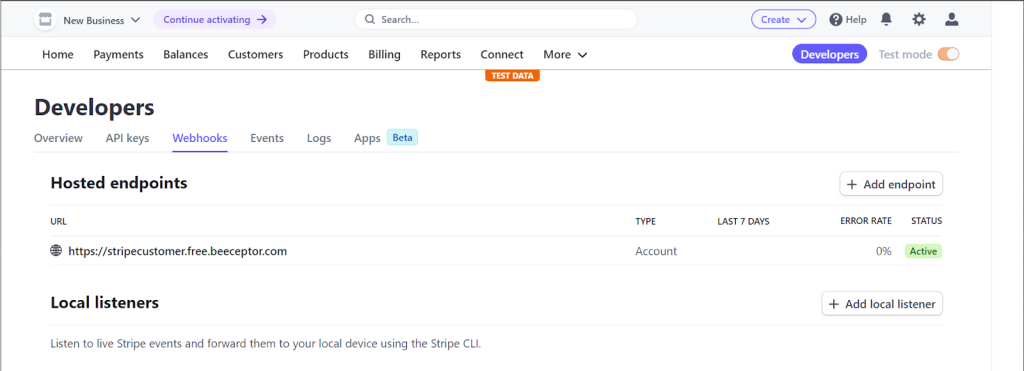
If you want to test a webhook you created, you can use beeceptor to quickly listen to events that are sent by a webhook. After you receive the JSON payload you can create a mapping based on this payload in your inbound callout template.
Select the “customer.created” event type from the list of available events and click “Add endpoint” to save your webhook configuration.
Creating an Inbound Callout Template in Salesforce
Now that we have configured the Stripe webhook, let’s create an Inbound Callout Template in Salesforce using Declarative Webhooks.
Here are the steps to creating the template:
- Log in to your Salesforce account.
- Go to App Launcher > Declarative Webhooks.
- Click ‘Inbound Callout Templates’ and then click ‘New’.
- Enter the following details for the inbound callout:
- Name: Create Stripe Customer
- Source Object: Account
Let’s break it down to steps, first we are going to determine the format of the request body, declare it’s method and determine the main object which is going to be Account for our case. Stripe can send authenticated webhooks on its request headers, but we’re going with public URL for our demo.
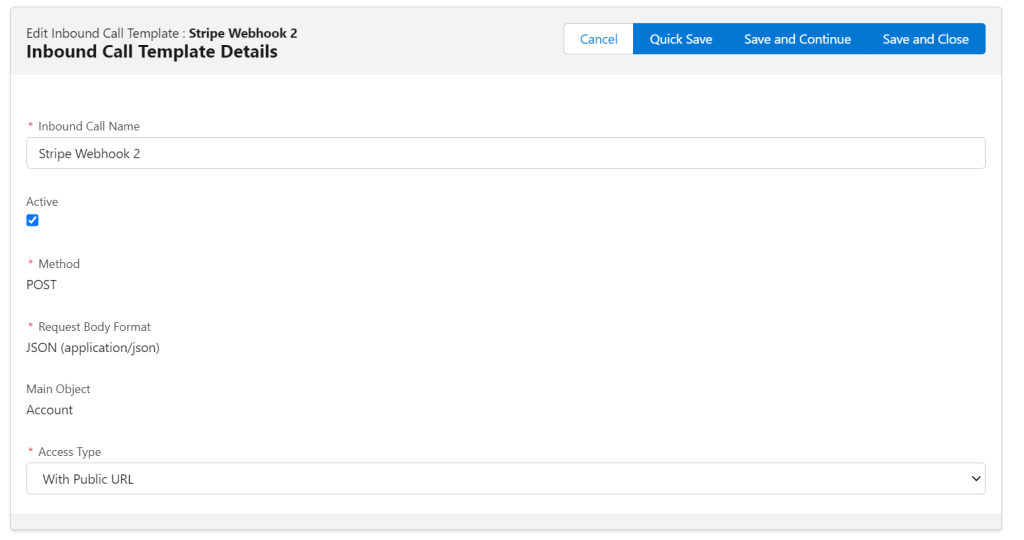
Request Body Mapping
Map the fields from the Stripe webhook payload to the corresponding fields in Salesforce. For example, map “data.object.id” from the payload to the “Stripe_Customer_ID__c” custom field in the Account object.
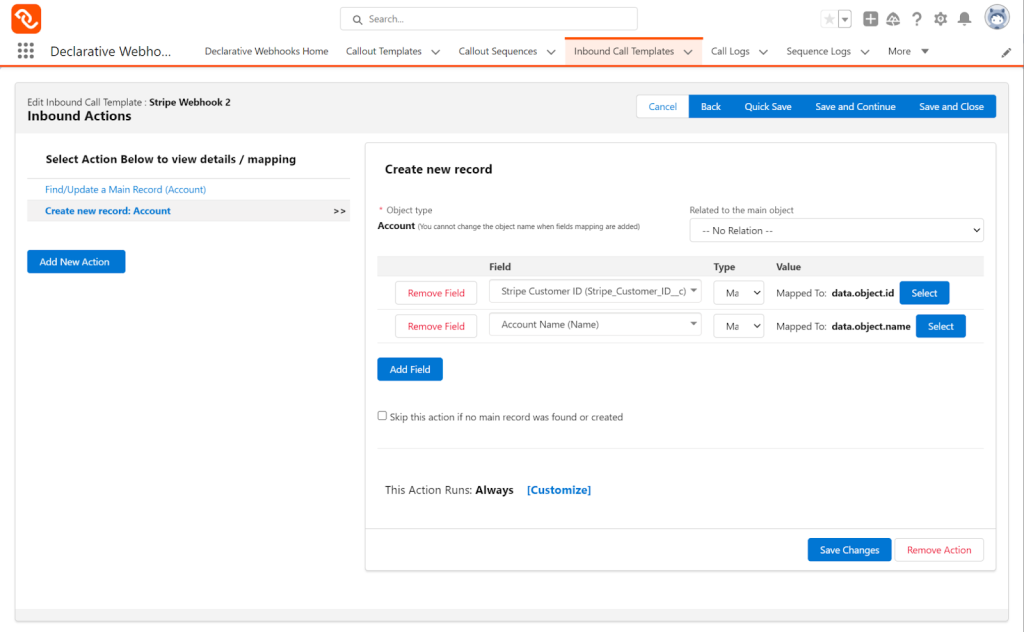
Here’s how the record should look like after mapping is done, remember the URL is unique for every org so make sure to copy your own for the webhook address on Stripe. You can also import this template here.
Best Practices for Secure and Efficient Stripe Integration
When integrating Stripe and Salesforce using webhooks, it’s important to follow these best practices to ensure a secure, reliable, and scalable integration, there are also other events you can listen to for advanced scenarios.:
- Use HTTPS: Stripe requires that webhooks use HTTPS to ensure secure data transmission. Any webhook URLs that use HTTP will be rejected so it’s a good thing Declarative Webhooks is a fully secure solution using HTTPS. Stripe provides a SSL certificate for its webhook endpoints, but you can also use your own SSL certificate if preferred.
- Optimize processing time: Stripe webhooks are designed to be lightweight and contain only the necessary data for your application to take action. If your Declarative Webhooks inbound template has a lot of complex actions which trigger numerous downstream processes, you should consider offloading heavy tasks to asynchronous paths in your Salesforce flows, scheduled flows, future methods if using Apex or scheduled batches to avoid slowing down the webhook processing. Stripe provides a pending_webhooks API endpoint to help you track which webhooks are still processing.
- Notification of successful payments: Listen for the “charge.succeeded” event. Update your application with the payment status and notify the customer.
- Subscription renewals and cancellations Listen for “customer.subscription.created“, “customer.subscription.updated“, and “customer.subscription.deleted” events. Update your application to reflect the new subscription status.
- Invoice payment failures and retries: Listen for “invoice.payment_failed” and “invoice.payment_succeeded” events. Notify the customer of failed payments and update your application accordingly.
- Document and maintain: Stripe provides comprehensive documentation for its webhooks, including a webhook integration guide, a list of webhook events, and examples of webhook payloads. The documentation is well-maintained and kept up-to-date with any changes or updates to the webhook system. It’s important to keep your webhook implementation documented and up-to-date as well, including any changes to the processing logic or handling of webhook events.
- Remember to test your webhook endpoint thoroughly to ensure it processes events correctly and responds with a 200 status code within the 30-second time limit imposed by Stripe.
Salesforce to Stripe REST API Integration
We will now walk you through the process of creating a Stripe charge from a Salesforce opportunity using Declarative Webhooks.
We are going to use the Stripe REST API, which fosters uniformity, modularity, and scalability, making it easier to manage and expand Salesforce applications.
Integration Scenario: Creating a Charge in Stripe from Salesforce
With the integration of Salesforce and Stripe, you’ll be able to streamline your payment processing and enhance your customer experience. By automating the payment process when an opportunity is closed, your sales team can focus on selling without worrying about manual payment handling. This not only saves time but also reduces the risk of human error.
Furthermore, this integration brings the benefits of Stripe’s robust payment infrastructure to your Salesforce CRM. You’ll have access to a secure, reliable, and flexible payment platform that supports a variety of payment methods and currencies. Combining the power of Salesforce and Stripe will help you grow your business by making it easier to accept payments from customers around the world.
Additionally, having payment data directly in Salesforce allows for better reporting and analysis. You can easily create reports and dashboards to track payment metrics and gain insights into your sales performance. This will help you make data-driven decisions to optimize your sales strategy and improve your revenue. In short, integrating Salesforce and Stripe helps you create a seamless payment experience, making it easier for your team to close deals and for your customers to do business with you.
Stripe’s comprehensive documentation and active developer community make it easy to find support and resources for troubleshooting and learning. The platform is continuously evolving, ensuring that developers have access to the latest features and security updates.
In addition to payment processing, Stripe offers a variety of supplementary services such as fraud detection, invoicing, and subscription management, which allow developers to build more comprehensive solutions with minimal effort. The platform’s global reach enables businesses to accept payments from customers all around the world, in multiple currencies, and using various payment methods.
I think they are a great example of building a community and supporting their ecosystem and their developers. You can check out their annual letter here.
Maybe I am biased because they also have a cool product named Stripe Atlas but that’s another post!
Stripe API Configuration and API Key Management
In this simple integration scenario, speaking in more of Salesforce lingo we’ll create a connection between Salesforce and Stripe using REST APIs to process a payment when a new opportunity is closed-won in Salesforce using Declarative Webhooks!
We are assuming the first part of the integration is complete and we have a customer and a default payment method in our test mode-enabled Stripe account. The first part of the integration is where we capture the customers generated in Stripe to Salesforce and store their Stripe Id. We are going to use this Stripe Id now to create a charge.
As a refresher for the first post, we are using test mode so always check this if you have an activated account. Stripe has a different mechanism for validating and using their API keys which you can learn from here.
We are going to use the test mode and test mode secret key to build our integration.
- Log in and search for API keys on the search bar and save your secret key for the test mode.

- You will see your “Publishable key” and “Secret key” listed. Make sure to keep your secret key secure, as it will be used for authentication in the integration.
In Stripe, to charge a credit card or other payment source, you create a Charge object. If your API key is in test mode, the supplied payment source (e.g., card) won’t actually be charged, although everything else will occur as if in live mode. (Stripe assumes that the charge would have been completed successfully).
We are going to call the create charge endpoint which is https://api.stripe.com/v1/charges, when you explore the documentation, you can also see that they have options for update, capture and search the charge with their respective endpoints and methods. Feel free to experiment as long as you’re in test mode.
Create a Stripe Callout Template in Salesforce
Now that we have the Stripe API keys, let’s create a Callout Template in Salesforce using Declarative Webhooks.
Remember that we are going to use the formula field on Opportunity, Account_Stripe_ID__c to map the Stripe ID of this account in the template. The other fields we are going to use are standard fields that you can find on the Opportunity object.
Here are the steps to creating the template:
- Log in to your Salesforce account.
- Add https://api.stripe.com to your remote sites.
- Go to App Launcher > Declarative Webhooks.
- Click ‘Callout Templates’ and then click ‘New’.
- Enter the following details for the callout:
- Callout URL: https://api.stripe.com/v1/charges
- Callout Authorization Type: Bearer
- Callout Authorization Token: Your Stripe Secret key
- Source Object: Opportunity
- Records: One Record per callout
- Request Headers: Content-Type with the value application/x-www-form-urlencoded
- Click ‘Save and Continue’.
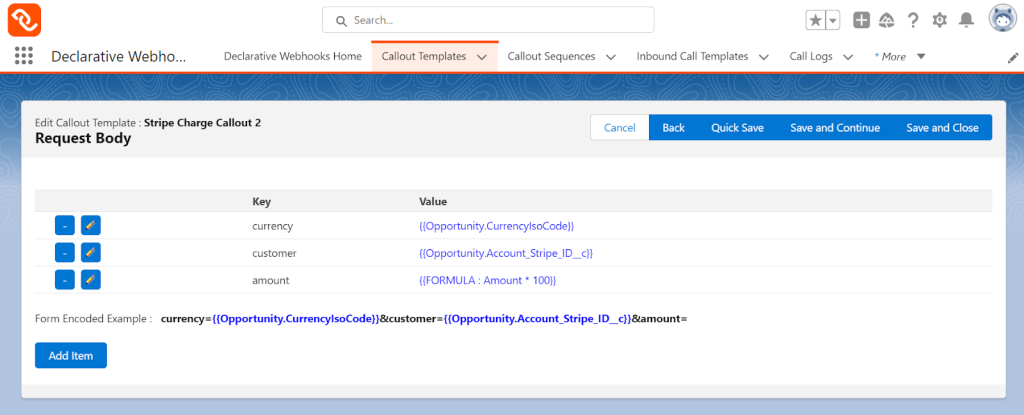
Here’s how mapping should look below, you can also import this template by clicking this link.
The key part is that Stripe is accepting incoming requests as the smallest currency unit (cent in our example). This is why we are multiplying the amount field by 100 since if we don’t and we send an Opportunity record with a 100 USD amount field, it will show in Stripe as 1 USD!
This is why you should always read the documentation carefully, whether you’re a developer or an admin, every integration is different with sometimes overlapping features.
For example, we are using the application/x-www-form-urlencoded header instead of our usual application/json. If you send a JSON body to this endpoint you would get an error since the API specifically allows for application/x-www-form-urlencoded.
Create Record-Triggered Flow in Salesforce to Call Stripe
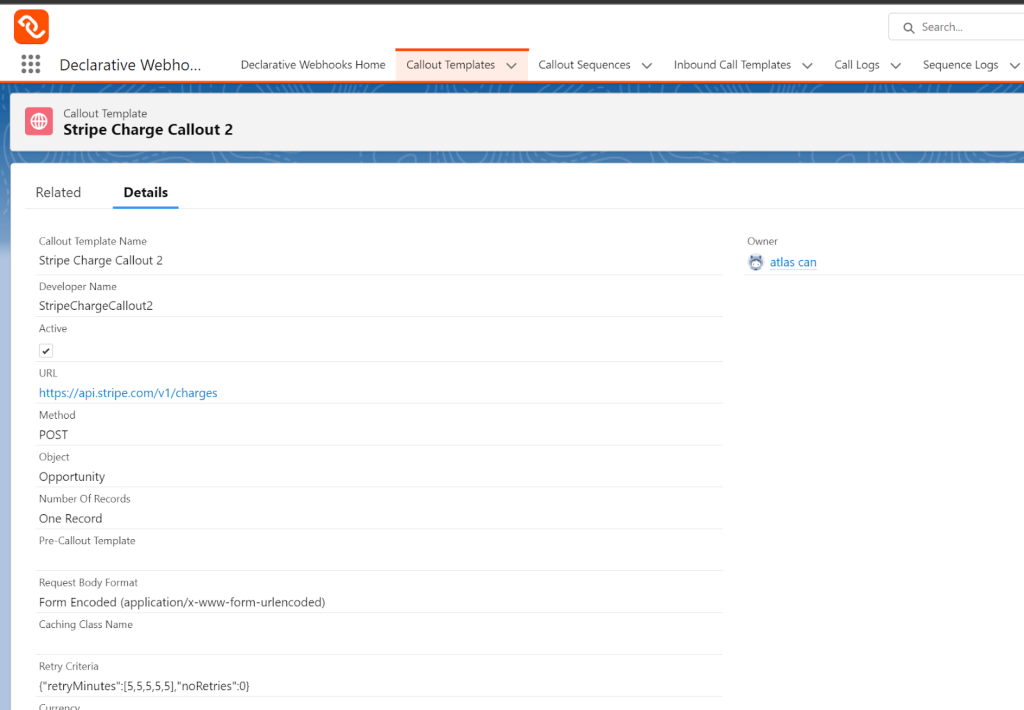
In Salesforce, follow these steps to create a Record-Triggered Flow that fires the callout when an opportunity is marked as ‘Closed Won’ also, grab the developer name for the callout template we just created so we can use it inside the Apex Action element.
- Go to Setup > Process Automation > Flows.
- Click ‘New Flow’.
- Select ‘Record-Triggered Flow’ and click ‘Next’.
- Configure the flow with the following settings:
- Object: Opportunity
- Trigger the Flow when: A record is updated
- Entry Conditions: Configure conditions, e.g., Opportunity.StageName equals ‘Closed Won’ and Opportunity.StageName (Prior) not equal to ‘Closed Won’
- Click ‘Done’ and add an Apex Action flow element to the canvas.
- Configure the Apex Action with the following settings:
- Apex Action using Callout Template Id or Developer name: The Id of the Callout Template you created or the Developer Name you can find on the template record page in the app
- Record Id: Opportunity.Id
- Connect the elements, save the flow, and activate it.
It’s time to test our integration! After you activate this flow, check your template is active and the Stripe endpoint is added to the remote sites, after you change the stage of an Opportunity with the Account Stripe ID field populated, you should see the charge created in Stripe almost instantly!

Conclusion
In this tutorial, we demonstrated how to create a Stripe Customer as an Account in Salesforce, storing the Stripe ID as an External Id. We also created a Stripe Charge from Salesforce when an Opportunity gets closed/won using Declarative Webhooks with a simple scenario.
Keep in mind Declarative Webhooks is a powerful tool that allows you to build complex integrations with just a few clicks, without the need for any code and this was a simple exercise!
As always thank you for reading and I will see you in the next post.
Thank you for following this quick guide.
If you want to learn more about Declarative Webhooks, please follow the links below:
More Integration Guides
© Omnitoria, All Rights Reserved.